
(If you still haven't signed up for the crochet along, hop over to this post and add your name to the list of participants! Also, if you have any questions at all along the way, leave them in the comments or write to me at maybematildaquilts [at] gmail.com--I'll do my best to answer them!)
Today is our first stitch lesson for the crochet along! I'll admit, I've been a little nervous about the teaching part of this crochet along--I've admitted before that I don't think I'm a very good teacher, but here's hoping that it's a little easier online, with pictures and text that I can plan out ahead of time, than it is in person, where I fumble through nonsensical explanations and always resort to, "No, do it like this . . . like this! Thiiiiiiiiiis!"
So here's the plan: I'm going to give you my own explanations with pictures, but include plenty of links to other great resources that will probably be much more helpful than what I have to offer. I think videos will be the most useful (watching someone actually do crochet is a completely different learning experience than looking at pictures of crochet), but I'm far too awkward and embarrassed to make my own video (seriously, I don't think you should be subjected to that), so I'll include some good ones for you.
For practicing, I would suggest using a worsted weight yarn that you don't particularly care about--save your project yarn for the cowl itself. Of course, if you only have project yarn, that's fine--you can always just pull your stitches out when you're done practicing, and reuse your yarn on the cowl. I would suggest using a hook somewhere in the F through I range to practice with (if you're practicing on worsted weight yarn). In these pictures, I'm working with scrap worsted weight yarn and an H hook.
Before You Start
Probably the trickiest part of learning to crochet (for me, at least) is working on your tension--you need to be able to hold the hook, work your stitches, and hold your yarn in such a way that your stitches come out nice and even. It can feel very awkward at first to try and hold everything in place, not to mention adding stitches to the mix! And if you pull the yarn too tightly, it'll be practically impossible to crochet more than one or two rows before you can't even work your hook through the stitches because they're so tight; hold it too loosely, and you'll end up with gaps and holes and goofy loops in your work. (Although I'm actually left-handed, I crochet right-handed, so that's what the pictures will show. If you plan to crochet left-handed, you'll need to reverse what you see in the pictures.)
Here's what works for me: I loop the yarn around my pinky finger of my left hand, then drape it over my pointer finger, like so, and hold the hook in my right hand (there are a few different ways to hold everything; just do what feels the most natural to you--here's a link that demonstrates some different ways to hold the hook and yarn):

View from the top:

Do whatever works for you--wrapping it around my pinky finger helps me keep the yarn running smoothly into my project and dispensing from the skein at an even rate. If it feels awkward or uncomfortable to you, or if your stitches seem huge and loose or way too snug, try something else! Here's a video from Crochet Geek demonstrating another way to hold your yarn and control tension, and another video that shows how to deliberately tighten or loosen your tension, and how tension can affect the look and size of your finished work. Whether your stitches are loose or tight or somewhere in between, the most important thing is consistency . . . if they're tight and that works for you, great! If they're loosey goosey and you like it that way, fantastic! The main thing you should focus on right now is that they're all loose or all tight, so your finished work looks even and consistent. One isn't necessarily better or worse than the other, but your work will look silly if you switch back and forth between the two.
Chain Stitch
A chain creates the foundation of just about every crochet project. Luckily, it's not very hard to do, and you'll be a pro at it in no time! Start by tying a slip knot around your hook (here's a video demonstrating the slip knot if you'd like to see it in action . . . plus the music had me kind of head-bobbing in my seat; further proof that I should never make videos):

Now, wrap the yarn around your hook from the back to the front (make sure you're working with the yarn connected to the ball and not the tail end dangling from the slip knot. . . I've made that mistake before!), and grab it with the end of your hook (this is called a yarn over, and you'll continue using it to make your stitches):

Pull this loop that you just grabbed down through the loop that's already on your hook (I find it helpful to hold the slip knot steady with my left hand as I pull the loop through):

You've just made one chain!

Now keep going--grab a loop of the working yarn and pull it through the loop on your hook. If you'd like to see an action version, here's a video from Lion Brand Yarn showing the chain stitch.
For demonstration purposes, I'm going to work with a chain of 11--count each chain you make until you hit 11, and you should have something that looks like this (when counting your chains, don't count the slip knot at the start, or the loop currently on your hook--just count the finished chains between the knot and the loop on your hook):

Are you a pro at chaining now? Excellent! Let's move on to the single crochet.
Single Crochet
We made our chain from left to right--now we work our first row of single crochet back across from right to left (other than when you're making a chain, you'll always crochet from right to left).
Do you see how your chain looks like a row of little Vs? Usually, unless the pattern specifically tells you otherwise, you'll make your stitches by inserting your hook under BOTH parts of the V, called the front loop and back loop.
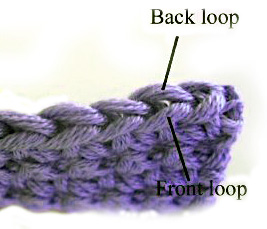
But when you're making that first row of stitches on top of your chain, it's just too difficult to try to get your hook under both loops. So for this first row, you can just insert your hook under the back loop only of your chain stitches.
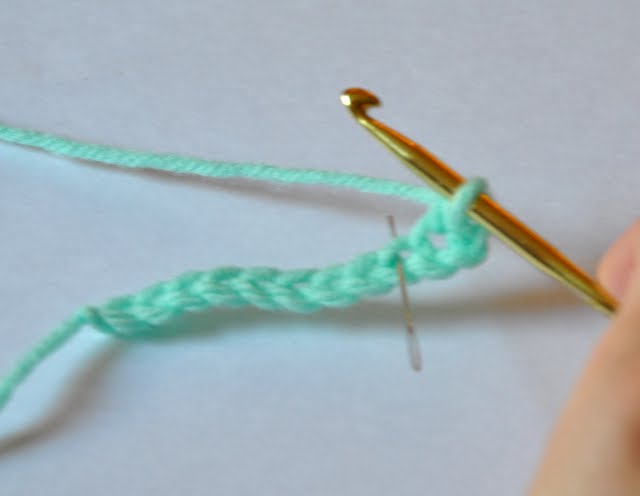
So, insert your hook under the back loop of the 2nd chain away from your hook (or, if you're counting in from the left, the 10th chain out of 11), the one marked with a needle in this picture:

Yarn over, as you did when making a chain:

And pull that loop through the back loop of the chain (you'll now have 2 loops on your hook--the one that was already there before you started your stitch, and the loop you just pulled through) (side note: when pulling your yarn through a loop, it's easiest to turn your hook so it's facing down--since I've already pulled it through in this photo, my hook is facing up again, but scroll down to the next picture to see how I hold the hook when pulling yarn through a loop. As you crochet, your hook will constantly be rotating up to yarn over, and down to pull them through; you'll get the hang of it with practice!):

Yarn over again:

And pull it through both of the loops on your hook:

That's a single crochet!
Here's another video from Lion Brand Yarn demonstrating the single crochet, and another from Crochet Geek--it will probably make more sense as you watch someone do it, versus just looking at picture, so hop over and watch the videos while you try it yourself!
Now keep going--work a single crochet into the back loop of the next chain (the one marked with the needle):
And keep single crocheting down the row. When you reach the end of the row, you should have 10 single crochets:

Turning Your Work
Maybe you noticed that we started with 11 chains but only ended up with 10 single crochet stitches (you're so astute!). Since our rows of crochet build up on top of each other, we have to use chains at the end of each row as a sort of ladder to get up high enough to work on top of the previous row. When you reach the end of a row, you'll turn your crochet work so you can go across from right to left again, but you'll be starting at the base of your previous row. So you'll need to create a turning chain to bring you up to the height of the stitches you'll be making.That one extra chain when you began became a little mini-ladder to make you tall enough to work into the stitches for your single crochets.
So, at the end of your row of 10 single crochets, make one chain:

And turn your work (here's a handy little illustration showing you how to turn)--just rotate it around, so you'll now have your ten stitches on the left, and your little chain on the right. The chain gives you some height so you can work your first single crochet into the first stitch of this row. You'll insert your hook into this first space here, marked by the arrow:

If it makes more sense to look at it from this direction, here's the view looking down at the top of your work. The teensy little V on the right is the chain, and you'll insert your hook under both loops of the first stitch, marked by the needle (again, unless a pattern specifically tells you to just work in the front or back loop, and unless you're working into the chain, you'll insert your hook beneath both loops):

Here's what my piece looked like after working my first single crochet in the second row:

Keep on going--single crochet in each stitch across the top of the row, and count as you go--you'll have ten stitches again. Make one chain at the end, turn your work, and continue into the next row. After a few rows of practice, you'll have a little rectangle or square made of single crochet stitches!

Don't worry if they don't look all neat and perfect--that's why we're practicing.
Once you have the single crochet down pat, learning the other stitches will be so much easier--all your basic stitches are just a variation on the single crochet, so keep practicing it and the others will come easily! Remember to be patient with yourself, and hit me with any questions!

yay great lesson as a refresher type thing
ReplyDeleteTeacher, teacher! I have a question! haha, just kidding.
ReplyDeleteI'm so exciiiiited!! I'm so exciiiiiited. I'm so... so.... scaaaaaaaaared! hehe.
My brain kind of hurts. Maybe we should have gone with potholders as our first crochet-along project...?
ReplyDeleteI already know how to crochet, so maybe I'm not the best judge, but I think you have great pictures and explanations.
ReplyDeleteSo I have a question... Is it normal for the crocheted portion to curl up on the outside edges? I just made a little square using 10ish stitches (started out with 11, must have lost one along the way, whoops) and went up about 12 rows, and the outside edges curl in towards the middle. Will it even out once more is done? Or will it always curl?
ReplyDeleteI'm glad I'm not the only one who's scared! I've been practicing for 2 weeks, but I've never made anything. I'm super excited to complete my first project! finding the last stitch in the row and turning, has been my issue, but I'm 3 rows deep and counting! horray
ReplyDeleteI left the last comment, then decided to come back and compliment your skills. as a new learner Ive been looking at pictures for weeks, yours are great with the counting added. skip one chain start in the second. second row: chain one, move into the first 'V', correct? that is the picture Ive lacked, but you have it! its really helped. you also corrected my single crochet. 'loop'/connect into the chain below, then complete a single crochet. it's all coming together. thank you thank you. and you have nice moisturized fingers. =)
ReplyDeleteGreat lesson! Thank you :)
ReplyDeleteLove the tip of wrapping the working yarn around your pinky. I think this will help tons in containing my tension. Excited to practice!
ReplyDeleteFabulous tutorial!
ReplyDeletethis looks really simple, I love it! Thanks for sharing! Please teach us how to crochet a flower soon!
ReplyDeletelove,mongs
mythriftycloset.blogspot.com
@Melisa--yep, totally normal for it to curl! It'll get straighter as you go on.
ReplyDelete@Misti, thank you, but I think they're probably just sweaty :-)
I taught myself to crochet when I was like 12, and I hold everything and yarn over all wrong. Oh well, like you said, so long as I'm consistently wrong, it doesn't really matter. :)
ReplyDeleteAnd who said you weren't a good teacher?
ReplyDeletePoppycock.
Great lesson!
ReplyDeleteI totally hold my hook and yarn 'wrong' when I'm crocheting. My grandmother taught me to crochet and when I was at her home recently working on a project she said, "What are you doing with your hook??? I didn't teach you that?!?!"
So funny! But, hey...I guess it's workin' just fine for me!! lol!
Still on vacation, but I wanted to let you know I tagged you today in a meme post. Looking forward to trying out crochet when I get back home.
ReplyDeleteI did it! I did it! I'm so excited!!! I can't wait for the next lesson!! :) Thank you!!!
ReplyDeleteI love crocheting! I always thought it was an old lady craft, but I'm finding out it's not! Hooray!
ReplyDeleteOK so far so good. I can make the chain and I finally understand single crochet. I just need a lot of practice to make it smooth. Oddly, I'm trying it right handed and it seems to be going better than when I tried lefty. Who knew!
ReplyDeleteThis tutorial is just great!!! I don't crochet, but this seems so easy... maybe I'll try it.
ReplyDeleteThanks
Ohhhh man....ok I've practiced for about an hour and I think I'm getting the hang of it! It's still a little messy but the videos you've linked to do help!
ReplyDeleteGreat! The pictures you put with a view from the top helped me out a lot, as well as clearly marking stitches. I have tried crocheting a few times before and was always coming out with too many or too few stitches on each row, haha. Now I can do it right!
ReplyDeleteI've been meaning to comment on your new thing…finally! I love the idea! I'm going to email this to my sister because she's been dying to figure this out. I myself know how to crochet, but I'm so PAINFULLY SLOW!
ReplyDeleteAnyway…love the idea.
Natalie
Awesome tutorial! I may have to pick up crochet again. I made a blanket years ago... for my baby who's 30. Something happened between those last few years and I can't for the life of me figure out how I did it. But now I will try again! Thanks for the tutorial to inspire!
ReplyDeleteI am really enjoying getting BACK into crochet again. However the issue I have is arthritis!!! Unfortunately finger loop around is not working for me but that's ok... I do it my way. I have started collecting hooks with bamboo handles to help out. I was wondering if there is something out there made for those of us dealing with this problem?
ReplyDeleteNanashorty--I'm so glad you're having fun re-learning crochet! It can be tough when pain gets in the way, but there are a few things that can help . . . I bought myself one of these ergonomic hook handles: http://www.amazon.com/Boye-Ergonomic-Aluminum-Crochet-Handle/dp/B004ALF72G I didn't get a chance to use it much (I bought it a few weeks before moving and haven't seen it since we've unpacked--I think it was a casualty of the moving truck), but I enjoyed it the few times I did get to use it. There are other similar items out there, too, like this one: http://www.amazon.com/gp/product/B001C1Y23W/ref=pd_lpo_k2_dp_sr_3?pf_rd_p=486539851&pf_rd_s=lpo-top-stripe-1&pf_rd_t=201&pf_rd_i=B004ALF72G&pf_rd_m=ATVPDKIKX0DER&pf_rd_r=100Q6VVVWSX1D8N0QBF7 but I only have personally used the first. My husband's a chiropractor, and he always suggests not crocheting for too long without taking breaks, massaging your hands (or, better yet, having someone else massage them for you!), and icing your hands after you finish crocheting (those aren't arthritis-specific tips . . . just what he tells me to do when I complain that my hands are sore). I hope you find something that works well for you!
ReplyDeleteThanks so much for this refresher! I'm always confused about the back loop and the front loop on the V, I think because the book I used to learn crochet had ambiguous drawings, so I was never sure if I was doing it right. My projects looked ok, so I just kept right on going. It's good to get some confirmation that I haven't been completely off my rocker :-)
ReplyDeleteThank heavens I found your blog via Pinterest! I have been trying to learn (with great difficulty) from you tube vids, friends etc. ... at last instructions, and excellent clear photos, that I can understand! Thank you!
ReplyDeleteWish I had this two weeks ago before I spent $45 on a private crochet lesson. I could not, for the life of me, figure out where to start the single crochet on the chain. I read books, watched videos, nothing... then I saw your directions and they are so clear! Thanks.
ReplyDeleteI'm not sure what I'm crocheting- it may end up being a scarf, or a large washcloth lol BUT the point is I'm crocheting something for the first time ever! Thank you! Between this and the videos you linked I think I got it!
ReplyDeleteWhen I was 9, I saw my mother crocheting, and I wanted to learn. She taught me the chain stitch...and that was it! I am now 47 and learning to crochet. I appreciate the pictures and the way you have of explaining it. We decided my first project is turning out to be a casserole dish mat, no more will I have to look for a dish towel that will protect the table!
ReplyDeleteThanks you for your tutorial ! You're a way better teacher than you think.
ReplyDeleteHowever, I have a question for you. I need to pratice single crochet and that's why I am working on this simple pattern ( http://crochet.about.com/library/weekly/aa041799.htm#dishcl ).
I have done and redone the same rows because either the tension wasn't good, or something that is bothering me appears.
I made sure to insert my hook from front to back, but some annoying lines keep appearing on my work ( I made sure to turn my project in order to have the chain on the right ).
Is it normal ? What is my mistake there ?
I have just realised that I didn't start to insert my hook in both loops after the first row was done.. Is it the reason ?
Thanks a lot for you help
Another thing I wanted to ask you : my work is twisting a little bit, is it because of the difference of tension I put while crocheting ?
DeleteP.S. : By the way, sorry for my English that is not always very good :) It isn't my mother language
Hi Caroline, it sounds like the lines are probably resulting from inserting your hook under only one loop instead of both--doing that 'pushes' the unused loop to the outside of the fabric, so you end up with a sort of striped/lined look. Just make sure that you're inserting your hook under both loops of the "V" to avoid the lines (although I know some people who crochet that way on purpose because they like the look of the lines, so don't feel like you have to change it unless you want to!).
DeleteTo the best of my knowledge, some twisting is unavoidable. I could be wrong, and maybe there are some tricks out there I don't know about, but I often end up with a little twisting as well, and I don't know how to avoid it. If you're working with natural fibers (cotton, wool, etc. instead of acrylic yarn), you can block the piece when you're done to take out any twists (but this doesn't work for man-made fibers). But in my experience, a bit of twisting is normal and more often than not straightens itself out by the time you reach the end of the pattern.
Good luck, I hope that helps!
Hi Rachel,
DeleteThank you for your response ! As long as it is "normal" ( for the twisting ), I will go on like this I guess.
Thanks a lot again !
This is fantastic. I have the single crochet down;)
ReplyDeleteGot here a couple months later but, let me tell you after trying 3 other sites/magazines, which didn't get me doing it right...I GOT IT!!!!
ReplyDeleteThanks a billion!!!!!
I'm going to a class on amigurumi next week, and even though they told me I don't need any previous knowledge, I didn't feel so comfortable going like that...I got it all right!!!!! Thanks, thanks, thanks from Argentina!!!
Your tutorial is great! I did do some crocheting a long time ago and had forgotten even the most simple steps. Lately, I've had the urge to get started again and it's your fantastic explanations that have promoted me to grab my Mom's hook once again.
ReplyDeleteI just learned to crochet--I literally learned from your posts and from youtube videos. Just finished a pair of leg-warmers and I'm now working on an ear-warmer headband. Thanks for teaching me to crochet! I also just started a blog, and I linked to you a bunch in a post with crocheting resources! You're a rad teacher! :)
ReplyDeletehttp://counting-to-31.blogspot.com/2013/01/crocheting-vs-physics.html
I FINALLY figured this out. Thank you, thank you, Thank you!!
ReplyDeleteOkay I,m giving this crochet thing another shot. Your pics and instructions are so well thought out. Here,s to teaching an old (70) dog new trick. :)
ReplyDeleteThank you so much ~I have finally after all these years have learned to crochet!!!! Thank You!!!
ReplyDeleteHi there, i am a new follower of your blog and what a helpful blog it is too, i was only here a moment looking at crochet in the round and have a little circle of crochet that i continued round in a 'i know what i'm doing now type way' but it's a start and one a few of my newly formed 'Craft Share' group will learn and enjoy from so thanks for sharing :)
ReplyDeleteThank You Thank You Thank you for writing this! lol. I am a newbie crocheter and left handed. I was being really stubborn with switching to the "other" hand haha, but realize it will be benefical for future projects since most patterns are written for righties! ;P its good to read a "lefty" blog for support and inspiration to keep at it!
ReplyDeleteI am really excited to try this. I had just about given up. The picture you posted was me pulling my hair out. Thank u for your time in doing this.
ReplyDeleteThank you so much for writing this out. I was wondering why each row got shorter and shorter, then wanted to hit my forehead and say duh as I read your instructions. Definitely much more clear. This beginner thanks you! :) (I was getting tired of trying to find a video that explained the actual problem I was having and listening to them blab... although they've been great for other parts of the learning process)
ReplyDeleteThank you so much for doing this series! I decided I wanted to learn to crochet about a week ago (so that I could make my own Halloween costumes) and all of your posts were lifesavers! I am a total newbie, but look what I made:
ReplyDeletehttp://sewinsomethin.blogspot.com/2013/10/happy-halloween-i-crocheted.html
Thanks again!
thank you so much , i tried it so many times before and it worked now after your amazing lesson!
ReplyDeleteYou explained very nice. I just started today and it came out nice.
ReplyDeleteJust made it first too tight which made it so hard for the next rows.
Thank you SO MUCH! FINALLY I've mastered the single crochet!! :)
ReplyDeleteI just wanted to let you know that your crochet lessons were great! Although I'm two years late, I used your blog to learn how to crochet and I am the proud new owner of a beautiful cowl! Thank you so much for the great pictures and directions. I have referred many people to your site that are also interested in crocheting!
ReplyDeletehello...im a newbie to the crochet world...always thought it was an "old folk" thing to do. but now im an "old folk" lol 65 yikes...ive started making a scarf , got about 12 rows done and its starting to take on a pyramid type shape...? dont know what im doing wrong. any ideas??
ReplyDeleteI so want to learn crochet and your post for the first lesson is awesome.l I know Im 2yrs late but is there any way I can get all your other lessons so that I can learn from you please. Thanks
ReplyDelete