Wednesday, January 13, 2016
Favorite Hair Products for a Pixie Cut
Of course, the products that are great for me might not be good for you, and vice versa. I have what my stylist has described as "a medium amount of very fine hair," so these products are mainly geared toward adding volume and texture, and preventing flyaways.
*affiliate links ahead!
1. Wella Enrich Shampoo and Conditioner :: This shampoo and conditioner duo is a rather recent purchase for me, so I've only been using them a few weeks. But I've been really happy with them--they add lots of softness and shine, and aren't heavy at all.
2. Aquage Uplifting Foam :: This has been a repeat purchase of mine for quite a few years now. It has the consistency of a thin mousse, and is meant to be sprayed right into the roots to give volume and lift. It is a bit pricey, but I love it and it lasts me a long time. Editing to add: I picked up L'Oreal Boost It Volumizing Mousse when my Aquage ran out recently, just to bridge the gap until I could order more Aquage, and I am really liking it! It gives my hair more of a stiff feel than the Aquage does, but I think the volume and lift is every bit as good as Aquage. Just an FYI if the price tag on the Aquage is giving you sticker shock!
3. John Frieda Full Repair Elixir Oil :: I bought this as a replacement for Moroccan Oil, which is wonderful but expensive. I've been using it for quite a while (probably a year or more), and I've been happy with it. I use 1 pump in my palms, then work it into my hair, focusing on the ends. I think it helps to smooth my hair, protect it from blow dryer heat, and give it some shine. I'll sometimes add a few more drops to dry hair to add shine.
Not pictured, because I honestly can't tell whether this is doing anything: Generic Value Products Shine Spray from Sally's Beauty Supply. I truly can't tell if it makes any difference for me, but I figured I'd mention it because I do, in fact, use it after every blow dry, despite not being able to tell if it makes a difference.
4. Beyond the Zone Rock On Volumizing Powder :: If I were forced to pick just ONE product to use on my hair every day, it would be this. (I should point out that I've tried a few different texture/volumizing powders and honestly haven't noticed a huge difference between them, so my loyalty isn't necessarily to this particular powder, but just to a texture powder in general.)
I'll warn you that these powders feel gross. They are chalky and sticky and make your hair feel dirty and nasty. But I'm willing to deal with that unpleasant side effect because it adds so much texture and grip to my hair, which is very fine with zero natural texture. I shake some powder into my roots at the crown of my head and along my part, then use my fingers to shake and rough it up. It gives great lift and texture that you can leave as is, or tease over, and it will actually hold. (If you have very fine hair like I do, you've probably gotten frustrated that no amount of teasing makes any difference! If you use some of this first and then tease your hair, it'll hold great.)
5. Ion Pomade Wax :: I use a small amount of this on my fingertips and use it to stick down any frizzies and flyaways, smooth the bangs out a bit, piece out some sections across the top and sides, and smooth the back down.
6. Kenra 25 Hairspray :: This hairspray is THE best ever ever ever. It gives awesome hold, and really helps volume to stick around all day! I've used it off and on for years, and always regret it when I decide to try a different spray. Editing to add: I picked up the Generic Value Products knockoff version of this hairspray from Sally's recently and really truly canNOT tell a difference between it and the real deal. Go ahead and save yourself a couple bucks!
If you have any hair products you just LOVE, I'm all ears!
Wednesday, November 25, 2015
9 questions to ask yourself before you get a pixie cut.
Today, I thought I'd share a few questions you might want to ask yourself if you're considering a pixie cut, from a veteran pixie enthusiast. (And I'm peppering in some pictures of some of my favorite celebrity pixie cuts, because no one needs more of my selfies.)
1. Is styling variety important to you? If you are the sort of girl who loves playing with different updos and braids and ponytails and curls and all that jazz, you might feel frustrated with a pixie. Of course, depending on the length of pixie you choose, you could still have options. If you keep a bit of length through the top, you can work in some flat-iron curls. You might even be able to do some twists and braids through the bangs. If you go with a true, short pixie, you could play with the faux hawk or even get an undercut. But if you are the girliest of girly girls who just loves trying tons of new techniques and styles on your hair, you might feel held back by a pixie cut.
2. Do you like to play with hair color? If so, I think a pixie cut is perfect for you. I have admitted to being a total weenie when it comes to hair color, but I keep telling myself that if I'm ever going to play around with color, this is the perfect time. Bear in mind, I'm not a professional . . . but my reasoning is that a pixie grows out so quickly and gets trimmed so often that damage from coloring will be kept to a minimum. You'll likely be getting trims every 6-8 weeks, so you'll be cutting off damaged ends just about as soon as you can fry them.
3. Speaking of frequent visits to the salon . . . does maintenance bother you? I have long-haired friends who get their hair cut once or twice a year. Meanwhile, I'm going back in for trims about every 2 months (3 if I'm reaaaally pushing it, but hello mullet!). If the idea of heading to the salon every few weeks bugs you, you might need to choose a lower-maintenance style.
4. Do you have a hairstylist you trust? I have zero hair cutting experience, but from the perspective of being the head in the chair, I think it takes a different set of skills to deliver a killer pixie than a long Disney princess cut. I love the gal I'm going to now, but when I got my first pixie cut a few years ago, it took 3 different attempts at 3 different salons over the course of 3 or 4 weeks to finally get the pixie I was hoping for. I don't mean for that to sound discouraging, but I want to emphasize the importance of finding a stylist who really rocks short hair. If you aren't sure whether your current stylist will be able to give you the pixie of your dreams, start asking around for recommendations of someone who knocks short hair out of the park.
5. Are you gonna freak out if you get a bad cut? Like I said above, it took me 3 tries to get the pixie I wanted a few years ago. If I had panicked after that first not-so-great attempt and told myself, "CRAP, I guess a pixie isn't for me," I never would have had the chance to experience how awesome and fun a great pixie cut is! So many people tell me that they love the idea of getting a pixie but they had short hair once and hated it. Honestly, having a bad short hair cut doesn't mean short hair is bad on you! Hopefully you'll get an amazing haircut on your first try and love your new pixie--but if you do end up with a cut you don't like, don't panic. Go to another salon, find another stylist, and try again. Of course, not everyone's going to love a pixie cut, but if you try it once and hate it . . . at least try another stylist and give it a fair chance before you give up on it completely.
6. How fast does your hair grow? I'm not sure what the 'right' answer to this one would be, but it's something to consider. If your hair grows slowly, you'll have the perk of adding a few more weeks between maintenance trims on your pixie, which is nice. But if/when you decide to grow your hair long again, it'll be a long, possibly frustrating wait. On the other hand, if your hair grows fast (like mine), you'll be back in the salon for trims so often that even your stylist's kids will know you by name. But if/when you want to grow it out, it won't be that long or difficult to do! Your answer to this question will be either a pro or a con depending on how you look at it, but it's something to consider if you anticipate hating the grow-out process, or hating frequent salon visits, etc.
7. You can always go shorter. Okay, so this isn't a question. Just something to remember. If you're nervous, start with something a little on the longer end (like my girl Kaley below), and work your way shorter over time. You'll be getting fairly frequent trims either way, so it isn't a bad idea to start a bit longer, and bring it shorter as the siren call of the pixie gets to you. It gives you wiggle room if you (heaven forbid!) end up with a cut you aren't crazy about, and if this will be a big, drastic change for you, it will feel like less of an adjustment.
8. Do you mind doing a bit of shopping? You probably don't :-) But just off the top of my head, making a drastic change in hair length had me itching (and, in some cases, needing) to go shopping for:
- New styling products. The products you loved for your longer hair might not do the trick on a pixie. It's probably going to take some trial and error to learn what products work for you and your pixie.
- Makeup. I'm not super into makeup, and didn't spend a lot of time thinking about it when my hair was longer. But with a short haircut, there's nothing to hide behind: your face is front and center, all the time. You might find yourself wearing a little more makeup than you did in the past, or making slightly more dramatic choices in your makeup. I'm all of a sudden loving brighter lip colors now, when I've never felt comfortable in them before. I'm telling you, the pixie makes you bold.
- Clothes and accessories. Certain necklines don't look 'right' on me with a pixie (just as some didn't look flattering when my hair was long), and you might find yourself itching for new clothes that 'fit' your new hair. I also find myself drawn to much bigger earrings than I ever wore when my hair was long.
9. How much time do you want to spend on your hair in the morning? Blow drying and styling my current haircut takes like 5-10 minutes, max. So if you hate spending a lot of time on your hair every day, you'll love the ease and speed of a pixie. The downside is that you can no longer rely on a ponytail to save your butt on a busy morning. If you wake up and have literally no time to spend on your hair, you're basically doomed to look like Frankenstein all day. A pixie takes very little time in the morning, but it does take some time. A ponytail can't save you anymore.
Pixie veterans, anything you'd add to this list?
Friday, October 30, 2015
Asymmetrical Pixie Cut
Ugh. These posts are always so embarrassing. *cringes*
Also, sorry for the super blurry shot of the back below. Forrest took that picture for me. We're working on his "hold the phone steady" skills. I guess you can only expect so much from a 5-year old.
The siren song of the pixie was too strong. I couldn't resist. I went for it, with a deep part on one side and longer bangs, and tons of texture through the top. It's so much fun.
(Same exact haircut above and below.)
Wednesday, July 22, 2015
The Long Pixie
Life is too short to stick with one haircut for long.
Thursday, April 2, 2015
Long –> Lob –> Stacked Asymmetrical Bob
Oh, a post full of cell phone snaps?! Rachel, you’ve outdone yourself! *applause*
One of my most popular posts ever—which I find ironic because I am not a hair/beauty person—is my post about growing out my pixie haircut a few years ago. That pixie was a lot of fun, and even while I was growing it out, I knew I’d take it shorter again someday. There’s just something about short hair. I can never resist for long.
I baby stepped into it over the past few weeks, and am now left wondering why I ever bothered with long hair when this is clearly so much better?!
We’ll back up a tad—after roughly 3 years of growing my hair out, it had gotten pretty dang long (by my standards, at least). My hair is very fine, and I don’t have a ton of it. And I don’t think it looked thin, exactly, but the longer it got, the clearer it became that I’m just never going to have the thick Disney princess hair I was picturing when I decided to grow it out.
In case anyone wants a refresher, here’s a truly terrible picture (taken by Forrest, which explains its terribleness) from a few months ago. Pretty darn long hair there.
For quite a while, I had fun with it being long . . . but man, over the past few months, it started to get to me. The longer it grew, the thinner and scragglier it looked (even with frequent trims). And the time commitment was just way more than I was willing to put in—at this length, I could only get away with waiting maybe a day or two between washes (with shorter hair, I can pretty easily go 3-4 days between washes), and my hair doesn’t air dry nicely, so I was spending too much time blow drying and styling it. It looked nice maybe one or two days a week, and the rest of the time it was in a bun. Buns are fine, but it felt like a waste to me to have long hair that only really looked nice one or two days a week.
So I went in for a long bob (I believe the youngins these days are calling it a lob?)—I figured that way, I’d keep all the benefits of long hair, but with way less time needed to make it look good (plus, I hoped losing some length might help with my issue of it looking fine and thin).
I had my hair stylist bring it to roughly collarbone length in the front, and slightly shorter in the back. I thought it was cute at this length, and I liked that I still had the fun styling variety that you get with longer hair—I liked it best wavy, but it also looked pretty good straightened (which I apparently never took a picture of). And it was just long enough to be able to put up, which is a nice option to have.
But after a whopping 2 or 3 days with this haircut, I got annoyed with it. Even after cutting off roughly 8 inches, it still felt so long to me. And I was getting thoroughly tired of long hair, and totally willing to go all in with something short. I waited a few weeks so my hairstylist wouldn’t think I was insane, then went back in for round 2.
This time, I was fully committed to the idea of it being short, so I didn’t fiddle around. I went with an asymmetrical stacked bob—short, stacked layers in the back with longer layers around my face, plus one side is longer than the other in the front, which is super fun and (in my humble opinion) gives it a little edge so it doesn’t look too ‘mom hair.’ We also did a subtle ombre, which does not show up very clearly in my high quality photography here.
I have loved this haircut so far, and I’m so glad I went ahead and chopped basically all of my hair off. The styling time is totally reasonable, it isn’t difficult for me to style (even for me, and I’m not terribly talented at hair stuffs), and to my delight, I can go a little longer between washes (I’ve been washing it every 3 or 4 days).
Unsurprisingly, I wish I’d gone even a little shorter, and am planning to do just that in a few weeks. It feels so good to be back to short hair. Having been at both ends of the spectrum, I have to say, I do prefer it short. It feels a lot more ‘me.’ I had forgotten, until the minute I cut off 8 inches, how having shorter hair makes me feel so much more confident and pretty. I’m sure I’ll end up growing it out again someday, but for now, short is feeling so very right.
Wednesday, January 14, 2015
More Favorite Drugstore Beauty
I don’t even want to experience the more expensive end of the spectrum when it comes to beauty products. I hear people express their deep love for $30 eyeshadows and $25 lipsticks and $40 mascaras, and I believe them! I’m sure those products are fantastic, and worth all of the (many!!) pennies they cost.
But as long as I don’t know what I’m missing, as long as I carry on with my lowly drugstore makeup collection, I’ll just be happy with my inexpensive product collection and never know the difference.
(See some of my other drugstore favorites in THIS post.)
1. L’Oreal Pop Balm in Fiery Red: I love the idea of wearing a classic, timeless red lipstick, but every time I try one, I feel like it’s too bold for me. I’m baby stepping toward a red lip with this lip balm, which is called ‘fiery red’ but isn’t really all that ‘fiery,’ in my opinion. It’s a nice, classic red, but very sheer and lightweight and not-scary. One day I’ll work up to a strong red lip . . . unless Forrest shames me out of it.
2. Detangling Brush: I’ve heard so much praise for the Tangle Teezer that I bought one for my sister for Christmas (she suffers from chronically tangled hair), then bought a knockoff version for myself for $4 at Ross recently (I could have sworn it was made by Bed Head, but I can’t find it anywhere online, so maybe I’m wrong!). They really are amazing at getting tangles out of wet or dry hair without any tugging or pulling, and I lose so much less hair when I use it compared with a wide-toothed comb or brush. I’m going to guess that if you have daughters who protest having their hair brushed, this would be a great item to make mornings easier.
3. John Frieda Repairing Oil Elixir: In my last drugstore favorites post, I sang the praises of a different John Frieda oil elixir. I liked that one a lot, but when it ran out I picked up this one, and I like it even better. It’s more lightweight than the previous product, and I think it smells better and gives more shine. I use 1-2 pumps on damp hair, another 1-2 pumps after blow-drying, and occasionally another half pump after straightening or curling. This is probably way more than Mr. Frieda intended anyone to use at any one time, but I love the stuff.
4. Revlon Colorstay Eyeliner Pencil: 9 times out of 10, when a makeup product runs out, I try a different brand in an endless search for the best product. But I’ve re-purchased this same eyeliner 4 or 5 times in a row now without feeling any need to continue searching for a better one. It goes on smoothly with great, deep pigment, and stays put all day. I buy it in Black Brown.
5. Carmex Lip Balm: At any given time, day or night, I can almost guarantee you I’m wearing a big thick layer of Carmex on my lips. I’ve bought and used it faithfully for years, and unless I’m going out and opting for a little color, I rarely put anything else on. I love the tingle when I first apply it, and I think it has the perfect amount of moisture, slickness, and shine. I wear it over bare lips, or put a layer on over lipstick for a little extra shine. I always have at least 2 or 3 tubes stashed around my house and in my purse. My favorite is the original flavor that comes in the tube.
6. Glamoflauge Heavy Duty Concealer: I’ve seen this touted as one of the most hardcore concealers you can get at the drugstore, and supposedly it’s even serious enough to cover tattoos. I don’t know about that (I don’t have any tattoos to test it on), but I really, really like it. It goes on nicely, blends well, and handles my under-eye circles and around-the-nose redness. I think it’s a bit pricey for a drugstore product (about $12), but I’ve had my tube for at least a year and it’s still 2/3rds full (a little bit of this concealer goes a long, long way). It also comes with a little concealer pencil, which I have never used.
What are some of your favorite drugstore beauty products? I keep a running list of items I want to try, so I’d love to hear your favorites!
Thursday, August 21, 2014
My Everyday Makeup Routine
This shop has been compensated by Collective Bias, Inc. and its advertiser. All opinions are mine alone. #AllDayLook #CollectiveBias
I am definitely feeling the irony in posting about makeup. I have never claimed to be any sort of beauty expert . . . quite the opposite, in fact. But I sort of enjoy reading about what products others like, and what their go-to makeup routine is—especially if they are not a huge makeup expert. I mean, if I head to your blog and see 5,000 tutorials on all sorts of fancy knock-your-socks off makeup looks, I’ll probably just be intimidated and click away and watch videos of kittens on youtube instead.
I’ve thought for a while that maybe it would be fun to post my own daily makeup routine. This definitely will not be fancy—I own precisely 2 upscale department store makeup items, and if I’m being honest, I’m not entirely convinced they were worth the extra money. I love drugstore beauty products, and I like to spend somewhere in the 5-10 minute range doing my hair and makeup for the day. I mean, really. I’m at home with a 3-year old and an infant 99% of the time. I don’t have loads of time to spend getting ready in the morning, but I still want to look put together and prepared for the day. I’ve noticed my day always goes better when I spend a little time getting prettied up in the morning, so I need a routine that’s quick to power through in the morning, and lasts all day without needing any extra attention or touchups later on.
I’ve used some of these Neutrogena products in the past, but I also tried a few new-to-me ones specifically for this post, and obviously, you saw the disclosure at the top—this is a sponsored post, so I’m using all Neutrogena products today, instead of my typical mash-up of beauty brands. This is indeed my normal day-to-day makeup routine, and although some of these products are not in my usual line-up and were new ones for me to try, I promise, I’ll share my real thoughts and opinions on them. Deal? Deal.
Let’s go.
Pregnancy did good things for me in the complexion department (and I thank my lucky stars that this was the case, because I know it could have just as easily wreaked havoc on my face). I have never dealt with terribly bad acne, but up until my pregnancy with Forrest, I would always, without fail, have at least a few zits here and there at any given time. That cleared up awesomely while I was pregnant, and my skin has stayed reasonably decent ever since (hallelujah!). All this background is to lead into my beauty routine step 1: moisturizer and foundation. I don’t feel like I need (or want!) very heavy-duty coverage, so I like to kill two birds with one stone here by mixing my moisturizer and foundation together in my palms for a really smooth, really lightweight coverage. Everyone’s been in love with those BB creams for such a long time, and although I’ve never found one I really like, I guess this is sort of my homemade version. I generally pump out 2-3 pumps of moisturizer into my palm (I’m using Neutrogena Oil-Free Moisture with SPF 15, which goes on remarkably lightly, and I liked it quite a lot). Then I pour out roughly that same amount, if not slightly less, of foundation on top of it (I’m using Healthy Skin Liquid Makeup Broad Spectrum SPF 20 in Natural Ivory, and I love how lightweight it feels).
I rub my palms together to mix the two, then work it in all over my face, starting with my nose and working my way out across my cheeks, up onto my forehead, and across my chin. If I have any extra on my hands after getting the coverage I want across my face, I’ll apply whatever’s left under my jaw and down my neck. Combining the moisturizer and foundation maybe speeds things up by the teeniest factor, but I mainly do it because it glides on so smoothly and makes my skin look very even and fresh and dewy. I’ve never liked the matte, powdered look, and I love that my skin looks so fresh and healthy when I use moisturizer and foundation together and apply them at the same time.
Next up, I use a little blush, and I am not including a photo of this step because I looked like an enormous doofus in every shot. I can only take so much embarrassment on this blog, you know. If I’m feeling extra ambitious on any given day, I’ll toss on some eyeshadow, but most of the time, I skip it and just use eyeliner instead. I have actually been unhappy with my eyeliner for months now, but I haven’t found a replacement yet, so I was excited to try the Neutrogena Nourishing Eyeliner. I love how smoothly it glides on, and the chocolate brown is a really nice color—it’s deep enough to make an impact without being too harsh, and it’s very smudgeable (this is both a pro and a con—it smudges nicely when you want it to, but also smudges off quite a bit as the day goes on). I like to pencil it right into my upper lash line, getting as close to the lashes as I can, then I go over the line again, thickening it towards the outer edges. I try to keep things more subtle along my bottom lashes—I work the eyeliner into the lash line, then run my finger back over it to make sure it’s soft and subtle and not a sharp, harsh line.
Mascara is consistently my trouble product when makeup shopping—my eyelashes are a pretty okay length, but they are as straight as straight can be (to the point where they actually point slightly downward, and I have to hold them up and out of the way on my eyelids in order to apply eyeliner and mascara on my lower lid). Finding a mascara that won’t weigh them down and undo my attempts to curl them has been a lifelong struggle (woe is me, my life is hard). After curling my lashes, I tried out Neutrogena’s Healthy Volume Mascara, a product I’ve used in the past but was eager to try again. It goes on wonderfully and smoothly (no clumps whatsoever), and is one of the most natural-looking mascaras I think I’ve ever used. It is probably too heavy for my wimpy, straight lashes, and I couldn’t convince them to stay curled with it. If curling wasn’t an issue for me, I think I would have found a new favorite mascara—the search continues (I am more than open to suggestions!).
One of my silliest beauty complaints is my lip color. They are exceedingly pale, to the point where they are hardly even a different shade than my regular non-lip skin color. A petty complaint, I know. So I like to slap a little color on them, and I have really loved using Neutrogena’s MoistureSmooth Color Stick. It goes on so smoothly, and feels moist and glossy without being overly slick or wet (a lip product pet peeve of mine). The color I’m wearing here is Watermelon, and next time I’m at Target, I’ll be picking up Berry as well—I had a hard time deciding between the two, and when I got home and used it and realized how much I liked it, I immediately regretted choosing just one color instead of grabbing both.
And that’s it! From start to finish, this little routine takes me about 5-ish minutes, and I like feeling like I’m pulled together without looking too made up. If I call it a natural look, that makes it sound like I’m keeping things minimal as a stylistic choice and not because I don’t know how to do anything fancier, right?
I’d love to hear some of your favorite drugstore products—is there anything you find yourself coming back to again and again?
If you’d like to try any of the Neutrogena products I used here, make sure to take advantage of this special offer at Target!
Also, perhaps you would like to know that Target and Neutrogena have teamed up to bring a Target Beauty Concierge event at select Target stores around the country this month! Event begins August 24th. Limited quantities available. Check with your local Target store for Beauty Concierge day and times.
Wednesday, May 14, 2014
Sunkissed Legs (a post in which my deathly white legs finally look like they belong to a living human being)
This is a sponsored post written by me on behalf of Sally Hansen.
As a lifelong vampire-white pale girl, I’ve tried many a self-tanning product in my day. I just want something that provides a natural-looking tan, doesn’t look streaky or splotchy, and won’t rub off on my clothes (I don’t even want to talk about what one recent self-tanning attempt did to my white [previously white] nursing bra . . . my only nursing bra, I might add)—is that so much to ask?
I’ve had my eye on Sally Hansen Airbrush Legs for a while. It’s a bit different from the typical self-tanner—rather than tinting your skin for days at a time, it simply washes off with soap and water. I kind of liked this idea, since in my struggle to find a great self-tanner, I’ve often ended up with not-so-attractive streaks and splotches and orange patches that have lasted for days (sometimes weeks), left behind by products that just wouldn’t quit. So I was intrigued by the idea of using a self-tanner ‘as needed,’ with low commitment—apply it for a special night out or to go with an outfit, then wash it away and don’t worry about it wearing off unevenly.
I wasn’t kidding about being pale.
Not kidding at all.
Let’s start with the traditional ‘before’ shot. My whitey-white legs, gleaming in their pure white glory. Put on your shades, folks, and do not adjust your monitors.
I was worried about getting it to look streak-free and even . . . I can never seem to get sunless tanners to look smooth, and how embarrassing would it be to have to post pictures of my streaky, splotchy tanning attempt here? But I was actually really impressed with how well it smoothed on—it was easy to work over the skin, and it blended very nicely. I got a little overconfident/slap-happy and wasn’t as careful as I should have been around my ankles and feet (I should have moisturized them first to keep things smooth), but even so, I loved how evenly it applied.
Major difference from the before picture, eh? I love how real it looks—golden and natural-looking, I don’t think I’d have guessed this came from a bottle. And since it’s still a little chilly here in Utah, it’s the perfect sun-free way to add some color for a date or girls night out, and a must-have for your summer beauty repertoire. (And in case you’re wondering, I don’t see any reason you’d have to limit it to your legs—I applied some to my arms, chest, and face [sparingly!], and thought it looked great!)
If it weren’t for the sweater (which, believe me, was an unfortunate necessity), I think I might have been able to fool you into thinking I’d actually left the house and seen the sun recently (Jeff joked the other day while we were out for a walk with the kids that this must be Darcy’s first time in the great outdoors, which is not a huge exaggeration . . . homebody alert).
Tee, Sandals, + Sweater: c/o LuLu*s // Shorts: c/o Jane // Bag: c/o Lily Jade
Want to learn more about Airbrush Legs? I hope you’ll join us for an #airbrushlegs Twitter party, in part because it seriously is a cool product that I can wholeheartedly and honestly recommend to you, and in part because I’m a panelist at the party and am super nervous about it and will feel like a major dork if no one shows up to chat with me. So do me a solid and RSVP at this Evite link, won’t you? The party is Tuesday, May 20 from 5:00 PM PST-6:00 PM PST, and all you have to do to join the conversation is use the #airbrushlegs hashtag!
Aside from being a fun spot to talk girly stuff and learn more about Sally Hansen, #airbrushlegs party participants will have a chance to win 1 of 4 (fouuurrrr!!!) awesome Girls Night Out Survival Kits (valued at $125 each!) stuffed to the brim with everything you need to prep for an awesome night out, including Airbrush Legs products, nail polish, makeup, and party supplies. Seriously fun stuff here, guys.
Head over now (NOW) (noooooowwwww) and RSVP to the party so you don’t miss out on your chance to get your hands on all these fun goodies! (And potentially a chance to watch me be awkward on Twitter, something I am exceptionally good at, and this event promises to be embarrassingly entertaining for one and all.)
This is a sponsored post written by me on behalf of Sally Hansen.
Monday, May 12, 2014
Silky Smooth Summer Skin (and Tree Hut Scrub and Daily Defense Cream Giveaway!)
This post brought to you by Tree Hut . All opinions are 100% mine.
You know how everybody has their health/beauty 'thing?' Like, Oprah had her 'don't eat after 7 PM' thing, and you have that one friend who has the 'fluoride is evil' thing, and everybody seems to be on board with the current 'coconut oil will save the world' thing? I have a little bit of a sunblock thing. I am religious about using a facial moisturizer with a high-ish SPF, and am very careful about using it every day. And considering that this is sort of my beauty 'thing,' I'm a little embarrassed that this is the first time I'm using a body lotion with SPF on a daily basis--it seems like something I should have started long ago. SPF on your face is sort of a no-brainer, but why haven't I bothered to use it everywhere before?
So today, I'm going to share with you two awesome products that will help you get silky soft skin to show off in your cute summer outfits, and it'll even include an SPF to protect you from head to toe. And I'm giving away a set of these products, too, so you can enter to win some for yourself! Sounds good? Good.

I always love a good exfoliator, and Tree Hut's Fig & Olive Detoxifying Mediterranean salt scrub is fantastic. It contains all sorts of natural oils (like avocado, safflower seed, evening primrose, and macademia seed oils, to name a few) to nourish and moisturize your skin, and the sea salt gives you an awesome scrub. Dead honest? I really didn't care for the scent, but I loved the smooth and silky results enough to get over it. And how's this for a surprise? My manly man husband keeps stealing it to use himself. He loves it. I started out scrubbing it just on my legs in the shower, and was so pleased with how smooth and soft they felt afterwards that I started using it all over--my skin feels so much softer than it used to, and I've even noticed my makeup going on more smoothly and evenly since I've used the scrub on my face. Love it. I've been using it all over my legs, feet, arms, and chest/neck/face 2 or 3 times a week in the shower, and can't get over how soft my skin feels afterward.

After getting a good scrubbin' in the shower with the salt scrub, I follow it up with some Raspberry Macademia Daily Defense Cream. I can't say enough about how much I love the smell and feel of this one--the scent is absolutely delicious, and it feels so nice on my skin. It doesn't have that sticky, coarse feel that sunblock has, but it contains SPF 20 to protect you from the sun (and really, we should be thinking about sun protection for the whole body, not just the face and neck). I've loved how soft and smooth my skin has felt after using this regularly (especially combined with the salt scrub!), and love the security of knowing I'm using a product with SPF to keep me safe.

(see how empty the salt scrub jar is? not kidding around about how much I love it--it's almost gone already! I'm going to have to head out for a refill soon . . . both the salt scrub and daily defense cream are available at Ulta, and really, I never turn down an opportunity to head to Ulta.)
Are you interested in trying out these 2 fabulous products yourself? How about this--head over and follow/like Tree Hut on Facebook, Twitter, Instagram, and Pinterest, then pop back here and comment to tell me what you love about Tree Hut and why you're excited to try them!
Thursday, February 20, 2014
Favorite Low Maintenance (Drugstore) Beauty Products
Far be it from me to claim to be an expert of any kind in the makeup/hair/beauty departments. It is not an exaggeration of even the slightest degree to tell you that I know how to do one and only one makeup look. My sister Bekah is quite the makeup expert (her talents never cease), and she taught me how to do my makeup . . . so I do the same exact face she taught me to do, almost every day. Whether I’m headed to Walmart or my own wedding, my makeup will be almost exactly the same. This speaks less to its versatility than to my own lack of makeup talent.
But, despite my lack of appreciable skill or knowledge or expertise, who doesn’t enjoy sauntering down the beauty aisles and trying out a few new products? So, bearing in mind that I a) don’t know a ton about makeup, b) dislike spending money on beauty products, c) don’t know a ton about makeup (have I made that abundantly clear yet?), and d) am willing to spend no more than 5-10 minutes on my daily makeup, max, here are a few beauty products I love and can certainly recommend. (For the record, I have no affiliation with any of these companies--they don’t know who I am or that I’m posting this, and these are really my honest-to-goodness thoughts on them. But there are some affiliate links in here, which means that if you click and decide to buy, I get a teensy itty bitty portion of the sale price [the cost to you doesn’t change].)
1. Monistat Chafing Relief Powder Gel. Many moons ago, I admitted on the blog—to much shock and horror—that I put this stuff on my face. Maybe that sounds gross, but here’s the thing: it makes your skin unbelievably velvety soft and smooth, and any makeup you apply over it goes on like butter and looks 10 times better. If you can first get past the awkwardness of handing the pimply teenaged checkout boy a tube of Monistat, then get past the eeky weirdness of putting Monistat on your face, you will be so, so happy.
2. Revlon Colorstay Foundation. I have trouble with foundation. I want something that feels very light and smooth, but still has good coverage, all in a good color to blend with my pale skin. This one fits the bill for me. Here’s how I mix up the magic: squeeze a smallish dot (like, the size of a little pea?) of the Monistat gel onto the back of my hand; pour a slightly larger amount of foundation over it; mix the two together and spackle it on. Goes on beautifully smooth and looks nice all day. Boom.
3. e.l.f. Baked Highlighter. I dust a little over my cheekbones, right under my eyebrows, and in the inner corner of my eyes. Makes me look a little less like a brain-dead zombie in the mornings. I like.
4. Ulta Precision Liquid Eyeliner. Bekah’s been trying to talk me into trying liquid liner for years. I’ve been scared of trying liquid liner for even more years. But I finally got tired enough of my pencil liner smudging all over the place and pulling a disappearing act after mere hours, so I picked this up and gave it a go. I really love it. The tip is sort of stiff and marker-ish, so it’s not as difficult to apply as I expected, and it really does last all the live-long day.
5. Ulta Color Coat Cream Eyeshadow. I got this in Rose Gold at the recommendation of a super helpful and not-terrifying Ulta employee, and I love it. It’s a gorgeous color with a really pretty gold shimmer, and it doesn’t crease like I assumed a cream eye shadow would.
6. Cover Girl Super Thick Lash Mascara. I have pathetic eyelashes, plus most mascaras end up smudging really badly under my eyes. This is the first mascara I’ve tried that’s made them look considerably less pathetic, plus it doesn’t smudge at all.
7. Cetaphil Cleanser and Moisturizing Cream. These are all I ever want from a cleanser and moisturizer. My skin has gotten notably smoother and softer since using these consistently, and the cream is the best thing I’ve ever used on Forrest’s eczema, too (even better than the prescription products we’ve tried). Cannot recommend them enough.
8. Frizz Ease Nourishing Oil Elixir. Once upon a time, I emptied my piggy bank to buy fancy pants Moroccan Oil. Yes, it is as wonderful as you have heard. But when it ran out, I thought I’d see if a drugstore brand could compare. This Frizz Ease oil isn’t quite as good, but definitely comparable, and at a fraction of the price, being almost as good is good enough for me.
I would loooooove love love to hear your favorite beauty products. Please do share :-)
Friday, September 14, 2012
Growing Out a Pixie Cut, One Year Later
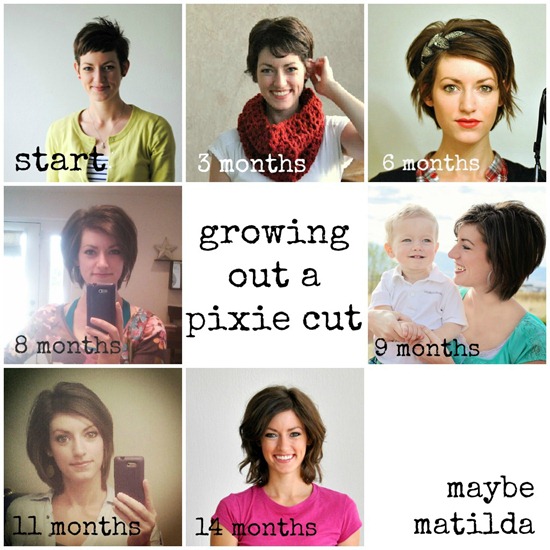
As promised, today I'm posting an update to my 6-month pixie cut grow-out post! You can find the original post, which shows my first 6 months of pixie growth, right HERE.
It’s now been a little over a year since I decided to grow out my pixie cut, so hopefully this will give you an idea of what to expect if you’re starting to grow out your hair (or maybe give you a little confidence boost if you’re tempted to try a pixie cut but are scared of the grow-out afterwards!).
When I was about 4 months into my grow out, I asked my hairdresser to cut it into an A-line shape (shorter, stacked layers in the back with longer layers and side-swept bangs in the front). I think this was a really good haircut to grow with—the neck/mullet area of a pixie cut grows in really fast and the front layers around the face take a longer time to catch up, so an A-line cut really helped keep the back under control while the front grew in.
It does feel a bit slow since the back view of your head doesn’t change much during those first 6 or so months, but I think we all know that a mullet is not the answer, and unfortunately that IS how a pixie grows in if you aren’t diligent about cutting off the neck layer.
I really enjoyed this short A-line cut and would definitely get this haircut again someday—I thought it was cute and fun, it’s easy to style, and it looks great with hats/headbands/clips when you want a little variety. It's just long enough to be able to play with a bit, without being too much work.
By about 7-8 months post-pixie (with regular mullet trims every 6-ish weeks), my hair looked like this:
Still growing into that A-line shape that I had started trimming it into earlier, but it was getting long enough that the back layer (which you can barely see, I’m sorry for not taking better pictures!) was starting to be able to grow in at the same pace as the front. At this point, when I went in for trims, I got actual, all-over trims, not just hacking off the mullet so the front could catch up.
We had family photos taken in April, which was about 9 months into my grow-out. I already shared these pictures in this post, but they give you a better look at the length/style than my unimpressive selfies do . . .

Now we’re getting to the point where my real life started to get awfully busy—vacations, house-hunting, a constantly teething toddler, a sister’s hospital stay, then buying and renovating and moving into our new house—so I unfortunately don’t have many pictures between 9 months and today (about 14 months).
I was actually kind of surprised to not be able to find any pictures of myself for 4-ish months (none that showed my hair, at least), but this awkward selfie about 10-11 months in is the best I can find--it has reached collar length, and is long enough to barely brush my shoulders (which felt bizarre after a few years of very short hair!):
And this brings us to today. I’m a bit late posting an update—I’m actually a little over a year into my grow-out now (about 14 months), but what can I say. I wasn’t even that great at taking a monthly picture when I was pregnant, for pete’s sake. I’m certainly not going to be on top of taking a monthly hair picture.
I like it best a little wavy, like that picture above, but I suppose straight is probably better for this post’s purposes.

I finally got a haircut a month ago (it had been a while!), and the hairdresser started to even out the A-line (shorten the front layers so they’re about the same length as the back). She wanted to take it shorter than I was willing to go, because there are a few spots that still haven’t caught up with the rest.
Do you remember in my last grow-out post, I mentioned a ‘hole’ in the side where the shortest layer of the pixie, right above my ear, had been? Well, that spot is still a bit shorter than the rest—see, in these profile shots, where there’s a shorter spot right around my ears? My hairdresser said we really ought to take it all up to that short layer so it can grow in evenly, but I couldn’t do it. I’ve been growing it out for too long to lose like 3 inches all in one go. That shorter spot doesn’t bother me at all, so I’m just ignoring it for now. I think it’ll work itself out over a few months of regular trims.
There you have it. One year of hair growth, from a pixie to a shoulder-length long bob (I believe the kids these days are calling it a lob). All in all, it has actually been pretty fun to watch it grow. I was really nervous about growing out that very short haircut—I expected month after month of awkward-looking hair that never really looked quite right—but there were actually only a few weeks early on when I didn’t like the way it looked, and it didn’t take as long as I expected to look like an actual style instead of awkward grow-out hair.
Now, I’ll try to answer a few questions that I get asked frequently on my previous post. Bear in mind that I am NOT a professional hairstylist, and I don’t know a lot about hair care or growth or styling or anything. I just enjoy experimenting with it.
What products do you use?
I’ve never in my life used professional salon products up until this past year. I figured this would be a good time to splurge on some quality stuff to make my grow-out a little more enjoyable. And since I was a complete newbie to professional products and had no idea what to look for, what was worth spending on, and what wasn’t necessary, I took the easy way out and just bought everything that Kate of The Small Thing’s Blog says she uses on a daily basis.
My thoughts on her product recommendations: I love the Kenra 25 hairspray. I can’t say enough good things about it--it gives a lot of lift if used at the roots, and great control. I'll definitely make this a regular purchase.
I also really like the Aquage Uplifting Foam; it definitely helps give my very fine hair a little body and root lift. I think the Redken Body Full shampoo and conditioner are fine, but I don't feel like I see any particularly mind-blowing results. Same with the Extreme CAT—I haven’t noticed any change at all by using it, but this could be because it is meant to strengthen and repair weakened hair, and I think my hair is already pretty healthy (I don't color it, and limit my use of heat). Perhaps someone with more damaged hair would see some results!
How do you get away with only washing your hair every 3 or 4 days?
I try to minimize the stress I put on my hair by not washing/styling it too often, and I use dry shampoo in between to keep it looking fresh. I get the occasional question of what dry shampoo I like and would recommend. Honestly, any of them. I’ve tried probably a dozen different brands and honestly have been equally pleased with all of them. I’m not sure this is a product worth splurging on. The only real difference I’ve noticed between brands is the scent (I don't think any of them smell particularly great, but some really do smell bad), so I guess I wouldn’t recommend one brand in particular, but rather would just recommend you find a scent you like.
Can you tell me how you style your hair?
Guys, I have no idea. I’ve never been great at styling my hair, but I’m getting better. Once again, I’ve found Kate’s tutorials helpful.
I get the best results for a straight style when I flip my head upside down and blow dry it upside down, with the blow dryer pointing down towards the floor. Then I use a flat iron just on the pieces that are unruly (my hair is very fine, and if I use the flat iron everywhere, my hair just ends up completely flat and gets very staticky).
And for the wavy style pictured earlier, I also blow dry upside down until just the roots are dry, then let the ends dry naturally (I have just a *tiny* bit of natural wave, although not a whole lot!) and use a flat iron or curling iron to add a few loose waves throughout the top layer.
I can usually manage to get 3-ish days out of each with the help of some dry shampoo and redoing a curl or two (or straightening a piece or two) each day.
Here’s to many happy hair days!