
(I've emailed our 10 winners of the Crochet Decoder iPhone App, so check your inbox to see if you won! And if you didn't, don't despair--the app is very affordable, and you can purchase it right over here if you'd like!)
Here's the moment we've all been waiting for in our Crochet Along: we're starting our cowls today!
Here's the moment we've all been waiting for in our Crochet Along: we're starting our cowls today!

If you haven't done so already, head over to Lion Brand Yarn to print out your pattern. I'll walk you through rows 1 and 2 of the pattern today and show you every little step along the way, then you can take off from here and your goal is to have at least 12 inches completed by Friday. Got it?
As always, if you have any questions, ask them in the comments (I'll answer in the comments, too, so check back in for a response!), or shoot me an email. If we need to, we'll have a little Q&A session on Wednesday, so don't be shy; ask away!
For the pictures demonstrating the pattern steps, I'll be using worsted weight yarn and a size H hook, just like I have been in all the how-to posts, just so everything is easier to see. I took a few pictures while working with my chunky yarn and it was almost impossible to figure out what was happening in the photos, so just remember, even though the pictures show a practice yarn and a smaller hook, use your chunky project yarn and size N(ish) hook, as the pattern calls for.
From the Time Out Cowl pattern . . . our first step is:
Ch 30.
Easy enough! (If you need to refer back to the pattern-reading how-to post, click here.) This just means to make 30 chain stitches (for a reminder on how to make a chain, click here).

The next step in our pattern says:
Row 1: (Dc, ch 2, dc) in 6th ch from hook (V-st made), *sk next 2 ch, (dc, ch 2, dc) in next ch; rep from * across to last 3 ch, sk next 2 ch, dc in last ch – 8 V-sts at the end of this row.
That looks a little daunting; let's break it down.
Our first instruction is "(dc, ch 2, dc) in 6th ch from hook". That means that everything within the parentheses (one double crochet, two chain stitches, and another double crochet) needs to be worked into the 6th chain away from the hook, which is the one marked by the needle in this photo (remember that when counting chains, you don't count the loop currently on your hook):

Working through just the back loop of the 6th chain, make one double crochet (for a reminder, click here):

Now make 2 chain stitches:

And work another double crochet into the 6th chain from the hook again--the same space that you placed your first double crochet:

Awesome! You've just completed the first part of the first row--"(Dc, ch 2, dc) in 6th ch from hook." The next part of the instructions says, "V-st made." Do you remember when we talked about this during the 'read a crochet pattern' post? Sometimes when a pattern requires a special stitch, they'll just have you do it and then tell you, "Woohoo! You made the special stitch!" That's exactly what's happening here--the (dc, ch 2, dc) sequence creates a V-stitch, and they're letting us know we made the first one. Do you see why it has that name?

The 2 double crochets with a chain 2 space in the middle form a little V. We're in luck--now that you know how to make a V-stitch, you're set for the entire cowl . . . all it is, really, is a repetition of the V-stitch.
Let's move on with our row 1 instructions. The next part says: "*sk next 2 ch, (dc, ch 2, dc) in next ch; rep from * across to last 3 ch". We talked about the asterisks in the read-a-pattern post as well--they mean that you'll repeat the steps inside the asterisks across the row.
So start by skipping the next two chains; we'll be making our next V-stitch into the chain marked by the needle:

Then work one double crochet, 2 chain stitches, and another double crochet (a V-stitch!) into the back loop of the chain:

Now you have 2 nice V-stitches! You'll repeat what was in the asterisks again--skip the next 2 chains and work one double crochet, 2 chains, and another double crochet into the following chain--until you reach the last 3 chains in the row, as the pattern instructs:

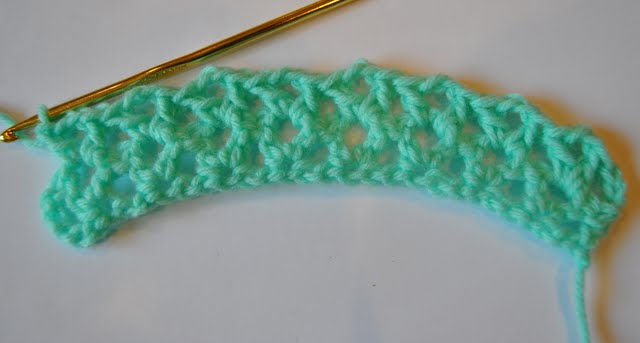
The pattern tells us: "rep from * across to last 3 ch, sk next 2 ch, dc in last ch". All right, we've repeated the whole way across, and now there are 3 chains left in the row. Now we stop repeating what's in the asterisks and just follow the instructions. We need to skip the next 2 chains and work one double crochet into the last chain (the one marked by the needle in the picture above):

Yay! You just finished the first row of your cowl! The final piece of information in the first row says, "8 V-sts at the end of this row." I told you earlier that patterns usually include a stitch count at the end of each row of instructions so you can check your work--this is our stitch count. We should have 8 V-stitches, as well as (although it doesn't tell us this, shame on you, pattern) our starting chain (the 5 extra chains at the start that were left over when we worked into the 6th chain) and that last double crochet into the final chain. Count 'em up--are you on track?

Let's move on to row 2 . . . it says:
Row 2: Ch 3, turn, (dc, ch 2, dc) in each ch-2 sp across, dc in top of turning ch.
Okay. So we start by making 3 chain stitches (in order to be tall enough to work double crochets in the second row) and turning our work:

The next step is: "(dc, ch 2, dc) in each ch-2 sp across" We already know from the first row that the (dc, ch 2, dc) makes our V-stitch. You just have to work it into each chain 2 space across the row. Looking at your work, can you identify the chain 2 spaces from the previous row? If you need a hint, they're the top of each V:

Instead of working into the loops of a specific stitch of the previous row (as you normally do, and have done in your practicing), you'll be working your stitches into the space created by the chains of the previous row. This means that you'll yarn over for your first double crochet and insert your hook into the opening of the V--not through any specific loops or stitches, just into the space that your earlier chains created:

Then finish your double crochet (do you see how it's worked into the space of the V-stitch below?):

Chain 2, and work another double crochet into the same space:

(If working into the chain space doesn't make sense, here's a video showing how it's done--mind you, she's using a different number of chains between her double crochets, but just pay attention to where she inserts her hook. Here's a post with a better picture than I was able to get of working into a chain space.)
Now just continue making V-stitches in each chain-2 space across your row. Make sure you're working in the ch-2 spaces only.
Our last instruction for row 2 is "dc in top of turning ch." This means we need to work one double crochet into the top of the chain from the previous row, which you can see way over on the bottom left of the above picture. If you'd like, you can work into a loop of this chain, or you can simply work a double crochet into the space created by that chain--either way is fine:

Row 2 is now done!
The next instruction in our pattern is simply to repeat row 2 until our piece is 52 inches long. How simple is that? Just keep on working row 2 until it's long enough, then we'll handstitch the short ends together to make a big long loopy cowl.
Also, I decided to start a Maybe Matilda Flickr Group--if you'd like to share pictures of your cowl in progress (or photos of anything you've made from my blog), feel free to join in and add your pictures (if you do, and if you blog about it, please also include a link so we can visit you)!
I'd love to see your progress!
Let me know if you have any questions, and have fun making your adorable winter cowl! Try to have 12 inches (or more!) done by Friday to stay on track.

Thanks Rachel...your walk through instructions are very clear...I'm getting excited to start my cowl!!
ReplyDeleteYay! I'll have to blog about it and send you the link. I confess I found the pattern the other day and already started... I was too excited to wait :)
ReplyDeleteYou make it look so easy....you crochet master you.
ReplyDeleteI have pinned this to do this fall, when things get a bit quieter. I love it in the mustard color. It's so cute!
Yippee! I have to admit that I couldn't wait any longer...and already finished mine!! I love the way it turned out...maybe I'll make another!!
ReplyDelete~ Sarah
I went WAY ahead and finished it already! I love it, I just need to try and get a picture of me wearing it now
ReplyDeleteYour instructions are awesome!! I've never read a pattern before, and while your previous post about reading them was helpful, I still couldn't visualize it. I wanted so badly to start the cowl this weekend, but couldn't decipher the pattern. Your step-by-step instructions make complete sense, and I don't know if I will be able to stop at just 12 inches :) One comment though, does anyone else find that working with a larger needle is difficult? Especially with just chain stitches. Maybe my bulky yarn just isn't bulky enough...
ReplyDeleteMelisa--I'm so glad you're getting the hang of it! There's nothing more frustrating that being stumped on a pattern and not being able to make any progress. You don't have to stop at 12 inches, of course . . . Crochet to your heart's content :-)
ReplyDeleteIs it normal for the crochet to round somewhat or should it have square corners with straight sides like a scarf?
ReplyDelete@Melissa, I think working with a bigger needle is a little tricky, and I am using Super Bulky (6) yarn.
ReplyDeleteI've done about 4 or 5 rows and I'm addicted! Thanks for the great instructions!
(oops, sorry Melisa . . . I never answered your question! Yes, I also think working with a big hook and chunky yarn is a bit tricky, but if you feel comfortable with a smaller hook and yarn, you'll adjust quickly!)
ReplyDeleteEmily, hmmm . . . It should look straight,
like a scarf. Maybe you're adding stitches so it's growing as you go? Count and make sure you still only have 8 v-stitches (plus the dc at the end and chain at the start) per row. Or do you just mean that the edges are curling up? My projects often curl up at the ends, but they get straighter as they grow.
Great instructions, off to get started!!
ReplyDeleteAlison
x
I am making this cowl right now for my sister, I have changed it up a little though, so funny this is the pattern you choose. :)
ReplyDeleteI also got so excited that I started this weekend. I have just finished mine and absolutely love it. I made mine in black to match my winter cape. I never dreamed I could make something so pretty. Can't wait to wear it tomorrow. Will you be doing a new pattern/tutorial every month?
ReplyDeleteKya
This is fun! I've never done a project with such bulky yarn or such a huge hook, and doing it in a craft along is a real confidence booster. I just started my cowl this evening and so far so good. :)
ReplyDeleteGreat lessons here. I'm going to be adapting the pattern a tiny bit myself but am enjoying being a part of it and seeing your instructions here.
ReplyDeleteThanks for the previous comment about the number of v stitches in the subsequent rows. I wasn't sure about that part! Great photo directions.
ReplyDeleteHola. He empezado a tejer y no puedo parar, es tan emocionante. Paso ya de las 12 pulgadas.
ReplyDeleteUn saludo.
Hello :0)
ReplyDeleteRachel thanks so much for your brilliant clear instruction...tried and epic failed before seeing them lol...oops!
And just to say mine curled big style i realised after about 4 rows that i was adding too may stitches...but im gonna do it agian as it was looking kinda cool.
Kate xx
PS have blogged xx
Mine's coming along nicely. I LOVE the color you chose for yours. So pretty.
ReplyDeleteHey Lady...I cast on the scarf today, and the pattern is perfect for my lack of knowledge!! I did half the width of the pattern ( I don't think that I have enough yarn to do it the full width )!! Thank you so much for doing this, I am learning so very much!!
ReplyDeleteI was freaking out thinking "i'm not ready yet" haha. and how was I going to get 12in done by Friday. But then I remembered I am one day ahead into the future being here in Australia, so I sneakily have til Saturday! hehe. Thanks for the opportunity Rachel
ReplyDeleteI admit that I'm not a fan of the cowl (or any cowl for that matter), but I am definitely a huge fan of crocheting!!
ReplyDeleteI've started a scarf and I am loving it! Thanks so much Rachel!
http://adriennexstitch.blogspot.com/2011/09/proper-try.html
As a somewhat experienced crocheter, lemme tell ya, I think you are a great teacher!
ReplyDelete12 inches--done! I am so excited that you have a timeline for this project so I'll actually finish it.
such fantastic instructions. I have posted my WIP on my blog (COWL WIP), but have to admit I am already finished with the project. Now to find the time to take a picture of the finished cowl.
ReplyDeleteThanks for the fantastic instuctions!
Hey girl...OK...so I'm pretty much killing it over here...crocheting is my new "thing" - LOVE IT! One quick question...when you get to the end of a skein, how do you start w/the new one? Just tie the ends together?
ReplyDeleteYou are an awesome teacher!
OH! And I realized (w/my Mom's help) the huge mistake I was making before...she said I was "binding off" instead of doing it right...does that make sense?
I'm with Maggie (above) -- how do I join the second skein onto the first? This bamboo yarn I'm using is so soft and yummy, but the skeins are not that big.
ReplyDeleteYou guys must be zipping along! I'll write a post about joining a new yarn for Friday, but in the meantime, here's a link on joining a new ball: http://www.dummies.com/how-to/content/how-to-join-yarn-in-crochet.html
ReplyDeleteAnd a video: http://www.youtube.com/watch?v=WN7Bev7qWp4
cheese and rice. I thought I had this down, after practicing and practicing and PRACTICING my stitches! I also thought my first row of V stitches looked vaguely similar to what it was supposed to, but, come the second row I have NO IDEA what happened, everything went crazy and I had to pull it all out. I have to admit I'm finding the big hook hard to handle, plus my yarn is kind of fuzzy so i guess that doesn't help me see the stitches very clearly... Anyone have some tips on how to hold the yarn also? I can't do the wrap around the pinky thing, it just tightens... and I am ending up holding that yarn string, with it all wrapped around my hand and then trying to hold my work and the hook in there somewhere also. Makes me lose track! YARGH!! Still... for having crocheted my very first stitch only yesterday, I'm proud :D
ReplyDeleteSky
Ok, How do I go from one ball of yarn to another? Just knot it? Or is there some fancy technique?
ReplyDeletei'm with sky, i practiced and practiced (with worsted weight and an "h") and thought oh, no problem -i love this crochet business. but i can't even get my first row finished on the cowl. the big hook is awkward and i can't seem to get a visual with that thick yarn...i'm trying to get it but i'm losing it! hmmm...
ReplyDeleteSky and Lynn--I'm sorry you guys are having trouble with the big yarn and hook! I agree, I think a larger hook and chunky yarn are harder to work with. If it's easier, you could follow the same pattern using worsted weight yarn and a smaller hook (something like an I hook) and you'd just end up with a thinner cowl. My mom actually just finished hers using worsted weight yarn instead of chunky yarn because she wanted it to be thinner and it turned out beautifully! Don't feel like you HAVE to do the chunky yarn and huge hook if that makes it difficult--try it with thinner yarn and a smaller hook and see if that helps!
ReplyDeleteAnd Sky, about holding the yarn comfortably--it can be really tough to find a way to hold everything that feels comfortable . . . just google something like "hold yarn crochet" and you'll get TONS of different positions to hold everything. Just try a few and see what works best!
do the type of hooks make a big difference w/chunky yarn? it seems as though i'm having a smooth flow problem, plus difficulty seeing where to put my second double crochet....why can't i get it in the same chain as the first? (and i invested in this chunky yarn so i'd like to stick with it) but it's gotta be me because everyone else seems to be breezin' through...and now a week cut out of the timeline...pressure, pressure...how about letting us slow-pokes catch up!?
ReplyDeleteLynn, I only own Boye hooks (I've bought them at Joann and Walmart), so I'm not very experienced with other brands . . . sorry. But I do love that brand of hooks! As for seeing where to put the stitches, the yarn you're using could be making it tough--I started my cowl with Lion Brand Homespun, which is kind of curly and fuzzy, and I had quite a hard time seeing the stitches, so I ended up buying a different yarn to use and I'm saving my original yarn for another project. I think if you can power through the first row, it'll be easier since from the second row on you don't really need to be able to see the individual stitches to work into--you'll just be working into the large, open chain spaces at the top of each V stitch.
ReplyDeleteCould your chain be too tight, making it hard to put two stitches into one space? I don't know how far you've gotten into the cowl, but if it's just that first row that you're stuck on, maybe you could start again and make the chain a little looser to see if that helps.
Maybe this is bad advice, but it might be worth a shot--even if you can't see the stitches terribly well for the first row, maybe you could try to just make that first row of stitches evenly spaced across your chain . . . as in, maybe try not necessarily working in the CORRECT stitches, but as long as you end up with the 8 v-stitches like the pattern says, even if they aren't in the correct chains, it'll be easier to follow the pattern more closely as you keep working. Does that make sense?
I just came across your blog through pinterest and I'm super sad I missed this! I'm going on a trip this next week so I'll be spending my evenings making one of these babies. Thanks for the more detailed instructions and pictures. I'm such a visual person it will be a huge help. Happy weekend!
ReplyDeleteI am a new crocheter and am quickly becoming obsessed! I started and finished this cowl yesterday and am starting a new one. I love your blog!
ReplyDeleteI'm a knitter and have some crocheting experience. I wanted to make some quick gifts and came across your tutorial for the pattern I wanted to try. Can I just say you ROCK! This tutorial helped so much. I'm sure I'll be done with this cowl by tomorrow. Thanks for sharing!!
ReplyDeleteThis comment has been removed by the author.
ReplyDelete