Maybe Matilda: outfit
Showing posts with label outfit. Show all posts

Monday, February 22, 2016

Family Photos with Jordan Bree Photography

Quite a few weeks ago, I entered an Instagram giveaway for a makeup session and photo shoot. I enter these giveaways all the time (you too, right?), and never expect anything to come of it. And 99% of the time, nothing happens, of course.

I'm totally counting this as a Christmas miracle -- I won! *insert dancer in red dress emoji!*

The lovely and talented Jen of Classy Cosmetics came over one Saturday morning in January to give me the full Disney princess makeover treatment, and I'm begging her to move in with me and make me up every day. She's amazing and hilarious and so good at what she does. Jen, I can offer payment in the form of all-you-can-eat cookies and unlimited laundry services.

After my makeup session, we headed out to meet Jordan of Jordan Bree Photography for our family photo shoot. You know how sometimes you feel incredibly awkward while having pictures taken? You're suddenly hyper-conscious of your every move and facial expression, and find yourself suddenly wondering, "Wait . . . how am I supposed to smile? Is this too much? Too little? What do I do with my arms? Who am I?"

Not the case here. Jordan was amazing and so funny and kept us laughing the entire time (even while Darcy cried and moaned and generally acted like a 2-year old about the whole experience). She made us so comfortable and the whole experience felt so easy and natural. And I am so excited about how beautifully our pictures came out!

winter family photos
  
winter family photos

winter family photos

winter family photos

winter family photos

winter family photos

winter family photos

I've put some others on my Instagram, so you can visit me there if you'd like to see some other shots. A big, huge thank you to Jen and Jordan for their amazing work! Make sure to visit them at the links below to see more of their talent in action!

Jen @ Classy Cosmetics: blog - youtube - facebook - instagram

Jordan @ Jordan Bree Photography: website - facebook - instagram

Friday, September 25, 2015

Bookworm Style -- DIY Poe Shirt

I've been slow to get on the graphic tee bandwagon . . . but I'm more than willing to climb aboard nowadays, especially for a nerdily bookish graphic tee like this one.

DIY Poe-Inspired t-shirt

I made this Poe-inspired shirt for myself this week. I mean, the kids have all sorts of cheesy Halloween stuff to wear over the next month. I want something spooky, too. And Poe . . . Poe is spooky. If you don't believe me, go listen to it read by James Earl Jones. *shivers*

DIY Poe-Inspired t-shirt

Hop over to Delicious Reads for the full tutorial, and get the cut file freeeeeeeee to make this for yourself if you're lucky enough to have that crafting tool that puts all other crafting tools to shame: the Silhouette.

DIY Poe shirt

Wednesday, December 3, 2014

3 Holiday Party Outfits + Jockey® Slimmers Giveaway!

Tracking Pixel

‘Tis the season for Christmas cookies and cinnamon rolls and big turkey dinners and daily hot chocolate and unexpected treats dropped off by neighbors. ‘Tis also the season for Christmas parties and family photos and wanting to look awesome. Kind of hard to enjoy both sides of that coin, eh? For this sponsored post today, I want to share how Jockey® Slimmers shapewear helps me look and feel my best for all the fun events coming up, even during this season of sweet, delicious, irresistible excess.

I know full well that I’m not fooling a single solitary soul when I occasionally play style blogger, but bear with me. If nothing else, posts like this at least help me to play around in my closet and figure out how to work with what I’ve got.

We have a few Christmas parties and dinners coming up, and I wanted to see what I could put together from my current wardrobe that would work for different types of gatherings—something a little dressier, something in the middle, and a casual get-together. And I’m really excited about my new Jockey® Slimmers that are helping me feel way more confident—I’ve been avoiding wearing some of these items because I’ve always found something to complain about (lumps here, bulges there), and I’m so glad I can finally enjoy them.

Let’s start with the dressier end of the spectrum, then I’ll wax eloquent on the topic of shapewear. I bought this dress after we had our most recent family pictures taken in the spring—I wore it for those pictures in navy, and loved it so much that I went back and bought the same style in ivory. (And pardon the modeling—I try. I fail. I keep trying anyway.)

winter white + black party outfit

Dress: Downeast // Tights: We Love Colors (c/0) // Heels: Thrifted // Necklace: Walmart

I was so excited to get this dress—but then I didn’t wear it for nearly 6 months, first because Darcy was nursing and it isn’t exactly a nursing-friendly dress, and then because we were headed into cooler weather and I wasn’t sure how to wear a white dress in the winter. But with black tights, heels, and necklace, I think it is deepened up enough for Christmas parties, and I’m glad I can finally wear this dress I’ve waited half a year for.

(Let’s ignore the fact that those heels, which I thought were such a steal when I thrifted them brand-new, are so wildly painful that even hobbling from the camera back to my spot against the wall was enough to get me swearing.)

Now, about this next one: I’m not joking when I tell you I’ve worn this exact outfit to church for 3 weeks in a row now. I’m going to go ahead and say that it would work swimmingly for a holiday party that is maybe a tad dressier than jeans-and-a-sweater, but not so fancy that you need to get out the ankle-breaker heels.

aztec sweater dress

Dress: Ross // Boots: Sole Society (c/o) // Cowl: made by me

I got this sweater dress on sale recently for $9.99, and immediately questioned my shopping wisdom once I got home and tried it on. This silhouette is never one I’m comfortable with. The shape doesn’t hide much, and I was not blessed with flat stomach genes (nor was I blessed with the willpower to make daily crunches a priority). So I just make sure I’ve got some shapewear on hand, and no one’s the wiser. I pair this dress with a cowl (the same one I made for my crochet along a few years ago!), and a pair of moto boots. It’s so comfortable and cozy, but still dressed up a bit for parties or a dinner out.

I’ve almost always reserved my shapewear for dresses, but I discovered that my Jockey® Slimmers camisole was just what I needed to make this tunic top wearable. I’ve actually had it for a few months, but haven’t worn it yet because the material is rather clingy. Everything, from the outline of my bra to the cookies I had for lunch yesterday, is perfectly displayed through the fabric. The shapewear camisole was perfect for keeping things tight, as well as smoothing out any lines from showing through the top. Which means I can now wear it for a more casual holiday get-together with friends, along with black jeggings and boots.

tunic + black skinnies

Top: Annie Jean Apparel (now closed—I’m so sad!) // Jeggings: Bella Ella Boutique
Boots: Fashion Corner // Necklace: Walmart

And I have to show you the best part of the top . . .
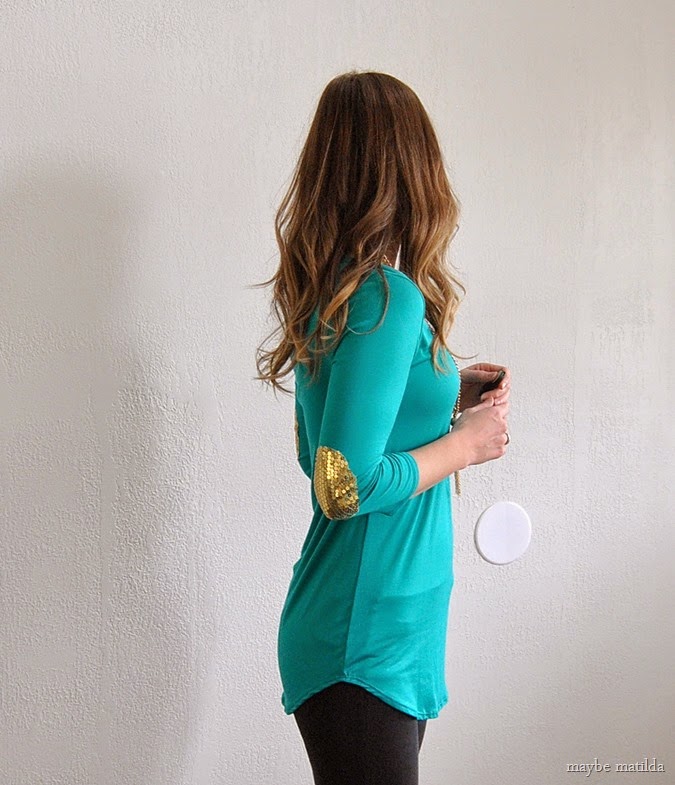
gold sequin elbow patches!!!

Gold sequin elbow patches!!!

I’m glad to have a few Christmas party outfits ready to go, and I’m especially excited about my new Jockey® Slimmers that helped me love these outfits way more than I have in the past—I’ve always found something to complain about when wearing these various items before (lumps and bumps, you know how it is), and while I’ve shared my love for shapewear before, the Slimmers bring my love to new heights. And I totally know how ‘sponsored’ that sounds, but I’m being dead honest. They are absolutely my new favorites, and I’ve worn them over and over in the few weeks I’ve had them so far. I wear shapewear fairly regularly, and while I may like how I look in it, I’ve never liked how it felt to wear it until now.

Whatever magical material they use to make Jockey® Slimmers is so soft and feels absolutely fantastic to wear (some shapewear I’ve worn before is so stiff and scratchy that I’m conscious of how it rubs and scratches against my skin for every.single.second), but my favorite feature is that it keeps thing firm and tight without making me feel like I’m being slowly strangled. Or squeezed to death by a python. Or being clamped ever tighter in a vice. You get the picture. Some shapewear I’ve worn in the past is so absurdly firm, so crazy tight that it’s almost impossible to even get into, much less wear for an entire day (while still trying to get a full breath of air in). I don’t know how they’ve done it, but they’ve finally made shapewear that is truly comfortable to wear. I suspect witchcraft. I’m fine with it.

If you are in the market for a little firming help this Christmas—and really, who among us isn’t? even the thinnest, most fit ladies I know have certain clothing styles they feel uncomfortable wearing because they’re self-conscious about some part of their bodies—I hope you’ll enter to win a Jockey® Slimmers shapewear prize pack to help you feel totally confident and gorgeous and sexy in whatever you wear! Enter with the Rafflecopter below--the giveaway will be open from December 1 – December 11, and 10 winners will be selected to receive one prize pack from Jockey® (ARV $45).

a Rafflecopter giveaway


This is a sponsored post written by me on behalf of Jockey® Slimmers.

Wednesday, February 5, 2014

The Vested Armless Wonder

May we let the following photos be a lesson to us all on the importance of checking one’s exposure compensation before one takes pictures. Although the optical illusion of having a torso and wrists but no arms connecting them to each other is kind of interesting, I guess. And yeeeeeah right, like I was going to head back out into the Arctic cold to shoot some more once I finished up and realized what they looked like. I ain’t risking no frostbite for a blog post. A truly committed blogger I am not.

mustard skinnies + patterned vest + boots

It’s been a little tough finding outfits that I feel put together in, but still make sense for nursing and taking care of little kids . . . even though it hardly matters, considering I only leave the house like 3 days a week, preferring most days to hole up at home like a frightened little house mouse. But I really, really do feel better and get more accomplished on the days when I put a little effort into getting dressed and ready, even if I’m not doing anything very exciting. Like, today, in this outfit? My one trip outdoors was to take these pictures. 

. . .

No, wait! I also checked the mailbox when I heard the mail truck go by, so that makes two trips out. My fellow social butterflies, raise those hands up high! (wings?)

yellow skinnies + patterned vest

But for whatever reason, just choosing an outfit seems to kick start my day, especially if it’s an outfit I feel good in. And I felt good in this one. Cozy and warm, but easy to nurse in, and although the pictures (hopefully) don’t show it, the pants are stained in enough places already to make me unconcerned about sticky hands making the situation worse. Always the glamorous perfectionist, I am. (This is why I can’t have nice things. CHILDREN.)

And how cute is the vest? Easily one of the coziest things I’ve ever owned, and it’s all thanks to my friends at Pretty Life Anonymous (one of the few style blogs I read faithfully—those girls are hilarious and so cute, and always get me thinking outside of my itty bitty comfy little jeans-and-a-t-shirt-all-day-erry-day style box). They were giving away this vest recently and the fashion gods smiled upon me in my raggedy spit-up covered frumpiness, and here I am with a new vest. So obviously it needed its own post. From one blog to another—it’s the Sisterhood of the Traveling Vest. Except its travels end here. I’m not as generous as the Pretty Life girls are.

Vest: SheInside
Pants: Old Navy
Boots: gift from husband, so who on earth knows where he shops? Not I.

Monday, January 27, 2014

Weekend Angst

Friends, last week kind of sucked. Buckle up, it’s going to be a rough ride.

Darcy inexplicably went from steadily increasing her nap and nighttime hours of sleep to suddenly aborting that nice progression and rocketing downhill in the wrong direction. Every day and night was considerably worse than the one before, and although she was pleasant when she was up, she would not sleep for anything close to an acceptable amount of time, and it’s been making me crazy. Craaaaazzzzyyyyyyyyy. I had kind of forgotten how completely exasperating it is to have a baby doing frustrating things for no apparent reason (‘I forgot’ might be the wrong term for it . . . more like ‘I repressed the horrible memories deeply in hopes they would never again resurface’). It seems kind of ridiculous to me to think she might be teething already (she’s 3 months old, and Forrest didn’t get his first tooth until he was almost one—late bloomers in this family), but the floodwater drooling and constant chewing on her hands and two little poky hard spots along her gums are giving me hope that maybe there’s a reason behind the lack of sleeping and maybe she’ll get back to normal (or what had previously been moving toward something resembling normal) soon, please God please. At this point I’m hoping for teething, because at least there would be a reason behind her suddenly changing her sleep routine, other than to experience whatever perverse joy children seem to find in making their parents lose their freaking minds.

I’m rambling. What I’m trying to get to is that after a rather crappy week at home, I really needed a pick-me-up, and I think I found one in the form of an outfit that made me feel nice. I had totally forgotten how hard it is to get dressed with a young baby in the house—between finding outfits that are nursing-friendly, to figuring out what fits and will be flattering on a body that has shifted and changed shape, to accepting the reality that you’re going to be stuck at home most days and that isn’t exactly great incentive to put much effort into getting ready, it can be really tough to find things that work and are reasonable for a mom’s routine. Anyway, it was so nice to get dressed for church and just feel good for a change. Good like a regular human being, the sort who sleeps at night and doesn’t obsess over nap schedules and baby wakeful vs. sleeping hours and bite her nails as she stresses over the cause of the lack of sleep and the potential end date of the lack of sleep and possible courses of action to restore sleep and sleep sleep sleep sleeeeeep.

Black pencil skirt + striped top + long cardigan + statement necklace

I was browsing Pinterest Sunday morning and feeling kind of grumpy (there’s a surprise!) about not having the nonexistent Pinterest closet and teensy twiggy Pinterest body and apparently limitless Pinterest budget with which I might attain the aforementioned Pinterest closet and body, and finally I mentally slapped myself and decided to use it to help me figure out what I could do with the things I do have instead of feeling bad about everything I don’t have. This pin looked like something I could maybe come close to, so I gave it a shot.

black pencil skirt + stripes + statement necklace 

So between that and a nice dinner with the parentals and a pan of homemade brownies, I’m feeling a little more optimistic about things. Darcy is in bed now as I type this and every finger and toe in the house is crossed that maybe tonight is the night she gets back on track. If not . . . I don’t know, I guess I’ll just whine at you some more about it. Cool?

Skirt: Loft
Shirt: H&M
Cardigan + Tights: Walmart
Shoes: KMart
Necklace: Ebay

Tuesday, February 21, 2012

Turning Bootcut Jeans into Skinny Jeans

You know what I'd really love? One pair of great-fitting skinny jeans. But with a closet full of jeans I've already owned for years, I have a hard time justifying a new pair in what may turn out to be a trendy fit.

One pair of jeans in my closet has been sitting around, unworn and unloved, for years. They fit me great, but there's one problem: they have really big, goofy flare legs.

Bootcut jeans are one thing (I love a bootcut), but these were in a league of their own. Even though I’ve owned these jeans for at least 3 or 4 years and really love the way they fit, I’ve only worn them a few times.

I decided since I don't wear them much anyway, I'd take a chance on them and see if I could turn those unloved jeans into a pair I might really enjoy wearing. I read a lot of tutorials and instructions on how to transform my jeans into skinnies before I got started, and all of the instructions I read were so different that I was left more than a little confused about what to do.

After some thought and trial and error, I thought it might be helpful for others who have thought about McGuyvering their jeans to hear what I did and how it turned out.

DSC_0468 (The finished product!)

I started by putting my jeans on inside out and pinning the fabric along the outer seam, starting about mid-thigh and working down toward the ankle. I knew I couldn’t replicate the look of the heavy topstitching on the inner seam, so I didn’t dare touch it, and only altered the outer seam.

I just worked my way down the leg, holding the outer seam as flat as possible and pinning where I wanted the new seam to go. I took the jeans off and used a pen and ruler to mark a gradual line along the pins, and started sewing along that line (make sure to use a heavy-duty needle!).

I started at the bottom of the leg and worked my way up. I think the most important point to take away from the many tutorials out there is to make sure your stitch line is smooth and gradual, and to blend it as smoothly and seamlessly as possible into the original stitch line when you reach the point along the thigh where you began pinning.
DSC_0457 This is what my pants looked like with one leg skinnified. (And yes, I’m standing on a bucket in my bathroom.) You can see, about mid-thigh, where I didn’t do a very good job of blending the new seam line into the old seam line—there’s some awkward puckering and bulging along the outer seam a few inches above my knee. I went back and sewed it again, making a longer, more gradual stitch line that blended less noticeably into the original seam, and it looks much more natural now.
DSC_0462
Here’s what the stitch line looked like from the inside.

Try the jeans on after sewing before you cut off the extra fabric to make sure you like the fit and can easily get your foot in and out. It'll be a tight squeeze to get them on since you'll have all that extra fabric inside, but do the best you can.

If something doesn’t look or fit right, adjust. If you like it, cut off the extra material  and zig-zag stitch over the raw edges to prevent fraying. Instead of fitting and pinning for the second leg, I just folded the first leg over the second one and used it as a guide.
DSC_0460 I had never realized before just how long these jeans are! I used Sew Much Ado’s hemming tutorial (which uses the original hem for a more natural look) to take them up so they hit just below the ankles—a good length for flats and heels.
DSC_0505

You can see the new, altered seam pretty well in that last picture above—the old seam at the top of the leg looks more “original,” and my new seam line comes in just above the knee.

DSC_0496 Overall, here are my thoughts on skinnifying bootcut jeans:

- I definitely recommend Sew Much Ado’s method for hemming jeans. Fast, straightforward, and leaves the hemline looking very natural and unaltered.

- Although I can tell that these jeans look altered now, I’m very happy with how they came out, especially considering how little time and effort I spent on them.

- I would definitely do this project again (and, as an update, have since 'skinnified' many pairs of bootcut jeans!). It turned a pair of jeans that had been neglected and ignored for the past few years into my new favorite pair.

Have you ever turned bootcuts into skinny jeans?

Tuesday, February 14, 2012

3 Step, $3 Infinity Scarf

First things first: Thank you so much for sharing your thoughts (and your gratuitous, giggle-inducing compliments) on my blogging identity crisis post. I really felt a little confused about why I’m blogging in the first place and what (if anything) I should be focusing on, and you guys gave me a great reminder of what I’m doing here: sharing my passions, my thoughts, my hobbies, and my everyday, real, unglamourized (not a real word) life so we can connect and laugh and be inspired and improve ourselves together. The consensus of thought in the comments seems to be that while we all enjoy a good crochet/craft post, most of you seem to just enjoy having a good ol’ internet buddy that you can chuckle and commiserate and create with. And I love being that buddy. So I hereby resolve to never again waste time worrying about what I should be writing, or meeting anyone’s expectations, or keeping up with Susie  Blogger over there with her daily inspirational words of wisdom and groundbreaking tutorials and 50,000 diehard fans. If I feel like crafting, craft post. If I feel like whining, whiny post. If I feel like showing off pictures of my gorgeous offspring, you bet you’re gonna see some gorgeous offspring. We’re just going to let it all hang out over here, for better or for worse. Here’s to real, honest blogging! (Yaaaaaay!)

Second things second: Newlyweds on a Budget is giving away 3 patterns of your choice from my shop right now . . . head on over and enter to win!

Third things third: Have you noticed the animal print trend happening lately? I follow a few style blogs and have really been loving the dose of animal prints in some recent outfits . . . whether it’s a big, look-at-me splash of leopard like in this adorable outfit from The Pretty Life Anonymous, or just a teensy touch tossed in, like the shoes paired with this look from Merrick’s Art, I’ve been enjoying the spunk and sass and flair that a little animal adds to an outfit. It seems to instantly perk up an outfit and give it more personality, which is always a good thing.

So I’ve had my eye out for cheap, cute animal prints lately and have been a little disappointed at my meager findings. I truly can’t overemphasize what a cheapskate I am—I decided against a $14 leopard print scarf the other day because I thought that was too much to spend for a scarf. I’ll always have meager findings as long as $14 for a scarf feels like a rip-off. A part of me knows that this is not an unreasonable price, but a louder, more obnoxious, penny-pinching part of me b****-slaps that part into silence. But at Joann’s the other day, I spotted a cute, lightweight, gauzy zebra print fabric in the red tag clearance fabrics—score! At $7 a yard, it didn’t seem like a fantastic bargain, but I figured I wouldn’t need much to make an animal print scarf for myself . . . I only bought 15 inches of it (which was plenty of fabric for a double-loop cowl/infinity scarf, and rang up to less than $3).DSC_0452 Now, there are plenty of infinity scarf tutorials out there already, and you can google around and find them if you prefer a more in-depth, professional approach and finished project. Here was my issue with the tutorials I found:

1) Many just did not make sense to me. I’ll admit, I can be a bit of a dummy when it comes to following instructions, so maybe my pattern-following issues are just my own problem that needs fixing. But I read through quite a few infinity scarf tutorials and ended up scratching my head, going, “How does this work? Fold what? Sew where? Hand stitch? No sir.” We’re going for simplicity here.

2) They looked too labor-intensive. Honestly, I spent less than $3 on fabric; I’m not going to spend an hour sewing pieces by hand and hiding every seam and finishing every raw edge and perfectly ironing each fold. Sim.plic.it.y. I didn’t turn on the iron, and I was even moaning about having to get out the pins. I considered not swapping out the hot pink thread from my machine. Keepin’ it simple.

So this is my imperfect, one-seam-visible, 3-step infinity scarf tutorial. It seriously took like 15 minutes to make . . . I spent more time editing the pictures than sewing the stupid scarf. If you want a perfect, store-bought, professional-looking piece, I would encourage you to follow someone else’s instructions, because my version does end up with one seam line visible from the outside. I am 100% fine with this, especially since I’m keeping it myself. For 3 steps, $3, and 15 minutes, I will gladly live with a visible line of stitches. Here’s what I did to make my scarf:

Step 1: Fold fabric in half lengthwise (a hot dog fold . . . is that how your teachers taught you in elementary school?), pin along the long edge, and sew. If applicable, make sure you sew the right sides of the fabric together . . . I couldn’t tell if my fabric had a right or wrong side, so I didn’t worry about it.

DSC_0444Step 2: Turn this tube right side out (so the raw edge and seam will now be on the inside of the tube and the right side of the fabric, if you have one, will be on the outside) and fold one end of the tube’s raw edges to the inside. You can iron this fold if you aren’t feeling lazy. You guessed it . . . I was too lazy. $3 project, people. Minimal effort.

DSC_0447

Step 3: Making sure your fabric tube is flat and not twisted (unless you want your scarf to have a twist, that might look neat!), bring the other raw open end of the tube up and tuck it inside of  the folded end from the previous step. Pin the layers together, making sure you’re catching both folded layers and the inner tucked layers, and sew ‘er shut (this is your one visible stitch line).

DSC_0448 DSC_0449 Boom. (Would you be surprised if you knew I really say “boom” when I finish quick projects? I think that just bumped me up by about 10 notches on the cool scale.) Infinity scarfed. I think it looks rather fetching looped twice around the neck for a close fit:DSC_0459

But I also feel significantly more stylish than I really am wearing it long and belted over a simple sweater:

DSC_0450 Low cost and even lower effort for a chic, stylish animal print scarf. I like it!

Thursday, January 26, 2012

My Sidewalk Shawl

I wrote a bit ago about the winter ripple blanket I crocheted during my crochet break over Christmas. A break from crocheting during which I think I crocheted more than I ever have before. It was delightful! Well, this little number was another project I worked on during that crochet break  (and—dare I say it?—it might be my absolute favorite thing I have ever created):
DSC_0343-2 Feast your eyes upon the Sidewalk Shawl, possibly the most beautiful pattern I’ve ever seen. I spotted the pattern (which is free, by the way!) a few weeks ago and drooled over the gorgeous picture for a few days before giving in and hooking it up. I was a tad hesitant to make this—it looked quite a bit more complicated than anything I’ve made before, and I didn’t want to screw it up. But I can only resist the crochet temptation for so long. And I’m glad I gave in because IT. IS. GLORIOUS.
DSC_0350-1 Look at that beautiful piece!  I’m not going to even pretend to be all humble and no-big-deal about this shawl . . . I just stare at it every day, and stroke it lovingly, and tell it how pretty it is. Kind of like I do with Forrest, only a little more tender.
DSC_0347-2 Part of me feels stylish when I wear it (after all, the girl modeling it in the pattern picture looks pretty chic, which is why I didn’t dare stray from the colors in the picture), and part of me wonders if shawls are fashionable. Or have ever been fashionable. The only time I ever see them worn is in old Western movies, by farmhouse wives while they churn butter or help birth calves. But when my fashion icon, Kate Middleton, was snapped wearing a shawl at a grocery store, I was sold. If it’s good enough for Kate, it’s good enough for me. Now if only I can get up the courage to wear the adorable little British hats and fascinators.
DSC_0348-2 Some thoughts on the pattern: this is certainly the prettiest, most intricate thing I’ve ever crocheted. But that comes at a price . . . it was also definitely the most complicated pattern I’ve ever followed. It wasn’t exactly hard, but it did require a lot of attention and counting. Usually, I watch a movie while I crochet, or listen to a book on tape . . . definitely not an option for this pattern. I had to sit in complete silence, by myself, with zero distractions so I could focus on the pattern completely. And you know how, with most patterns, you’ve got it memorized after a few rows and only refer to the pattern to make sure you’re still on track? Or you can at least recognize the repeats in the pattern and predict what’s coming next? I never really felt like I could guess where this one was going—only in the last one  or two pattern repeats did I start thinking, “Oh, right! This makes sense! I remember doing this before!” Up until the very end of the project, every row felt like a surprise (hence the need for total silence while I worked on it). Again, it wasn’t exactly a difficult pattern . . . it just required more focus and attention than most of the patterns I’ve used. And I’m thrilled with the result—I seriously keep looking at it and thinking, “I can’t believe I made something so beautiful!” Just like with Forrest . . . this is my shawl baby. Oh, how I love my sweet shawl baby.
(I used about 3 or 4 skeins of Caron Simply Soft in in Grey Heather to make my Sidewalk Shawl.)
(Also, I’ve been playing along with Freckles In April’s outfit challenge this week, and I’ll be linking this post up to her blog!)
Related Posts Plugin for WordPress, Blogger...

