Maybe Matilda: crochet in the round
Showing posts with label crochet in the round. Show all posts

Thursday, November 13, 2014

Puffed Flower Square

Today’s my second go at sharing a granny square for the Blog Hop Crochet Along! It’s been so fun to see all the bloggers’ unique designs, and I’ve loved following along in the facebook group to see all the participants’ take on the patterns. Thanks to all who are joining in—it’s so fun to see everyone’s work!

I’m calling today’s pattern the Puffed Flower Square. I love the smooshy puffy flower in the center of all that traditional granny square goodness.

Puffed Flower Granny Square Pattern // www.maybematilda.com

But before we get to the pattern, here’s the recap on the crochet along so far:


Today I am excited to be joining The Blog Hop Crochet Along! Nine other bloggers and I are teaming up to a new afghan square pattern every day for a month. Crochet along with us and you will have a gorgeous new afghan just in time for the holiday season!

Here's how it is going to work:

  • Every day (M-F) a new square pattern will be posted on one of our ten blogs. 
  • You can join in the fun by crocheting each day's square on that day whenever you have time.
  • Share your progress and post photos of your squares in our facebook group.
  • By the end of the Crochet Along you will have twenty 12" squares all ready to be pieced together into a beautiful afghan just in time for the holiday season.
  • Finally, we will be hosting some fabulous giveaways! You could win Lion Brand yarn to make your own afghan, $100 CASH money, OR our COMPLETED AFGHAN! That's right, we are going to be piecing all of our squares together and shipping an afghan out to one very lucky winner.


Hopeful Honey - Persia Lou - Little Monkeys Crochet 

Fiber Flux - Loopsan One Dog Woof - Maybe Matilda

Dream a Little Bigger - Whistle & Ivy  - Gleeful Things 

We would love if you crocheted along with us. If you'd like to add a button to your blog or website you can grab this one here:
The Blog Hop Crochet Along

Today I am sharing the Puffed Flower Square. You can find links to all the other patterns at the end of this post. The links will be updated daily!

{Pattern Goes Here}

[Blogger InLinkz script]

[Wordpress InLinkz script]

Puffed Flower Granny Square Pattern // www.maybematilda.com


For my square today, I used an I hook, but feel free to use another size if you prefer, and just add or eliminate rows to end up with a 12” square.


Puffed Flower Square


Beg puff st: (yo, insert hook in st, draw up a loop) 2 times, yo, pull through all loops on hook.


Puff st: (yo, insert hook in st, draw up a loop) 3 times, yo, pull through all loops on hook.


1: Start with a magic ring; work 12 sc into ring. Join with sl st to first sc and pull yarn tail to close center. Change colors if desired.


2: Ch 3 (counts as first dc), beg puff st, ch 1, *puff st, ch 1*, repeat from * to * around, sl st to starting ch to join. Fasten off, join new color in any ch 1 space. (12 puffs, 12 ch 1 spaces)


3: Ch 3, beg puff st in ch space from previous round, ch 2, *puff st, ch 2* around in each ch space from previous round, sl st to starting ch to join. Fasten off, join new color in any ch space. (12 puffs, 12 ch 2 spaces)


4: Ch 3, beg puff st in ch space from previous round, ch 3, *puff st, ch 3* around in each ch space from previous round, sl st to starting ch to join. Fasten off, join new color in any ch space.


5: (Ch 3, dc 2, ch 3, dc 3) all in same space; this creates the first corner. *Sk puff st, dc 3 in ch sp, sk puff st, dc 3 in ch sp, sk puff st, (dc 3, ch 3, dc 3) in ch sp.* Repeat around, sl st to starting ch to join.


6-11: Sl st to ch 3 in corner of previous round, then (ch 3, dc 2, ch 3, dc 3) in corner of previous round. Work 3 dc in spaces between each (dc 3) of previous round, and (dc 3, ch 3, dc 3) in each corner space of previous round. Change colors whenever desired, and if necessary, add or eliminate rows to reach 12”.



Friday, June 21, 2013

Striped Crochet Giraffe

So I’ve been brainstorming and collecting ideas for our soon-to-be baby girl’s bedroom, which naturally means I have a new crochet project to share. The first step in planning a new room, as any professional will tell you, is to stop planning the new room and crochet something to go inside it instead.

As I’ve been browsing nursery pictures to figure out the look I want to go for in her bedroom, I keep gravitating to the same sort of style: very simple, very clean-looking white/gray spaces that just have little bursts of color tossed in with wall art/pillows/accessories. And since that room is still packed to the gills and ready to puke forth its mess of craft supplies and discarded projects and miscellaneous crap that gets tossed in when we’re too lazy to find real homes for it, I figured I’d start small (and start far, far away from that scary messy room) with a crochet project that fits into my ‘pops of color’ bedroom plan.

Stripey Crochet Giraffe by maybe matilda

How cute is that? I used this free pattern HERE for my little giraffe, and figured this was a good opportunity to use up some yarn I already have rather than go out and shop for something new. To tell you the truth, mixing colors like this scares me. I don’t mix colors. But I decided to go big for this little project, and I think she’ll make a great pop of color perched on a dresser or bookshelf in the baby’s room.

Crochet Giraffe by maybe matilda

I thought there were a few confusing spots in the pattern (rows that didn’t add up to the right stitch count, or notes added in later that I wasn’t sure how to interpret), but it seems to have worked out (and sadly, if any of you have questions, I’m afraid I’m not going to remember what I did). I need to work on crocheting as tightly as humanly possible in amigurumi—there are a few spots on this giraffe that look like they’re stretched mighty thin over the stuffing, but it is murder on the hands to crochet that tightly. I need a massage, stat.

DSC_0040

And amidst all this colorful, baby-hormone-ridden cuteness, let’s not forget the little man of the house and the reality check that his PMS mood swings always bring about. He literally jumped in front of the camera for the picture above, and when I suggested he go stand by the giraffe for more pictures, he trotted over excitedly ("Yeah! Forry pitcho!”) aaaaaaaaaand:

DSC_0042

. . . promptly changed his mind about the whole idea. At least this gives you a sense of scale on the giraffe.

Also, this real conversation really happened when he first saw the giraffe.

Forrest: Is nice goat. Pet the goat.

Me: It’s not a goat.

F: Oh. Nice moose. Pet the moose.

DSC_0047

Never a dull moment with this one. Let’s hope little missy is a bit more even-tempered.

Monday, January 21, 2013

Crochet Valentine Hearts Photo Tutorial

I am a woman of my word. I promised a step-by-step photo tutorial for these little heart cuties, and I am here. to. DELIVER!

Crochet Valentine Hearts with step by step photos and instructions

(Hey look, I did that blogger thing where I made a nice pinnable image for you!)

These itty bitties are so leetle and so sweet and so quick and simple. Now, first things first: this is not my own pattern. I found the pattern HERE at Heloise V. This tutorial is to help you out in making the smallest heart pattern on her site. She also has instructions for medium and large adaptations, as well as a pattern for adorable little applique flowers, so hop over and check out her fun site! The size variations in my photos are due to different hook sizes, but all 3 were made using the same, smallest heart pattern.

Second things second: although this isn’t a difficult crochet pattern, you’ll of course have an easier time if you are already familiar with crochet basics. Visit my Crochet tab at the top of the page to find some basic crochet tutorials and step-by-steps to help you learn. If you get stuck at any point, just look up the stitch you’re stuck on in google, and you’ll find a zillion and one videos to help you out.

Crochet Valentine Hearts Tutorial

Aren’t they darling? I’m smitten.

You can use any old scrap yarn you have lying around, and any size hook that is appropriate for your yarn (if you’re using worsted weight yarn, anywhere from an F through a K should work nicely). I used a G hook for the tiniest pink heart in my photos (it’s about an inch and a half across), an I hook for the medium size bright pink one, and a K hook for the largest maroon heart. They were all made with the same pattern, all are made of worsted weight yarn, and the only thing that I changed from one heart to the next was the hook size, so play around and experiment with different hook sizes to find a size you love!

You’ll need to start with a magic circle. To be honest, I find this tough to capture in pictures and to explain, so please refer to this tutorial and this video if you need help.

Make your magic circle and chain 3.

Hearts tutorial by Maybe Matilda

Now you’re going to work 3 treble (or triple) crochets into the circle. Yarn over your hook twice:

Crochet heart step-by-step

Then insert your hook into the circle and pull up a loop, then yarn over again:

Photo Tutorial for Crochet Hearts

You’ll now have 4 loops (plus the yarn over) on your hook (as pictured above). Pull the yarn over through just the first two loops on your hook, then yarn over again:

Photo Tutorial for Crochet Hearts from Maybe Matilda

You’ll now have 3 loops on your hook, plus the yarn over. Pull the yarn over through just the first two loops again, exactly as you did in the previous step. Yarn over again:

How to crochet a heart

You’ll now have two loops left on your hook, plus the yarn over. Can you guess what’s coming next? I bet so. Pull the yarn over through the two remaining loops on your hook.

How to crochet hearts

There’s your first treble crochet! Now just repeat those steps for two more treble crochets:

How to crochet Valentine's Hearts

By now, you should have your chain 3 on the right, then your three treble crochets, as pictured above.

Next up, we need to work 3 double crochets. Yarn over your hook just once:

Crochet Hearts step by step

Insert your hook into the circle, pull up a loop, and yarn over again:

Crochet a heart photo tutorial

Pull the yarn over through the first two loops on the hook, and yarn over again:

Crochet instructions to make a heart

Then pull the yarn over through the two remaining loops on your hook:

Step by step photos to crochet heart

There’s your double crochet! Now work two more double crochets.

Crochet Heart Pattern and Tutorial

From right to left in the picture above, you should have your chain 3, 3 treble crochets, and 3 double crochets. (My chain 3 is kind of hiding my first treble crochet in that picture. Don’t worry about it, it’s in there, I promise.)

Now chain 1 by yarning over the hook and pulling it straight through the loop on your hook.

Step by Step Heart Tutorial

Work one treble crochet into the circle. Refer to the pictures up top if you don’t remember how. This treble will be the ‘tip’ of your heart.

Step by Step Heart Tutorial

Chain 1 again.

Step by Step Heart Tutorial

Now you’re basically going to repeat the first half of the pattern, backwards, to form the second half of the heart. First up is 3 double crochets. Refer to the double crochet pictures above if you need help.

Step by Step Heart Tutorial

Then you’ve got 3 more treble crochets. You’re probably a pro at these by now.

How to make crocheted hearts

Now just chain 2:

How to make crocheted Valentine hearts

Then slip stitch into the circle to finish it up. Just insert your hook into the circle, pull up a loop, and pull the loop straight through the loop already on your hook.

Make a Crochet Valentine Heart

And you’ve got your little heart! Mostly!

Step by step photo instructions to crochet hearts

See the loose ‘tail’ yarn at the top? Pulling that will tighten your heart and cinch it closed (the magical part of the magic circle—it disappears like magic!). Give it a good firm pull until your heart is completely closed in the center.

How to make cute little crochet Valentine Hearts

Ah, that’s more like it. Fasten off your yarn by pulling a loop through the loop on your hook (just like working a chain), snipping your yarn a few inches away from the hook, and pulling the loop completely through. Tighten it up and weave in the ends, and you’re done!

In case you want to see all the stitches labeled on the heart, enjoy this pictographic brilliance:

Step by Step Crochet Hearts from Maybe Matilda

So, to sum up, the hearts are simply made by . . .

Magic circle, ch 3, 3 trc, 3 dc, ch 1, 1 trc, ch 1, 3 dc, 3 trc, ch2, sl st.

(trc = treble crochet; dc = double crochet; ch = chain; sl st = slip stitch)

Ta da!

Crochet Hearts Photo Tutorial

Fun, huh? Once you’re comfortable with the stitches, you’ll be able to whip these up in no time at all.

I used these hearts as little ornaments for a Valentine’s ‘tree’ in this post, and I have another fun project incorporating them that I’ll share in a bit.

Hope you enjoy! If you have any questions, leave them in the comments and I’ll do my best to answer them for you.

Monday, August 20, 2012

Bug Buddies Crochet Finger Puppets

It feels like it’s been forever since I’ve crocheted anything . . . I had my etsy shop closed for quite a few weeks while we moved and worked on our new house, and heaven knows I don’t crochet for myself often, so it was nice to get some crochet motivation in the form of an invite to try out Lion Brand Yarn’s new line, Bonbons: sets of adorable little mini-skeins of sport weight yarn. I think I literally “awwwww!”ed when I opened the box and saw the cute little skeins. (Why is everything cute when it’s mini-sized? Bonbons are freaking adorable, before you even make anything.)

I haven’t worked much with sport weight yarns before, but I loved the colors and feel of the Bonbons. I wanted to make something bright and happy and fun, so I came up with these little bug buddies for a certain little 2-year old I know who is currently obsessed with finger puppets (although his Grumplestiltskin pictures as the end of this post would lead you to believe otherwise):

DSC_0052

Aren’t they cute?! I hadn’t originally planned on making them bugs, actually, but after embroidering their faces, it seemed pretty obvious that they needed antennae, too. So bugs they are, I guess.

DSC_0047

If you want to make some bug buddies finger puppets, feel free to use the pattern I came up with below.

DSC_0050

Bug Buddies Finger Puppets

(This pattern will make small, kid-sized finger puppets. For larger, adult size finger puppets, move up a hook size and/or start with 10-12 stitches and continue as follows.)

Use sport weight yarn and an E hook.

Create a magic circle, sc 8 into circle. Don’t join rounds, just work in a continuous circle.

Row 1: Sc around (8)

Row 2: 2sc in 1st st, sc 3, 2sc in next st, sc 3 (10)

Rows 3-5: Sc around (10)

Rows 6-13: (switch colors now if you want to make a striped body) Sc around, switching colors at the start of each new row. Don’t cut the previous color, just continue crocheting and pick it up again when you switch.

Continue until desired length is reached. 13 rows was plenty for my 2-year old’s fingers. 

Sl st to next st and fasten off, weave in ends.

Use black yarn/thread to embroider eyes (I made French knots for the eyes) and antennae, and red/pink for a mouth.

Hope you enjoy! I tried to get pictures of Forrest playing with his new finger puppets and he obliged with his usual level of enthusiasm:

DSC_0044

DSC_0042

Such a happy little ray of sunshine. Oh well.

Friday, June 1, 2012

My Granny Transformation is Complete

I think I’m aging far too quickly. I’ve been slowly morphing into a granny for years  (far more quickly than most people seem to), but things are speeding up lately. My gray hairs are multiplying at an alarming rate, my hobbies are increasingly grannyish (baking homemade bread, reading [gasp] non-fiction, and of course, crocheting like a fiend), and I’m pretty sure I’m getting arthritis.

But one old lady thing I swore I’d never do was crochet a granny square blanket. Before I learned to crochet, I thought granny squares were the ultimate tacky old lady craft. I had only ever seen them done in a distinctively grandma fashion (although neither of my own grandmas crochet, as far as I know, so I’m not sure who I’m basing this on): bold, harsh, non-matching colors, cheap and scratchy yarns, washed and used hundreds of times for decades until the blanket feels like cardboard. I hated them and said I’d never sink to a granny square level.

I hereby repent of my granny square prejudice. Once I started to crochet, I noticed that there are so many gorgeous—truly stunning—granny square blankets out there. They weren’t all the mismatched, wonky-looking, tired and scratchy pieces I’d thought. As soon as I identified a theme in the granny square blankets I loved, I was itching to make my own. My favorite granny square blankets have plenty of white to tone down all the color (like this one), have something of a color theme (like this one), and look very orderly despite the chaos that is a blanket made of a zillion different colors (like this one).

So I tried my hand at the infamous granny square blanket, and I have to say, my inner granny is pleased. She’s already plotting for more. I kind of think she might be evil. I mean, she is kind of taking over everything around here.

DSC_0026

I followed this pattern for the squares—I love that they look almost like little flowers, so the entire blanket ends up reminding me of a flower garden. That pattern was pretty straightforward and easy to follow, and I had a fun time crocheting up stacks of little granny square blocks.

DSC_0025

I used all yarns from my stash to make this blanket, but I tried to stick to a color theme. It’s definitely a loose theme, and all I kept in mind when choosing the colors, really, was that they be girly. I used mostly pinks, yellows, purples, and blues, and even the not-so-girly colors like gray and sky blue and green came together to make a decidedly girly blanket.

DSC_0030

Predictably, the absolute worst part of making this blanket was joining the squares. Is there anything worse than being only one step away from finishing a blanket, but that step is an interminably long, mind-numbingly dull step such as whipstitching squares together? (Answer: yes, there are a million worse things. Sheesh, white girl problems.)

DSC_0033

I finished it off with a cute little scalloped border. And I love it. I love the whole thing. It took a few weeks to put together—it was really quite a lot of work between making all the squares, switching colors hundreds of times, weaving in countless little yarn tails, sewing all those squares together—but I think it is so fun and spunky and sweet and charming. And, of course, hopelessly old-fashioned and granny-ish. In a good way.

This one’s headed over to the shop, so pop in to check it out if you know a little lady who could use a sweet granny square flower garden blanket.

Monday, January 16, 2012

Winter Ripple Crochet Baby Blanket

For a few weeks around Christmas, I put my etsy shop on vacation so I could  take a little break from the constant crocheting and just enjoy the holidays. And what did I do with those weeks of vacation, you wonder? I crocheted. I crocheted a lot.
DSC_0542
I think it’s probably a good sign when the hobby of choice that I spend my “vacation” time on is also the work I’m taking a vacation from. Ideal, isn’t it? I used that little shop break as a chance to work on a few projects I’d wanted to begin but didn’t have the time for during a busy Christmas season in my shop. I’ve wanted to try a round blanket for a while (inspired once again by the talented Casey and her beautiful crochet—she makes such fun ripple blankets), and I found this pattern, which I used (with a few variations) to make this cute baby blanket.
DSC_0543
I was so glad it snowed before I took these pictures—I have a feeling this blanket just wouldn’t look right photographed against bright leaves and grass. Doesn’t it look so wintry? I crocheted it in a really lovely, comfortable off-white yarn, and I love the unique style of this blanket.
DSC_0545
And, as always, bobbles are a delight on baby blankets. Little ones love to play with them, and they add such a fun detail. (Even just looking at those neat, tidy rows of stitches makes me feel calm and happy . . . tell me I’m not the only crazy lady who is comforted by rows of crochet stitches . . . )
DSC_0548
The pattern designer requests that these blankets not be sold in online shops (a detail I really wish I’d noticed before I started working on this blanket), so for now, this one’s adding a little granny chic style to the sofa in my living room. I kind of like it there, but I think it’ll eventually head to the Bungalow Boutique in Heber to see if we can find it a new home.
DSC_0550 If you’re interested in it, please email and let me know!maybematildaquilts[at]gmail[dot]com). I’d love for it to head to your house to cuddle a sweet baby or add some fun style to a room! It's been spoken for! But if you'd like me to make another one just for you, let me know and I'll get busy. maybematildaquilts(at)gmail(dot)com

Tuesday, January 3, 2012

Crochet Raccoon Scarf (for him)

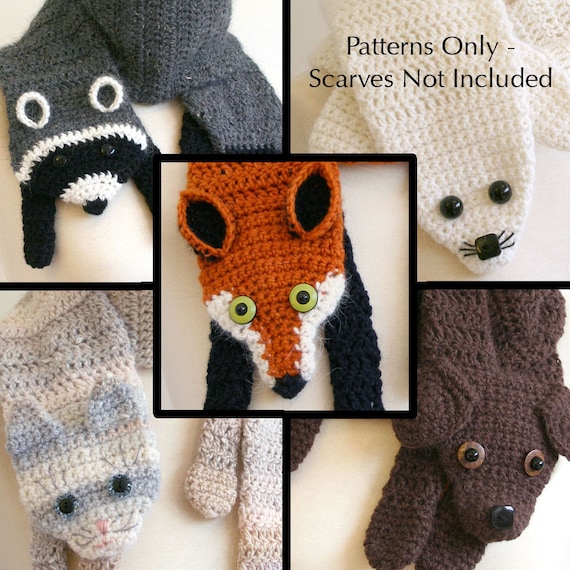
I still have a few handmade Christmas gifts (both given and received) to show you, and I’m particularly excited about this one. It was one of Jeff’s presents that I was most excited to make and show him, and that I fought hard to get him to open early. (I failed. I spend most of the month of December trying to convince Jeff that we should open all our presents right now, but it never works.) You might recognize Bees Knees Knitting as one of the sponsors of our crochet along this past fall—Jenny creates amazingly creative and adorable crochet animal scarf patterns, like these:

Jeff and I loved them, and he especially got a kick out of the raccoon scarf (top left in the picture above). I had my doubts about if he’d actually wear it, but hey, what is Christmas about if not giving gifts to loved ones that they can’t return and might never use?

DSC_0528

Awwwww! How sweet is that little fella? He was really fun to make, and I was able to make him entirely out of yarn I already had, so it was practically free to make (minus the cost of the pattern, of course). Speaking of the pattern, I give it two thumbs up—easy to understand, clear instructions with a helpful diagram to show placement and sewing instructions for the ears and legs. I made a few minor changes to accommodate my own laziness (like working in a continuous spiral instead of individual circular rows), and it came out swimmingly.

DSC_0530 Cute as that scarf is, it hasn’t been worn outside yet, which (I’m sure) can only be blamed on the 50+ degree weather we’ve been enjoying lately. But I can hardly complain about that! I’ll gladly take 50 degree weather in January over my lovingly handmade gifts being used. Especially since I spent the last three winters in Iowa, which could also be referred to as The American Arctic, That Place With The Same Weather As The Highest Point On The Himalayas,  Little Siberia, or When Hell Freezes Over It Will Feel Just Like This Place. I think I’ve earned a 50 degree winter.

Related Posts Plugin for WordPress, Blogger...