Maybe Matilda: boy
Showing posts with label boy. Show all posts

Thursday, June 13, 2013

Quick + Cheap Graphic Canvas Art

I’m traveling outside my box today . . . far outside my box. So far from my warm, comfy box. Hold on to your hats, folks, there is no yarn in this project.

I tried my hand yesterday at making some artwork for Forrest’s bedroom (which you can see HERE). For the most part, I’m pleased with his bedroom and feel like it’s more or less completed (at least, it’s completed enough for my minimalist decorating taste), but there was one obvious area that I’ve kind of ignored . . . the space above his dresser:

DSC_0044

I hung that mirror shortly after we moved into our house almost a year ago, but never really decided what else to do with that area. I had originally thought it would be cute to collect a few vintage toys to display on/around the mirror, but I only ever found one old toy that I liked, and Forrest lost it within like 10 minutes of purchase, so that didn’t pan out. But posting that picture above must have been the kick in the pants to finally make that spot look a little more on purpose.

Mirror Vignette with Quick DIY Canvas Art

(You are so welcome for the attention to detail I put into my photography and blog posts—the mirror still has the sticker tag on it [I’ve owned it for at least 4 years], and who can remember the last time it was washed? Not this perfectionistic Susie Homemaker.)

Sticker tags and finger smudges aside, that’s much cuter, isn’t it? The little ‘Say Your Prayers’ sign was a 50 cent thrift store purchase quite a few months back that I had never bothered to hang, so it took all of 5 minutes (5 precious minutes procrastinated for 6+ months) to hang it along with Forrest’s cute baby picture. But that left the spot to the left of the mirror empty, and I flipped through my Pinterest inspiration pics and found two cute canvas projects that I thought would look great and (hopefully!) be relatively easy to make: this cute wall art from The Embellished Nest, and this great herringbone canvas art from View Along The Way. I decided to combine the two—I loved the graphic layout of The Embellished Nest’s project, but preferred the painting style from View Along the Way’s art, so I picked my favorite parts of each project and went to work.

Cute Canvas Art for under $10

It came out far from perfect, but it’s good enough for me. I think it’s a cute little piece, and it was actually kind of fun to put together despite my serious lack of talent in the artwork/painting arena.

Here’s how I made this little canvas art, quick and painless, for under $10:

Graphic Canvas Art DIY

I bought:

- a 3-pack of 8 x 10” flat canvas panels from Walmart ($3.97 for the pack of 3)

- a few small acrylic paint bottles (57 – 97 cents each)

- package of foam brushes (I think $1 for 4 brushes?)

I used masking tape to lay out the design—two long vertical strips first, followed by smaller zig-zag strips. Measuring would have been smart; I just eyeballed it.

DIY Graphic Canvas Art

Make sure the edges of your masking tape are pressed down tightly. Since I peeled up and rearranged mine a few times, it probably wasn’t pressed down tightly enough, and I got some leakage underneath the paint. Part of the problem was that I initially tried to go for the ‘drippy’ paint look from View Along the Way’s Herringbone Art, and although I love how it looks on hers, it wasn’t working for me and I think the added water helped the paint work its way under my tape. Whoops!

Start adding your paint, blending each color with the next as you work your way down. I can’t say there’s a lot of technique here . . . I just started with my first color and painted a few horizontal strokes across, then when I was ready to fade into the next color, dipped my brush into the next color without cleaning off the first color so they blended together on the canvas. I tried to add some red at the bottom of the canvas to tie into the sign and photo, and got a swift elementary school art class reminder of what blue + red equals. Had to hide that with more blue; purple is not part of this room’s color scheme.

DIY Canvas Art Tutorial

I peeled off my tape while it was still wet, then waited until it was dry to go back with white paint and clean up some of the taped-off areas that the colors had leached onto under the tape. Once it was completely dry, I used a Command strip to hang it.

Quick and Easy DIY Canvas Art Tutorial

And there it is! A quick, simple, fun little painting project to fill that little space. I think it turned out cute, and now I have two extra canvases to play with. Don’t get too excited—very limited art skills over here.

Wednesday, February 13, 2013

Crochet Dog Stuffies for Valentine’s Day

I’m not all that into Valentine’s Day. I mean, it’s nice, and I always appreciate getting a card or candy or flowers or something, but my husband and I don’t typically make a big deal out of it. We went to Chili’s last weekend . . . that’ll probably count as our Valentine’s date. Chili’s! The ribs! The romance!

But now that we have this little boogerface stinking up our house, I kind of want to make it a fun day for him. So we’ll be spending today baking up Valentine’s goodies, and I can’t wait to give him his present tomorrow . . .

Crochet Amigurumi Dog by maybe matilda

A little crochet puppy! He’s cute, huh? The sweater gets me. It gets me every time I look at him. Forrest is pretty into puppies (and kitties aka ‘titties’; yes, that’s right, titties) at the moment—his new favorite game is coming up to me while I’m on the couch, meowing or barking at me, then saying, “gent-oh? gent-oh?” (which is how we try to remind him to pet nicely, I think he thinks ‘gentle’ just means ‘pet’) and waiting to be petted or have his belly rubbed. It’s pretty sweet. I hope he likes his little puppy dog.

And I couldn’t resist showing him off to my sister ahead of time, and she liked him a lot, too, so guess what she is also getting tomorrow?

Girly Puppy Amigurumi by maybe matilda

The girly version! I like this one even better than the one I made for my son. I like the colors better, and I did a better job with placing the facial features. I almost don’t want to give her away.

Amigurumi Dogs

I used the Amigurumi Dog pattern from Lion Brand Yarn, and they were a cinch to work up. Relatively quick (although making all the separate pieces is kind of slow and tedious, I’ll admit), but overall a very simple pattern. I wasn’t crazy about the ears in the pattern, so I went for a more folded-over look instead. I like how they turned out.

Crochet Puppy by maybe matilda

A moody close-up. She’s pondering the state of the economy, or maybe thinking about something deep like . . . I don’t know . . . the poetry of . . . Ginsberg? (The only name that comes to mind . . . it’s early, I’m still waking up, cut me a break.)

I tossed up some listings in my shop for custom versions of these little puppies—you can find the boy puppy HERE and the lady puppy HERE, and message me for a discount if you plan to buy two or more! As always, feel free to play around the colors when you order . . . I’ve got a nice big yarn stash, just begging to be used in whatever creative color combos you come up with.

Did you make any Valentine’s gifts this year?

Monday, January 7, 2013

Adding Long Sleeves to Short Sleeve Shirts

I feel like I should always add a disclaimer to my sewing posts: I’m a lazy seamstress. I have no doubt whatsoever that there are nicer, neater, more professional ways of getting this done. I love sewing, but I enjoy the finished products more than the process, so I generally hurry through and cut corners and take the easy way out instead of doing things ‘right.’ So, now that you know I’m something of a cheater and there are definitely more professional-looking ways to get this same job done, let’s move along.

How to add long sleeves to short-sleeved t-shirts!

I like the long-sleeves-under-a-short-sleeve-shirt look, and I like that adding a long sleeve gets you more bang for your buck by carrying a summer top into fall and winter. So when I was offered some tops from T-shirts.com, I snatched up these adorable short-sleeve shirts for Forrest, as well as a plain adult tee to use for sleeve material. Here’s how I used a plain t-shirt to add a long sleeve to a short sleeve tee.

How to use an old t-shirt to add long sleeves to short-sleeve tees

I started by using a long-sleeve shirt that fits Forrest well as a pattern piece. I lined up the outer edge of the sleeve along the side seam of the large adult shirt, with the end of the sleeve hitting about 1/2” away from the bottom hem of the shirt (by using the side seam and hem, you won’t have to do much sewing/hemming on your long sleeve—score!). I left that extra 1/2” at the bottom hem to allow for growth in the coming months. I laid the new short-sleeved shirt on top of the long-sleeved one with the shoulder seams aligned so I would know how far ‘up’ to cut the new sleeve.

Adding long sleeves to short-sleeve tee

Then I just cut through both layers of the gray t-shirt at once, staying about 1/2” away from the long-sleeve pattern piece. I stopped cutting about 1/2” past the hem of the short sleeve, then moved the two top shirts out of the way and continued in a straight line out to the shirt’s side seam.

How to sew long sleeves onto short sleeve shirt

Turn that piece inside out and pin the long cut edge closed, then sew it shut with a straight stitch. You’ll end up with a tube.

Sewing long sleeve

Time to attach the new sleeve to the existing one. Leaving the long sleeve inside out, slip it inside the existing sleeve (the shirt should be right side out) with the raw edge lining up with the existing sleeve’s hem. I took this picture so you cold see how the sleeve should be placed . . . but obviously, inside the shirt. Make sure the side seams of the sleeve are lined up with the existing sleeve’s seam (should be in the armpit), and pin it around.

Sewing long sleeve into short-sleeved top

Then, slowly and carefully, sew around the sleeve, staying close to the existing hem’s stitch line. It’ll be a little tricky to navigate around the little sleeve opening, but you can do it. Just work slowly and make sure to keep the opposite side of the sleeve out of the way so you don’t sew through it by mistake.

Sew long sleeve to short-sleeve top

Backstitch at the start and end, trim your threads, and pull the sleeve right side out. Tada! Long sleeved! If you’d like, go back in and trim the excess fabric away at the new seam around the sleeve so you don’t have any extra bulk. I’ve seen some tutorials where you sew in the new sleeve at the shoulder so you don’t have to worry about ever seeing any extra fabric around the seam. That is probably a better idea, but I don’t know . . . this just seemed much faster and simpler to me, so I did it this way. Like I said, I’m a lazy seamstress.

Add long sleeves to short-sleeve shirt

True to the shirt’s name, my little grumposaur had a very hard time modeling this one for me. These pictures were, unfortunately, the best we could get. At least we tried.

How to add long sleeves to a short-sleeved shirt

(Let’s pretend that’s a coy pose and not a shoveling of bribery chocolate chips into his gullet.)

DIY add long sleeves to short sleeve shirt

I love how it turned out! Now he’s got a cute new winter shirt and, if I want to, I can always just pull that seam out and remove the long sleeves in the spring. This was very quick and easy to do, and a great way to extend the life of his seasonal wardrobe.

(I was not compensated for this post, but I did receive the shirts free from T-shirts.com. The ideas/opinions/writing/everything-but-the-t-shirts-themselves are mine.)

I’m sharing this project at Craft-o-Maniac, The Girl Creative, Sew Can Do, Mommy by Day Crafter by Night, Sugar Bee Crafts, and Tip Junkie.

Monday, February 27, 2012

30 Minute Baby Lounge Pants (from an old t-shirt)

I’ve re-fallen in love with sewing lately. It was hard, for a while, to get excited to sew when that meant lugging out a clunky sewing machine that was so tired and sick and senile it could hardly get through 2 or 3 inches of stitches before getting stuck or tangled or just slipping quietly into a coma. But the new machine I got for Christmas was sent straight from heaven, and I’ve been having such a great time starting projects I’ve put off for months and rediscovering a favorite hobby that had almost been ruined by an uncooperative machine.

One quickie project I’d wanted to try for months (but wasn’t willing to sacrifice to the old demonic sewing machine) was refashioning an old long-sleeved thermal top into baby pajama pants. My sister (who graciously gives me all her old thrift-store-bound clothes so I don’t have to go buy them back from the thrift store) gave me this old shirt, thinking maybe I could use it for a project. It looked to me like it would make the perfect pair of comfy-cozy baby lounge pants. And 30 minutes later, it was a pair of comfy-cozy baby lounge pants!

pants

If you’ve seen many of my sewing projects, you know that my favorites are the super-fast, super-simple, low-fuss ones. Sure, it’s fun now and then to sew something a little more fancy and intricate, but my very favorite things to sew are almost always the simple, quick projects that don’t require much time or skill. I sure love instant gratification. Part of the reason I put this project off for so many months is because I kept trying to make it more complicated than it needed to be—first I thought I’d use the sleeves as legs, then use the body of the shirt to make a matching pajama top . . . and after months of setting it aside, I finally said to myself, “Self, cut it out. Just make it a simple project and be done with it.” I can be so wise sometimes.

Here’s what you’ll need to make a pair of cute and quick baby lounge pants:

- an old t-shirt or thermal top

- a pair of pants that fits your kid to use as a pattern piece

- elastic

- sewing machine, matching thread, etc.

1. Start by turning the top inside out and laying the pants on it, lining up the bottom of the legs with the shirt’s bottom hem (make sure the front and back layers of the shirt are even and flat). These Spongebob pants were getting a little short on Forrest, so I left a little space between the pant legs and the shirt hem to make a longer pair. (I took this picture before I realized the shirt should be inside out, so ignore that—make sure the top is turned inside out!)

DSC_0519

2. Cut around the shape of the pants, through both layers of the shirt, about 1/2” away from the pants along the legs. Cut further away from the waistband on top (about 1 to 2”) to leave room to make a casing for an elastic waistband. Don’t cut the bottom hem of the shirt off—by leaving it intact, it works as the leg hem so you won’t have to do that part yourself. Yay! (If you want wider, yoga-style pant legs, just cut further away from the pants. I was going for tight-fitting, legging-style pajama pants, so I cut the fabric pretty close to the pants.)

DSC_0523 

3. Pin the two shirt layers together along the outer and inner legs. Don’t pin along the waistband or the foot opening at the bottom.

DSC_0524

4. Sew the layers together along the outer leg and inner legs, using a 1/2” seam allowance. Don’t sew along the waistband or the bottom of the legs.

DSC_0526

5. Now we’ll make a casing for an elastic waistband. Fold the waist of the pants down about 1/2”, like so, and press: (the pants should still be inside-out, so you’re folding toward the wrong side of the fabric, or what will be the inside of the pants)

DSC_0527 . . . then fold it over again so it’s a tad bigger than the width of your elastic:

DSC_0528 And pin it in place.

6. Sew along the bottom edge of the fold:

DSC_0529 

. . . and stop sewing before you get back to where you started, so you’ll have an opening of about 2 inches that you can use to insert your elastic:

DSC_0530

7. Cut a piece of elastic so it’s about an inch smaller than your child’s waist size, and insert it through the waistband opening:

DSC_0531 And sew the two ends of the elastic together:

DSC_0532

8. Now just sew down that last inch or two of waistband that you left open, and you’re finished!

DSC_0533

You’ve got yourself a really fast, really simple pair of cute baby lounge pants.

DSC_0542 You can’t put a man in lounge pants and expect him not to lounge. Forrest watched The Cat in the Hat in total comfort, thank you very much.

DSC_0546 We take our relaxing seriously around here. Brother was completely uninterested in this photo business.

DSC_0552But I think he looks awfully cute and snuggly in his little lounge pants.

Tuesday, January 3, 2012

Crochet Raccoon Scarf (for him)

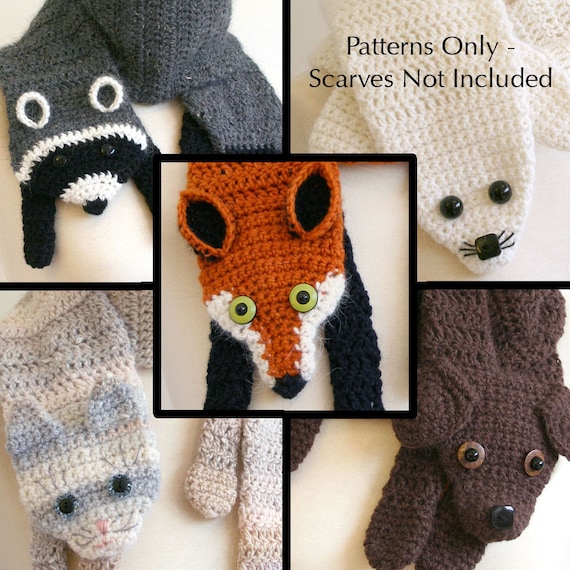
I still have a few handmade Christmas gifts (both given and received) to show you, and I’m particularly excited about this one. It was one of Jeff’s presents that I was most excited to make and show him, and that I fought hard to get him to open early. (I failed. I spend most of the month of December trying to convince Jeff that we should open all our presents right now, but it never works.) You might recognize Bees Knees Knitting as one of the sponsors of our crochet along this past fall—Jenny creates amazingly creative and adorable crochet animal scarf patterns, like these:

Jeff and I loved them, and he especially got a kick out of the raccoon scarf (top left in the picture above). I had my doubts about if he’d actually wear it, but hey, what is Christmas about if not giving gifts to loved ones that they can’t return and might never use?

DSC_0528

Awwwww! How sweet is that little fella? He was really fun to make, and I was able to make him entirely out of yarn I already had, so it was practically free to make (minus the cost of the pattern, of course). Speaking of the pattern, I give it two thumbs up—easy to understand, clear instructions with a helpful diagram to show placement and sewing instructions for the ears and legs. I made a few minor changes to accommodate my own laziness (like working in a continuous spiral instead of individual circular rows), and it came out swimmingly.

DSC_0530 Cute as that scarf is, it hasn’t been worn outside yet, which (I’m sure) can only be blamed on the 50+ degree weather we’ve been enjoying lately. But I can hardly complain about that! I’ll gladly take 50 degree weather in January over my lovingly handmade gifts being used. Especially since I spent the last three winters in Iowa, which could also be referred to as The American Arctic, That Place With The Same Weather As The Highest Point On The Himalayas,  Little Siberia, or When Hell Freezes Over It Will Feel Just Like This Place. I think I’ve earned a 50 degree winter.

Friday, December 30, 2011

Little Boy Quiet Book

Sundays in the Brown household are kind of—what’s the word I’m looking for?—torturous. That may be slightly overdramatic, but not by much. We start off the day by skipping Forrest’s first nap (he still takes two) to head to church, so right off the bat, he’s already grumpy. Toss in an hour of forced silence and lap-sitting and it is not a very fun experience.

Hopefully Sundays will go a little more smoothly from now on—my mom made Forrest the most adorable little quiet book for Christmas! I’ve thought about making one for him, but it just seemed like so much work. And, my mom informs me, it really was a ton of work. She made this one for Forrest as well as a girly version for my niece (which you can see here), and she spent weeks working on them. I think it was worth it—look how cute this book is:

DSC_0531 It buttons closed so he won’t lose all the teensy pieces, and he loves carrying it around by the handles.

The robot’s arms and legs have elastic inside so he can pull them out and let them snap back into place . . . isn’t he cute?DSC_0532 The mailbox (whose flag goes up and down, by the way) contains letters written to Forrest from both sets of grandparents, his mom and dad, and his beloved aunt Bekah (who, I am convinced, he loves more than me), and the writing page has a spot to hold a crayon and a pocket for his little notebook.DSC_0534 DSC_0535 Clearly, this page was too fun to resist—the barn holds 4 little finger puppet animals, and the kite’s puzzle pieces attach with velcro so they can be pulled off and rearranged.DSC_0533 This page is my favorite—a little car fits inside the garage and can be pulled out and zoomed around the streets. Plus, all the street signs attach with velcro and can be switched around as he learns what they mean.DSC_0536 The flower petals are also attached with velcro, so when he learns numbers he can pull them off and place them back in order. And another too-fun-to-keep-his-hands-off page . . . the toolbox also has a hammer, a screwdriver, and a saw; not pictured because they were taken to bed for naptime. Sweet dreams to Forrest in his crib right now, cuddling his hammer and  saw.DSC_0538 The last page is a tree that changes with the seasons—there are pink flowers to place on the tree in spring, these autumn leaves, and bright green leaves for summertime (which can all be stored in the grass pocket at the bottom of the tree). Plus a handy pocket on the inside back cover to catch any stray pieces.DSC_0537 Isn’t it cute? Sundays should be a little more pleasant now. If not for Forrest, at least for me—I plan to take advantage of his fun new quiet book at church, even if he doesn’t.

To see the girl version of this book with fun girly pages, check out my mom’s Bungalow Boutique blog here.

Wednesday, December 28, 2011

Christmas and a Baby Quilt

I hope you all appreciated the lack of a Merry Christmas! post here over the weekend. When I noticed that my Google Reader had over 200 new items, all with some variation of the title “Merry Christmas from the ________ Family!” I decided to refrain. You can only read so many Christmas posts, right?

I do, however, have a plethora of pictures that you probably won’t actually care to see. I’ll limit myself to just a few; feel free to skip them and leave me a “He’s adorable!” comment instead. (I bask in those comments.) First up, we have my attempt to get a picture with Forrest in front of the Christmas tree without his precious new toy telephone:

christmas picture I think that’ll be our Christmas photo montage for next year’s card. I almost wish it had been a video instead of photos so you could hear the dialogue . . . me in my super-high “everything’s  cool!” voice saying, “Forrest! Picture time! Woohoo! No more phone! Put down the phone! This is fun! Stop crying! WE’RE HAVING FUN!” almost drowned out by his whining and shouting and staunch refusal to loosen his little vice grip on the phone. I finally gave up, and good thing, too, because we did manage to get a few cute pictures together. With the phone, of course. It is an important member of this family already.DSC_0584-1 We had a lot of fun with my parents and siblings—Forrest is head over heels in love with Grandma and Papa, a love that was only reinforced when one of their gifts to him was . . . a cell phone. Notice that Papa is the one playing with the toy cell phone, and Forrest has claimed a real one. May this go down in history as The Year of the Phone.DSC_0599 And I’d like to thank Michelle of Decor and the Dog for introducing me to the Forever Lazy, which we got my brother for Christmas. I purposely did not ask his permission to post this picture, because I can’t imagine I’d get a “sure, go for it,” so just don’t tell him. Besides, everyone knows that covering up the eyes means you can’t tell who is in the picture.

DSC_0606-1I received a lot of great gifts this year (including some spectacular homemade ones that I’m excited to post about), but one gift in particular really stands out.

DSC_0595-1I COULD WEEP WITH JOY. My parents got me a Bernina. A BERNINA!!! (Here’s the best part: it was my dad’s idea. How about that!) I took it for a test run on Monday . . . this thing is incredible. Absolutely incredible. There is no clunking or grinding or whirring when I sew. It does not randomly choke or cough or spew out a wad of tangled thread. The stitches are perfectly straight, instead of each being tilted to the side, making a “straight” line look more like a lightning bolt. LIKE SOME OTHER MACHINES I USED TO KNOW. Welcome to the family, baby. I’ll love you forever.

Now that I’m saying a not-so-fond goodbye to my horrible, horrible old machine (I like to call it The Machine Who Must Not Be Named), I’d like to show you the last thing I ever sewed on it. This project, which should have taken a few hours to make, sucked up a few weeks of my life between working up the courage to break out my awful old sewing machine, picking out messed up stitches, working on my self-control to hold myself back from physically harming it, and, finally, finishing the project. Despite the awful machine, I think it came out pretty cute.

DSC_0535 A new little nephew will be making his debut this Friday, so my mom and I  worked together to  make him a quilt. It’s the first quilt I’ve made in almost a year and a half, which says something about how much I despised my old sewing machine. I had almost forgotten how much I love sewing and quilting.

The quilt is a disappearing nine patch, inspired by this one from Cluck Cluck Sew (a blog I am a huge fan of, by the way . . . her fabric and color choices are so inspiring to this neutral-loving, color-fearing girl). My sister-in-law said that she preferred fabrics and colors that didn’t look too baby-ish . . . she wanted it to look a little more grown-up, with greens and deep blues and some gray tossed in to give it a more modern look.

DSC_0540 Hopefully we gave her the look she was aiming for! This was a really fun, easy quilt to put together, made even easier by our decision to do straight line quilting instead of my personal favorite, free motion quilting, which we thought would have looked awfully busy on this style.

DSC_0537 (You know what really adds a touch of class to photographs? A trampoline in the background.)

The little fellow also received the crochet edged receiving blanket I posted about here, as well as a little owl hat that I hope will make its way into his newborn photo shoot. I was setting up the blanket and hat to take some pictures when a little helper stopped by and offered to model it for me (and by “offered to model” I mean “snatched the hat and jammed it onto his humongous head”).

DSC_0531 I think it’s just a tad small for his gigantic 1 1/2-year old noggin. But hopefully it’ll fit just right on a sweet newborn.

Related Posts Plugin for WordPress, Blogger...