Maybe Matilda: upcycle
Showing posts with label upcycle. Show all posts

Friday, June 26, 2015

DIY Curious George Shirt (Be a Good Little Monkey!)

My kids are hardcore Curious George groupies. And that's totally fine with me. I think it's such a cute show. Let's be honest, there are some kids' shows that are just awful to watch, or even to hear in the background while you're busy doing other stuff. (Don't even get me started on Sid the Science Kid.) But I think Curious George is as sweet and adorable as they come.

Forrest was the original George fan in our house, and now Darcy is crazy about, too. I love seeing them sitting side by side to watch George together. And it's not uncommon at all to hear Forrest telling Darcy to 'be a good little monkey!' (If you don't watch the show, that's what the man in the yellow hat says to George in nearly every episode.)

So I figured Curious George inspired shirts were in order for my little monkeys.

diy curious george shirt "be a good little monkey"

I'd like you to know that Darcy ate 2 and a half bananas in the 5 minutes it took to get these pictures. Girlfriend is insatiable. They were meant to be props, not snacks! She is indeed part monkey.

diy curious george shirt "be a good little monkey"

Making an important call on his banana phone, I guess? I don't even know.

diy curious george shirt "be a good little monkey"

These cute tanks were really simple to make with my Silhouette Portrait and some heat transfer vinyl.

I started with store bought shirts--I picked these up from the toddler boys' section at Walmart. Then I downloaded a font that was as close to the Curious George font as I could find. It's called 'Wrexham,' and it is free at Urban Fonts.

Step 1: Lay out your design in Silhouette Studio. Make sure to measure your shirt so you know how large to make the words. I made my first line of words just shy of 6", and the second line between 7-8" to fit Darcy's shirt (18 months). For Forrest's (4T), I stretched the text box about 1" bigger. Remember to mirror image the design so that it cuts in reverse!

Load the heat transfer vinyl into the Silhouette and start cutting. Weed out the excess vinyl after cutting is complete, and you'll be left with just the design, cut backwards, on the transfer paper, as shown in picture 1 below.

Step 2: Lay out the design on your tank. The plastic backing is slightly tacky, which is awesome since you can play with the positioning and just press it down when you're ready so it won't slip as you iron. (And you can't see it in my picture there, but the plastic backing is, in fact, still there.)
how to use heat transfer vinyl and silhouette to make your own t shirt design
 Step 3: Cover the shirt with a thin cloth and iron over it (follow the vinyl package instructions). I ironed it a little longer than called for, just to be safe.

Step 4: Slowly peel off the glossy backing to reveal your awesome completed shirt.

DIY Curious George shirts

Forrest was really excited about his shirt, and eagerly put it on before the fabric had even cooled down from being ironed. And I expected Darcy to put up a major stink about having her clothes changed (because in her world, a wardrobe change is only a baby step away from child abuse), but as soon as she realized that her little shirt matched her brother's, she was frantically clawing at the outfit she was wearing so I could take it off and put this on her. I think she might like matching him. Much tears, many sad at the end of the day when the monkey shirt had to come off so the jammies could go on.

DIY Curious George shirts

Yes, that picture's blurry and as such is probably not blog-worthy . . . but it was one of my favorites anyway.

Do you have any Curious George fans at your house, too?

Wednesday, October 22, 2014

DIY Marauder’s Map Shirt (and free Silhouette template)

You’ll never guess what audiobook I’ve been listening to this month.

Go on, guess.

Make a cute and easy Marauder's Map t-shirt with your Silhouette and this free template!

The correct answer is Harry Potter and the Prisoner of Azkaban and no one saw that coming at all.

The words needed to open the Marauder’s Map seem extremely appropriate for a certain someone I know—and I don’t want to embarrass anyone, so I won’t name any names, but it starts with a 4 and ends with an ‘est.’ This child is never not up to no good.

Make a cute and easy Marauder's Map t-shirt with your Silhouette and this free template!

I’m still learning all the ins and outs of my Silhouette Portrait, but even with my beginner-level knowledge, this was still a very quick project to put together. And I wasn’t sure how well it would turn out, so I didn’t take any progress pictures, but it’s a simple enough project that hopefully you don’t need them.

I just set up the text in Silhouette Studio how I wanted it, then grabbed a stock image of footprints online and added them to the design. After cutting the design onto vinyl, I peeled the letters out and tossed them, then used the rest as a stencil. I mixed craft paint with textile medium and sponged it onto the stencil to create the letters and footprints (with a layer of cardboard inside the shirt to make sure you don’t get paint soaking through to the back, of course). I’ve seen people do painted t-shirts without using the textile medium, so I’m assuming it holds up fine without any issues, but I’ve always used the textile medium. In my experience, it gives a very smooth finished product and holds up beautifully in the wash. After peeling up my stencil piece, I just let the shirt air dry overnight, then ironed it to set the paint (your textile medium will give instructions on how to set it).

DIY Marauder's Map t-shirt with free template for Silhouette

I’m happy to share the Silhouette Studio file here for anyone to use to make their own shirts (personal use only, please!)—I hope I’ve done this right. Please tell me if something doesn’t work properly and I’ll work on figuring it out :-)

Get the file for the template as shown HERE.

And get the file for the REVERSED template HERE.

Monday, January 7, 2013

Adding Long Sleeves to Short Sleeve Shirts

I feel like I should always add a disclaimer to my sewing posts: I’m a lazy seamstress. I have no doubt whatsoever that there are nicer, neater, more professional ways of getting this done. I love sewing, but I enjoy the finished products more than the process, so I generally hurry through and cut corners and take the easy way out instead of doing things ‘right.’ So, now that you know I’m something of a cheater and there are definitely more professional-looking ways to get this same job done, let’s move along.

How to add long sleeves to short-sleeved t-shirts!

I like the long-sleeves-under-a-short-sleeve-shirt look, and I like that adding a long sleeve gets you more bang for your buck by carrying a summer top into fall and winter. So when I was offered some tops from T-shirts.com, I snatched up these adorable short-sleeve shirts for Forrest, as well as a plain adult tee to use for sleeve material. Here’s how I used a plain t-shirt to add a long sleeve to a short sleeve tee.

How to use an old t-shirt to add long sleeves to short-sleeve tees

I started by using a long-sleeve shirt that fits Forrest well as a pattern piece. I lined up the outer edge of the sleeve along the side seam of the large adult shirt, with the end of the sleeve hitting about 1/2” away from the bottom hem of the shirt (by using the side seam and hem, you won’t have to do much sewing/hemming on your long sleeve—score!). I left that extra 1/2” at the bottom hem to allow for growth in the coming months. I laid the new short-sleeved shirt on top of the long-sleeved one with the shoulder seams aligned so I would know how far ‘up’ to cut the new sleeve.

Adding long sleeves to short-sleeve tee

Then I just cut through both layers of the gray t-shirt at once, staying about 1/2” away from the long-sleeve pattern piece. I stopped cutting about 1/2” past the hem of the short sleeve, then moved the two top shirts out of the way and continued in a straight line out to the shirt’s side seam.

How to sew long sleeves onto short sleeve shirt

Turn that piece inside out and pin the long cut edge closed, then sew it shut with a straight stitch. You’ll end up with a tube.

Sewing long sleeve

Time to attach the new sleeve to the existing one. Leaving the long sleeve inside out, slip it inside the existing sleeve (the shirt should be right side out) with the raw edge lining up with the existing sleeve’s hem. I took this picture so you cold see how the sleeve should be placed . . . but obviously, inside the shirt. Make sure the side seams of the sleeve are lined up with the existing sleeve’s seam (should be in the armpit), and pin it around.

Sewing long sleeve into short-sleeved top

Then, slowly and carefully, sew around the sleeve, staying close to the existing hem’s stitch line. It’ll be a little tricky to navigate around the little sleeve opening, but you can do it. Just work slowly and make sure to keep the opposite side of the sleeve out of the way so you don’t sew through it by mistake.

Sew long sleeve to short-sleeve top

Backstitch at the start and end, trim your threads, and pull the sleeve right side out. Tada! Long sleeved! If you’d like, go back in and trim the excess fabric away at the new seam around the sleeve so you don’t have any extra bulk. I’ve seen some tutorials where you sew in the new sleeve at the shoulder so you don’t have to worry about ever seeing any extra fabric around the seam. That is probably a better idea, but I don’t know . . . this just seemed much faster and simpler to me, so I did it this way. Like I said, I’m a lazy seamstress.

Add long sleeves to short-sleeve shirt

True to the shirt’s name, my little grumposaur had a very hard time modeling this one for me. These pictures were, unfortunately, the best we could get. At least we tried.

How to add long sleeves to a short-sleeved shirt

(Let’s pretend that’s a coy pose and not a shoveling of bribery chocolate chips into his gullet.)

DIY add long sleeves to short sleeve shirt

I love how it turned out! Now he’s got a cute new winter shirt and, if I want to, I can always just pull that seam out and remove the long sleeves in the spring. This was very quick and easy to do, and a great way to extend the life of his seasonal wardrobe.

(I was not compensated for this post, but I did receive the shirts free from T-shirts.com. The ideas/opinions/writing/everything-but-the-t-shirts-themselves are mine.)

I’m sharing this project at Craft-o-Maniac, The Girl Creative, Sew Can Do, Mommy by Day Crafter by Night, Sugar Bee Crafts, and Tip Junkie.

Monday, February 27, 2012

30 Minute Baby Lounge Pants (from an old t-shirt)

I’ve re-fallen in love with sewing lately. It was hard, for a while, to get excited to sew when that meant lugging out a clunky sewing machine that was so tired and sick and senile it could hardly get through 2 or 3 inches of stitches before getting stuck or tangled or just slipping quietly into a coma. But the new machine I got for Christmas was sent straight from heaven, and I’ve been having such a great time starting projects I’ve put off for months and rediscovering a favorite hobby that had almost been ruined by an uncooperative machine.

One quickie project I’d wanted to try for months (but wasn’t willing to sacrifice to the old demonic sewing machine) was refashioning an old long-sleeved thermal top into baby pajama pants. My sister (who graciously gives me all her old thrift-store-bound clothes so I don’t have to go buy them back from the thrift store) gave me this old shirt, thinking maybe I could use it for a project. It looked to me like it would make the perfect pair of comfy-cozy baby lounge pants. And 30 minutes later, it was a pair of comfy-cozy baby lounge pants!

pants

If you’ve seen many of my sewing projects, you know that my favorites are the super-fast, super-simple, low-fuss ones. Sure, it’s fun now and then to sew something a little more fancy and intricate, but my very favorite things to sew are almost always the simple, quick projects that don’t require much time or skill. I sure love instant gratification. Part of the reason I put this project off for so many months is because I kept trying to make it more complicated than it needed to be—first I thought I’d use the sleeves as legs, then use the body of the shirt to make a matching pajama top . . . and after months of setting it aside, I finally said to myself, “Self, cut it out. Just make it a simple project and be done with it.” I can be so wise sometimes.

Here’s what you’ll need to make a pair of cute and quick baby lounge pants:

- an old t-shirt or thermal top

- a pair of pants that fits your kid to use as a pattern piece

- elastic

- sewing machine, matching thread, etc.

1. Start by turning the top inside out and laying the pants on it, lining up the bottom of the legs with the shirt’s bottom hem (make sure the front and back layers of the shirt are even and flat). These Spongebob pants were getting a little short on Forrest, so I left a little space between the pant legs and the shirt hem to make a longer pair. (I took this picture before I realized the shirt should be inside out, so ignore that—make sure the top is turned inside out!)

DSC_0519

2. Cut around the shape of the pants, through both layers of the shirt, about 1/2” away from the pants along the legs. Cut further away from the waistband on top (about 1 to 2”) to leave room to make a casing for an elastic waistband. Don’t cut the bottom hem of the shirt off—by leaving it intact, it works as the leg hem so you won’t have to do that part yourself. Yay! (If you want wider, yoga-style pant legs, just cut further away from the pants. I was going for tight-fitting, legging-style pajama pants, so I cut the fabric pretty close to the pants.)

DSC_0523 

3. Pin the two shirt layers together along the outer and inner legs. Don’t pin along the waistband or the foot opening at the bottom.

DSC_0524

4. Sew the layers together along the outer leg and inner legs, using a 1/2” seam allowance. Don’t sew along the waistband or the bottom of the legs.

DSC_0526

5. Now we’ll make a casing for an elastic waistband. Fold the waist of the pants down about 1/2”, like so, and press: (the pants should still be inside-out, so you’re folding toward the wrong side of the fabric, or what will be the inside of the pants)

DSC_0527 . . . then fold it over again so it’s a tad bigger than the width of your elastic:

DSC_0528 And pin it in place.

6. Sew along the bottom edge of the fold:

DSC_0529 

. . . and stop sewing before you get back to where you started, so you’ll have an opening of about 2 inches that you can use to insert your elastic:

DSC_0530

7. Cut a piece of elastic so it’s about an inch smaller than your child’s waist size, and insert it through the waistband opening:

DSC_0531 And sew the two ends of the elastic together:

DSC_0532

8. Now just sew down that last inch or two of waistband that you left open, and you’re finished!

DSC_0533

You’ve got yourself a really fast, really simple pair of cute baby lounge pants.

DSC_0542 You can’t put a man in lounge pants and expect him not to lounge. Forrest watched The Cat in the Hat in total comfort, thank you very much.

DSC_0546 We take our relaxing seriously around here. Brother was completely uninterested in this photo business.

DSC_0552But I think he looks awfully cute and snuggly in his little lounge pants.

Sunday, November 13, 2011

T-Shirt Sleeve Refashioned to a Cute, Easy Headband

My sewing machine is having problems. Who could have predicted that the ultra-bargain machine I bought 4 years ago on clearance at Walmart wouldn't last forever? I couldn't. I feel very betrayed by this unexpected turn of events--we've always gotten along so nicely. I'm torn between my love for it (the sweet memories! the quilts we've made together! the refashions! the home decor!) and deep anger toward it (how dare it rebel against me! I raised it and taught it everything it knows! I'm going to drop it off a building!). While we sort out our issues (rather, while I decide whether or not I can afford a new machine), I made a simple no-sew headband (originally posted a few weeks ago on A Little Tipsy).

My husband left a few t-shirt sleeves lying around the other day after cutting them off to make tank tops for working out (yes, he's that guy at the gym . . . I'm sorry), and I remembered a quick craft I used to do as a teenager:
Turn a cut off t-shirt sleeve into a headband! I remember making these when I was in a pinch in high school . . . headed to school, but suffering an awful hair day? Cut off a sleeve. Bam. Bad hair hidden. Going for a jog and need to keep your bangs off your face? Sleeve. Boom. Problem solved. I used to leave them plain and just wear them as simple knit headbands, but now that I've grown a little craftier (and am armed with a glue gun), I like to add a little embellishment to this simple headband.
And the best part is, there's no sewing involved (take that, ornery sewing machine!). There is one teensy stitch that you can feel free to skip if you don't want to bother with any sewing, and no one's the wiser. Since knit fabrics don't really fray, you don't have to worry about any hemming at all. Just cut and go!

Want to make one yourself?

Start with a sleeve cut off from one of the many big, worn out t-shirts you probably have in your closet. Make sure the sleeve isn't from a smaller size t-shirt, or it won't fit over your head. My sleeve was from a men's large shirt, and it's a perfect fit for me. Just cut it away from the body:
Then cut off the hemmed cuff of the sleeve and the end that was connected to the body of the shirt, leaving a 2-4 inch loop with straight edges:
Since the sleeve is sewn at an angle (which you can see at the bottom of the sleeve in the picture above), you may want to trim the point down a bit--just open up the loop and trim off any odd points or straggly ends. It doesn't have to be perfect--the ends will curl in and hide any imperfections, so don't worry about making it exactly right.

Now for the optional sewing--you can certainly skip this part if you prefer, but it's very quick and easy and, I think, adds a little extra interest to your headband. Thread a needle (with thread that matches your sleeve--I used pink so you can see the stitches better), tie a knot in one end, and sew a few loose, wide stitches across the headband. Don't tie off the end just yet.
Cinch up the sleeve fabric by pulling snugly on the thread. You can decide how loose or tight you want your fabric to be . . . when you like the look, just tie a knot and trim the thread.
You could also stop here and sport your simple cinched headband. I wanted a little extra embellishment (I can hardly help myself), so I got out my glue gun and made a few little felt flowers (there are quite a few tutorials to make these out there, so I'm not going to repeat one here . . . but here's a great example) and a few little leaves:
Just hot glue the embellishments right over the cinched portion of the headband:
And there you have it! A super quick and easy--not to mention really cute--headband.
You can also make sleeve headbands from a smaller size t-shirt for younger girls . . . bet you never thought you'd have a use for your husband's icky discarded gym shirt sleeves, did you?

Wednesday, September 28, 2011

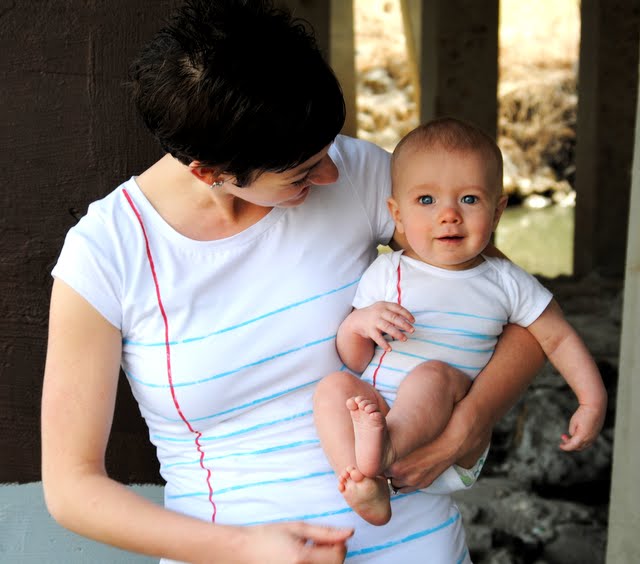
Lined Paper Tee Shirt Tutorial

In case you missed this post last month on Ucreate, here's my fun, sorta nerdy back-to-school (or anytime!) tee refashion project:

I think this lined paper tee is such a fun way to bring out the inner student, and possibly even encourage a little bookishness in a little one (maybe that's a stretch, but a girl can hope, right?).

(Oh my gosh, look how teeny Forrest is! Although this post only went up last month, I actually made these shirts and took these pictures when Forrest was maybe 6 months old . . . so about 7 months ago! He's so shrimpy! Never fear, I've kept making these shirts for him as he's grown . . . he has one that fits in his closet right now.)

It's really simple to put together, and you can easily make it in any size. And how cute would it be if you embroidered or stamped your child's name or a favorite quote onto the lines? 

Here's what you'll need to make this tee:

a white tank, tee, or onesie
masking tape
foam brush
blue and red acrylic paint
fabric painting medium (available at craft stores--you'll find it with the paint supplies)

To start, place some cardboard between the front and back of the top so your paint doesn't bleed through to the back of your shirt, then place your tape in straight horizontal lines across your shirt to mark the areas where you'll paint your blue lines. I put my first strip of tape right beneath the sleeves. I spaced the tape strips about 1/4" apart from each other, but only painted in every other open space (on an adult size tee) to create a little more distance between the lines. For my little guy's onesie, I painted in the spaces between each tape strip.


Mix your blue paint and fabric painting medium according to the directions on the medium (usually a 2 to 1 mixture of paint to medium), and lightly sponge it between your tape strips. A little goes a long way, so try not to get too heavy-handed with your brush. (And personally, I really like the look of a lightly painted, sort of splotchy paint line!)

(You can see here that I only painted in every other open space for the adult tee. For a baby/toddler top, you can paint in each open space.)

Give it some time to dry, then carefully remove the tape. Place two long strips of tape vertically down the left side of the shirt where you'll paint your red line. Again, place the strips about 1/4" apart, and make sure they're running straight down the tee so you don't end up with a wavy line.

Mix your red paint with the fabric painting medium according to the directions on the package, and sponge it on as you did for the blue lines. Let it dry for a while and carefully remove the tape.

If you're making a baby onesie, don't forget to lift up the shoulder flap to tape and paint underneath it!

Make sure you read the directions on your fabric painting medium to find out how to finish your shirt--you'll probably need to let it air dry for 24-48 hours, then iron it to set the paint. You can just turn the shirts inside out and toss them in the washing machine, and the paint holds up just fine.
If you make one of these shirts (or anything using one of my tutorials/ideas), feel free to add it to the Maybe Matilda Flickr Group so we can all check it out!

Also, I had a request a few weeks ago to make a onesie for a customer in my etsy shop, and she really loved it on her little girl . . . so there's a listing right here in my shop if you want me to make one for your little one!
Related Posts Plugin for WordPress, Blogger...