Maybe Matilda: townhouse
Showing posts with label townhouse. Show all posts

Friday, July 10, 2015

Townhouse Tour: Family Room

The townhouse tour continues today, and for the first time in its history--hold your applause, ladies and gentlemen--moves downstairs.

So far, I've posted about our master bedroom and Forrest's bedroom. Today I'm showing you the family room, where we spend the most time (although with my penchant for cookie-baking and the piglets' insatiable appetites, that title might actually belong to the kitchen).

(And as a reminder, we recently sold our first home in order to pay off our student debt, and are renting a townhouse while we save money for our next house.)

family room tour

With the exception of the coffee table (which is a recent hand-me-down from my mom), nothing in here is new. Just rearranged a bit from where we had things in the old place.

Well, that's not true--I guess the white pillow covers are new. I've always wanted a white couch. Budget aside, though, it just wouldn't be realistic for us right now. Small kids, sticky fingers--I don't even want to think about what we would do to that poor unsuspecting couch.

I picked up these plain white pillow covers at Ikea and lined them up along the back of the couch in the hopes that it lightens up our dark furniture. It's still not a white couch, but it sort of gives a white couch-ish type of impression. And they're definitely easier to toss in the washing machine than a couch would be.

family room tour

For the first few weeks, we had a rug in here. But it was creeping and crawling all over the place--huge bulges and wrinkles throughout, no matter how much we tried to straighten and flatten it out. We never had that issue with that rug in our old house, which had hardwood floors, so maybe it's the carpet in here that caused it to creep? Whatever the reason, it was driving me insane (plus the kids were constantly tripping over it), so we took it out.

I'm not good at styling little vignettes, so my mom handled all of this. It's her thang. (You can find her on instagram if you'd like to see her gorgeous home and design).
family room tour

Rainbow bookshelf!

family room tour

family room tour

On the opposite side of the room, we've got a fireplace . . . sort of floating in mid-air. I'm not sure I've seen fireplaces like this before, without a hearth (or without even touching the ground). It's taken some getting used to. I do love having a fireplace, though, and I think that big chunky white mantel is very pretty.

family room tour

This is a bit odd to me--the fireplace sticks out into the room with two recessed portions on the sides (the back wall of one side goes up to the ceiling, but on the left side of the fireplace there is only a half wall that looks out over the entry--otherwise, I would have put my leaning bookshelves in these spaces).

And I obviously haven't figured out what should go in those spaces. I'm very hesitant to buy furniture specifically to fit into a rental--we don't plan on being here for much more than a year, so it doesn't really feel worth it to me to buy things specifically to suit this place. So for now, it looks a bit odd and empty over here. Real life, folks. Maybe something will work itself out in time. If you have suggestions, I'm all ears!

family room tour

Thursday, June 25, 2015

Townhouse Tour: Nautical Big Boy Bedroom

Our recent move seemed like a good time to upgrade Forrest from his toddler bedroom setup to a 'big boy' bedroom. It started out simple enough with a few practical ideas, and snowballed until we had an entire room makeover on our hands.

His itty bitty 3 drawer dresser has been bursting at the seams for years now, so maybe we ought to get a bigger dresser for him . . . and if we're going to be getting a bigger dresser, maybe I'd better get him a matching nightstand, too . . . and if he's going to have a full-sized dresser and nightstand, I suppose he ought to move up into a twin bed since his little toddler bed might look silly next to all that big furniture . . .

All of a sudden, we had an entire bedroom transformation on our hands. These projects always start out innocently, don't they? Classic 'if you give a mouse a cookie' situation.

I wanted it to be a room he could grow with--something that's perfectly fun for him now while he's little, but will be just as fitting for a 6- or 10- or 13-year old boy. I love how it came out.

Classic, Nautical Big Boy Bedroom


Classic, Nautical Big Boy Bedroom

 His bed started out as my brother's bed when he was little, then when he left for college, it moved into my room. So Forrest is now the 3rd person in the family to use this bed. I love the simple, timeless style, and I think it's a perfect fit in here.

I wondered if he'd have any issues with moving from a little toddler bed to something bigger--he's actually done really great. He loves his new bed and seems to think it's really cool and grown up to sleep in a big bed.

Classic, Nautical Big Boy Bedroom

 The inspiration for the whole room began with the bedding. I toyed briefly with the idea of sewing a quilt. That lasted about 2 minutes. Right up until I realized that we were moving for Pete's sake and did I really want to add a giant sewing project onto my to-do list? NOPE.

I remembered looking at Beddy's months and months earlier, and revisited their site, where I fell hard for the Game On bedding set. It looked to me like the perfect bedding for a classic boys' room--it has personality and was a great jumping-off point for the rest of a traditional, nautical room design, but it's simple and classic enough to be a great fit for all sorts of bedrooms, so I'd have some freedom to change up the look of the room later on. But more on the bedding in a minute.

First, the dresser that started it all. As I mentioned earlier, Forrest has been using a 3-drawer dresser forever, and while it was a good fit for his baby clothes, it was just too small as he (and his clothes!) grew. So we went all-out with a big 9-drawer dresser, with the hope that I never have to buy him a larger dresser ever again. It's a pretty large piece of furniture, but this room is bigger than his room in our old house, so I think it actually works fine in here. Never could have made this work in his old room.

classic, nautical big boy bedroom

I bought it from a woman on facebook, who said she would refinish it however the buyer wanted. So I asked her to paint it navy blue with a stained top, and I think it came out nicely. The map above the dresser is a years-ago thrift store find, and I've always loved it. I've wondered if I should paint the frame, but it's one of those 'eh, whatever' projects that I always think I'll get around to someday, but never end up actually finishing.

I feel like Pinterest would want me to accessorize and style the top of the dresser. But real life tells me that this is a 4-year old boy's bedroom, and any styling will last approximately 45 seconds before he sweeps it off to use as a superhero fighting arena. So I didn't even bother. Just for the sake of these pictures, I tossed on a wood slice leftover from my sister's wedding decor, along with a wooden fish my brother brought back for me from Guatemala about 15 years ago, and Forrest's alarm clock that is only like 80% clock, and 20% little kid finger grime.

classic, nautical big boy bedroom

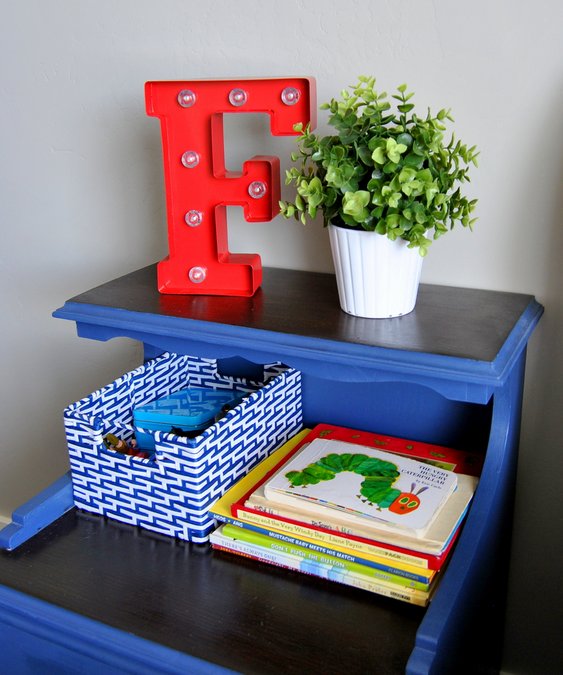
The woman who painted the dresser also refinished this little nightstand for the room, too. I worried about the style of this one, but I've decided that it's actually really functional. The drawers are fake (bummer), so having an extra shelf provides some of the storage I wish it had in the first place.

classic, nautical big boy bedroom

The little basket (toy storage) is from HomeGoods, the plant and planter are from Ikea, and the light-up letter is from Joann. The anchor art above the bed is also from HomeGoods.

I felt like a nautical bedroom wouldn't be complete without a red, white, and blue pennant banner. I made this super simple one in less than an hour (super simple in that I didn't bother making it reversible or finishing the cut edges or anything--it's going to hang, untouched, on a wall, so I don't see the point of making it all fancy). The fabrics are from Joann--1/4 yard each of 5 different prints, plus 2 spools of navy ribbon. I love the playful touch it adds.

classic, nautical big boy bedroom

One of my biggest annoyances in Forrest's room has always been that he won't (or can't) make his bed by himself. It's not that big of a deal for me to make it for him, really, but it's just another chore to do when I already have so many things to do around the house every day. I've tried teaching him how to make his bed, but even with a small toddler bed, he couldn't reach far enough to pull the blankets up, and he could never pull them straight, and he'd get frustrated and upset about it.

This is awesome--the Beddy's includes all the bedding you need in one piece. The fitted sheet and blanket are connected along the bottom, and the top blanket just needs to be zipped up along the side to make the bed. When you need to wash the bedding, you just pull it all off in one piece and toss it in the washer. And the top blanket? It's lined with minky. What I wouldn't give to sleep under a minky blanket each night.

beddy's zipper bedding

He just unzips it at night and climbs inside (and a minky panel pulls out so that even when he's under the top blanket, there's some blanket hang-over on the sides so he won't get chilly). How obvious is it that he thought it was awfully silly to pretend to be sleeping for this picture?

beddy's zipper bedding

And in the morning, he just pulls the blanket straight and zips up the side to make his bed.

beddy's zipper bedding

I LOVE that he can make his bed completely on his own. He doesn't need my help, he doesn't get frustrated about it like he used to, and it only takes him a few seconds. The quality of the bedding is really wonderful, and the idea itself is genius. No more morning fights over making his bed.

beddy's zipper bedding

For your viewing pleasure: a GIF of the bed-making in action. I hope this works. I have no idea what I'm doing.

beddy's zipper bedding

Just an FYI: this post is not sponsored. But I wrote to Beddy's after falling in love with their bedding online and they graciously sent Forrest's bedding in exchange for mentioning them in this post. And I can recommend them 100% . . . awesome customer service, high-quality materials, and it makes our mornings go a little more smoothly.

What do you think of Forrest's bedroom? Do your kids struggle to get their beds made in the morning?


Thursday, June 11, 2015

Townhouse Tour: Master Bedroom

We've been settling into our new place for about a month now, so I suppose it's time I start posting a few pictures. I'm starting with the master bedroom today, simply because it is A) the room that looks the closest to being 'finished' and fully moved into, and B) it happened to be the cleanest room of the house. That's all it takes to earn the honor of being the room to kick off the house tour!

As a reminder, we sold our house last month, and instead of buying a new house, we used all the money from the sale to help pay off our student loan debt. We only moved about 10 minutes away from our old place, into a townhouse that we'll be renting for a year (minimum) while we save up for a down payment for a house.

Without further ado: our new master bedroom.

cottage style master bedroom tour

cottage style master bedroom tour

The bed was a Craigslist find from about 5 years ago--I spent $25 on it, plus $15 worth of oil-rubbed bronze spray paint to cover up the original brass (which I think is back in style now . . . but the oil-rubbed bronze certainly fits better with my style, if I can claim to have one . . . cottagey, I suppose?). The paint job is holding up okay . . . I just won't take any pictures too close or you'll see all the spots where the spray paint is rubbing and scratched. For now, it'll do. Remember how I said we haven't yet abandoned our cheapskate, penny-pincher, poor student lifestyle? Prime examples in this post :-)

The photo above the bed was our 'guest book' from our wedding. I was sure we'd never, ever sit down and flip through an actual guest book, so instead we framed a big photo of ourselves and set out pens for people to write a message on the photo mat (sadly, we missed out on about half of our guests who didn't realize they were supposed to be signing the mat--should've set out some instructions). 

Photo 'guest book' for a wedding

We've spent many hours pondering which of us this cryptic signature is referring to:

Photo 'guest book' for a wedding

. . . and we've written that exact message into the guest book of every wedding we've attended since.

DIY pillows for bed

In our previous house (that still sounds weird), we painted the master bedroom a soft, celery green (I've wondered if the new owners will keep it or paint over? It was hands down my favorite color in the house, but I have learned that green is a somewhat polarizing paint color). I liked how soft and quiet the colors in that room were, so I kept all the bed linens neutral (creams and tans).

But against these gray walls, the neutral colors of our bedding and pillows looked dead boring. I've had a Hobby Lobby gift card burning a hole in my pocket since Christmas, so I finally spent it on fabric and sewed some new pillows for the bed (I re-used the old pillow forms, and sewed envelope-backed cases for them). I'm not a terribly knowledgeable or talented seamstress, but I can handle pillow cases. I love the bit of color they bring into the room. I'm on the hunt for new lampshades--not loving the pattern or the brown tones on our current ones anymore. No luck yet.

cottage style master bedroom

Our nightstands are not actually nightstands at all, but some sort of little end tables? They were hand-me-downs from my parents about 7 years ago and have never been terribly functional as nightstands, but if it ain't broke, right? I may have gone slightly basket-happy on my side, with one basket underneath for my yarn and half-finished crochet projects, and another on top for my books, Kindle, and little odds and ends. Maybe once we're in our next house, I'll bite the bullet and get us actual nightstands with drawers. Just one minor detail on a huge list of things I'd like to upgrade someday.

cottage style master bedroom

And while we're speaking of furniture that needs an upgrade, may I recommend that you never, ever, ever buy this Ikea dresser? Worst purchase of our lives. It is the crappiest piece of furniture devised by mankind, but we have been too cheap to replace it, and have dealt with its issues for years. We stained it this dark color (it was unfinished when we purchased it), and it looks okay . . . but it's main problems are in the totally horrible construction. Two of my drawers don't close completely unless angrily kicked (a gentle kick won't do--must be delivered with fury), the bottom of one of Jeff's drawers continually falls out and must be reattached, and one of my drawers has a board that comes loose every time it is opened which must then be lined up perfectly and (again) kicked into place. It's a terrible piece of crap.

The mirror above the dresser was another hand-me-down from my mom, that I'm not totally sure about in that spot. (Thoughts?) I'm considering painting it a distressed white and hanging it on the wall. For now, it's just leaning there while I decide what to do. The two little birdhouses are from Hobby Lobby (quite a few years old now).

cottage style master bedroom

On the opposite side of the room we have the closet, and a rather big empty corner that I'm thinking would make a nice little reading area if I can find a cozy chair for a good price. But I am hesitant to buy anything specifically for this townhouse, since we know we won't be here very long. So this will probably never come to be, but I am clinging to the idea that someday, somewhere, I will have a charming little reading nook!

And that hanging on the wall (I have no idea what to call it) really pleases me. Yet another hand-me-down from my mom, that I haven't ever used until now because I wasn't sure what should go into the little basket area. I finally cut a piece of burlap to fit, and placed 3 fake plants from Ikea inside. I really like it.

cottage style master bedroom

And finally, the master bath, which I only took this one picture of, because do you really want to see the toilet and shower? They aren't anything too exciting or special, I promise, although I am really excited about having 2 sinks, as well as a good amount of cabinet space in here. The master bath in our previous house was about 1/3rd this size, with 1 sink and almost no storage space at all. Jeff eventually gave up and just moved all of his stuff into the kids' bathroom, since we couldn't ever get ready in our bathroom at the same time. First world problems in a serious way, but still. This feels very spacious and luxurious. Although I can't figure out why the builder would have installed 2 mirrors but only 1 light fixture, awkwardly centered between them?

cottage style master bedroom

A weird design choice, if you ask me. But whatever. Renters can't be choosers.

So there you have it, the first room of the new place. More to come.
Related Posts Plugin for WordPress, Blogger...