Maybe Matilda: jewelry
Showing posts with label jewelry. Show all posts

Friday, June 12, 2015

Friday List: Dainty Everyday Necklaces

Recently, I was gifted a beautiful, simple gold necklace by my lovely new friend Kelly of Delicious Reads . . . when she gave it to me, she said something like, "You strike me as the sort of person who would really appreciate a simple, low-key everyday necklace," and she hit the nail squarely on the head with that one. (And perhaps I'm reading too much into it, but I really like whatever it must say about me that I apparently come across as a 'low-key, everyday necklace' sort of person.)

I admire big, glitzy jewelry from a distance, but I rarely buy it. I'm not sure where exactly statement necklaces fit into my current stage of life, spending the majority of my days at home with 4 messy, grabby little hands. I love the simplicity of owning a beautiful, dainty, everyday necklace (or two, or three . . . ). It makes getting dressed and ready for the day that much easier--the simple, everyday necklace always goes. 5 Beautifully Simple Everyday Necklaces from Etsy

1. Gold Bar Pendant by Unforgettable Jules // This is the necklace that my friend Kelly chose for me, and I have been wearing it just about daily (which, if you ask me, is exactly the point of owning a sweet, dainty, delicate necklace--it is a no-brainer, no-stress jewelry choice). I have been loving it immensely.

2. Tiny Silhouette Necklace by Le Papier Studio // I love that this necklace--in addition to being adorably simple and sweet--adds an extra touch of meaning with the silhouettes. Perfect for a mother, to carry her babies' silhouettes around her neck.

3. Birthstone Beaded Necklace by Lolabean Jewelry // Normally, I would shy away from color when searching for an 'everyday' type of necklace. But I think this one, with its tiny row of birthstone beads, is perfect. It's simple and personal, and I love that it adds just the tiniest bit of color while still being soft and quiet enough to complement any outfit.

4. Personalized Heart Necklace by E and E Project // Two or three years ago for Christmas, I got my sister a tiny heart pendant with her initial on it, similar to this one (although hers simply had an 'R' for Rebekah, instead of two initials). And many times since then, I've wished I'd bought one just like it for myself (or stolen hers--R for Rebekah could just as easily be R for Rachel). I just love the look of this sweet necklace.

5. Personalized Double Strand Necklace by The Silver Wren // I think double strand necklaces are so beautiful and fun (and I love when they are truly a double strand necklaces instead of 2 separate necklaces worn together). This one, with a simple circle pendant as well as a customizable bar, is beautiful. You can have a name, initials, or a meaningful word stamped into the necklace. I love that it is beautiful and personal.

What's your jewelry philosophy? Small and sweet, or big and bold?


Friday, December 16, 2011

Homemade Jewelry Organizer Tutorial with Pretty Life Anonymous

Do you guys read any fashion blogs? I am crazy picky when it comes to style and fashion bloggers. I love the idea, but it must be executed perfectly for me to fall in love with them. I've added and deleted countless fashion blogs from my reading list and currently have three (no joke, 3 as in "1, 2 . . . 3. That's it? Yep, 3.") that I have remained hopelessly devoted to. On my list of 3 steadfast style blog survivors are the sisters of the Pretty Life Anonymous. Two headless sisters (I presume they do, in fact, have heads, but I haven't seen them yet) with fantastic fashion sense (and one with an adorable new baby belly) who crack me up on a daily basis, inspire me to spend that extra 5 minutes putting together a sweatpants-less outfit in the morning, and are always introducing me to great new music, recipes, and trends. These two are winners in my book. And that really means something, since they are among the lone survivors in the barren wasteland that is the style portion of my Google Reader.
null
--------------------------------------------
Well hi there, Maybe Matilda, friends! This is W from the Pretty Life Anonymous and I could not be more excited to be visiting Rachel's blog today, since I LOVE her and I don't care who knows it.  But listen, I'm not kidding you when I say, I NEVER make my presents. And I mean never. Not because I don't think that handmade gifts are awesome, but because when I try to make them I usually end up with multiple glue gun burns, a body part sewn to a piece of fabric, or a bunch of gunk that looks more like a lavender flower threw up, then the oh-so-thoughtful homemade lavender soap it was meant to be. These failed attempts have thus resulted in my becoming the BEST gift card giver ever at Christmastime. 

But this year, a Christmas miracle happened. Pinterest came into my life {cue choir's singing} and my desire to DIY was renewed. And you know what? I've had some failures, sure, but I got back up, dusted myself off, spent 13508 more hours on Pinterest, and eventually had some successes. And today I am going to show you one such success, one so simple, even the girl with the track record of mod-podging her hair together can do it. 

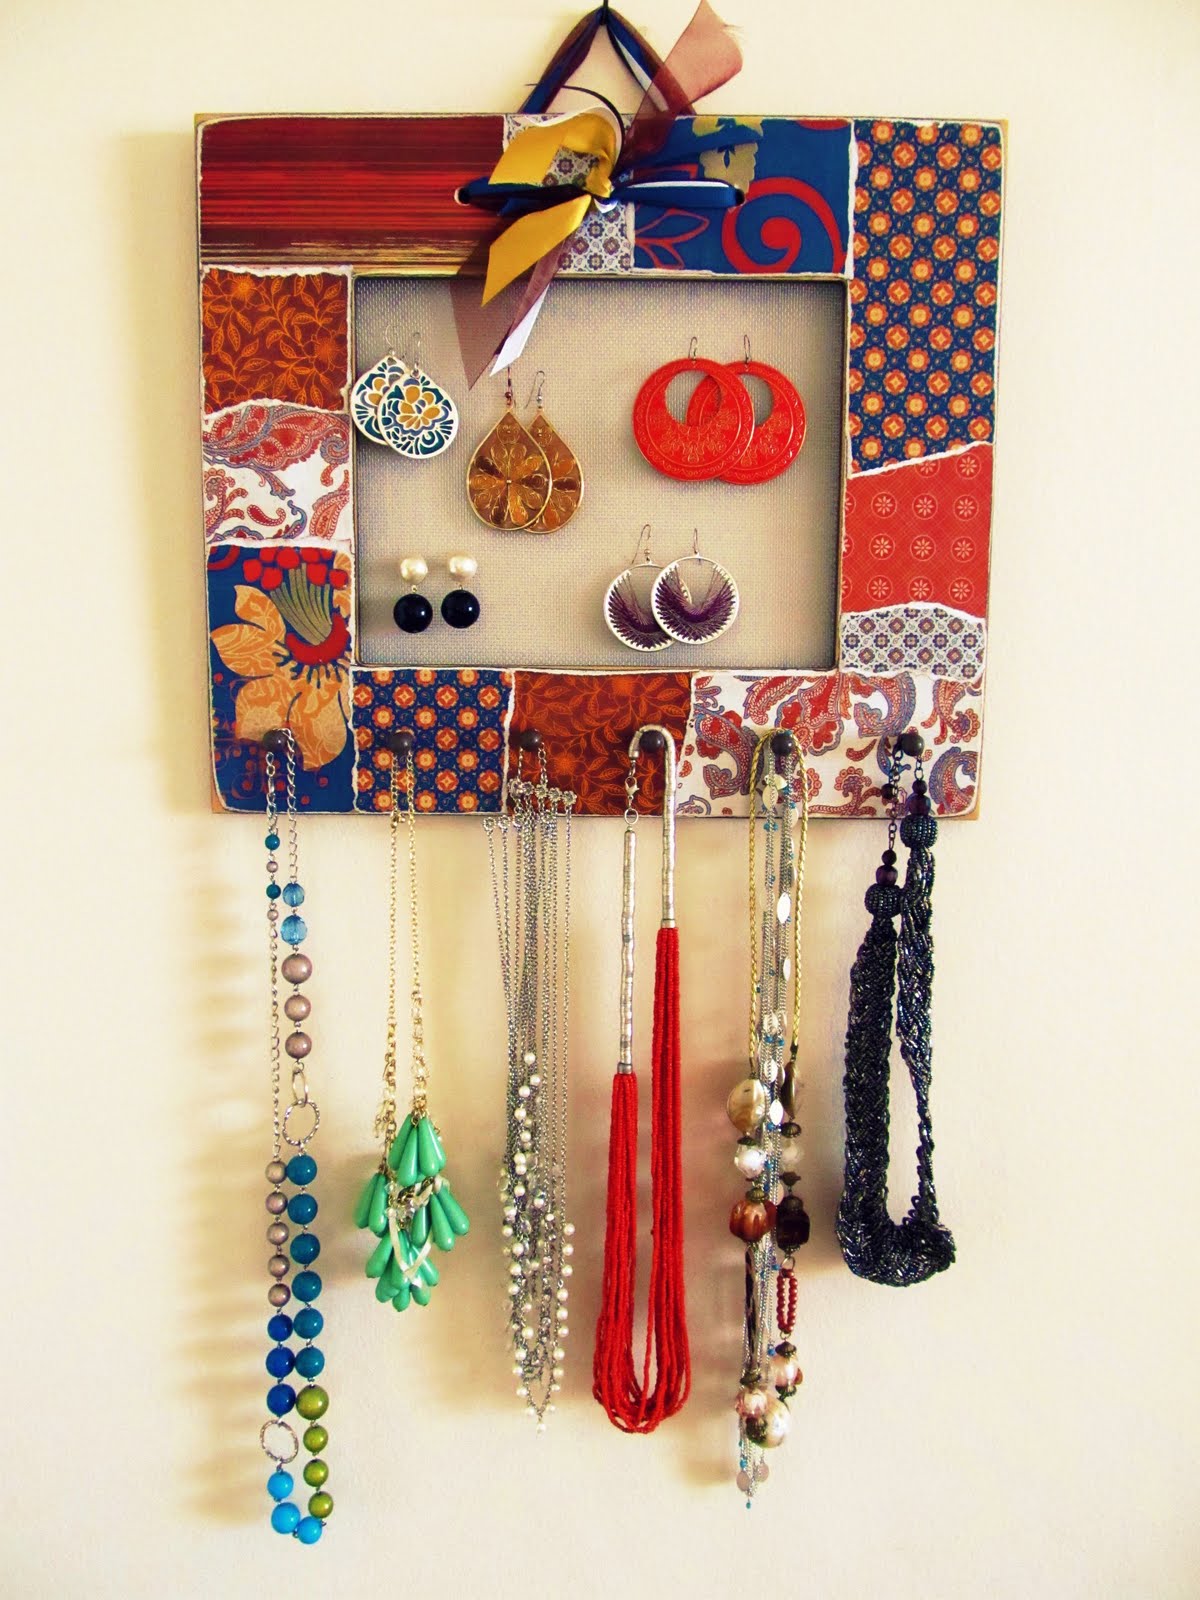
Here she is! A pretty little homemade jewelry holder. Isn't she just presh?: 


What you need: 
-An unfinished frame w/no back (see Hobby Lobby)
-A couple of any kind of knob or hardware hooks you find cute
-Enough wire mesh to fill in the hole of the frame you choose (see Home Depot)
-Scrapbook paper
-Modpodge
-Paint
-Ribbon

Here are the steps. There are only 7. And number 7 isn't really even a step. That's how easy this was: 

1. Drill two holes a couple of inches apart at the top of the frame. 
2. Paint frame front and back, let dry. And paint knobs if they are unfinished. 
3. Measure mesh to fill the hole of the frame, cut to size, then glue gun in from the back.
4. Cut scrapbook paper to cover the front of the frame. Attach with modpodge.
5. After the modpodge has dried, attach knobs across the bottom with glue gun or screws. 
6. String through ribbon and rough up the edges with some sandpaper. 
7. Done. 

Take a closer look: 


Cute, right? The perfect gift to make any jewelry loving friend or family member, and a craft so easy and safe you'll even have all of your limbs once you are finished. And, it's like I always say, having all of your limbs = a Merry Christmas. 

oxox/W. 

Wednesday, December 7, 2011

My Handmade Ring

I'd like to show you today the newest handmade item in my life . . . I only got it a few months ago, but I can tell it's destined to become a favorite. It was a special handmade gift planned and chosen by the person who knows me better than anyone else . . . me.
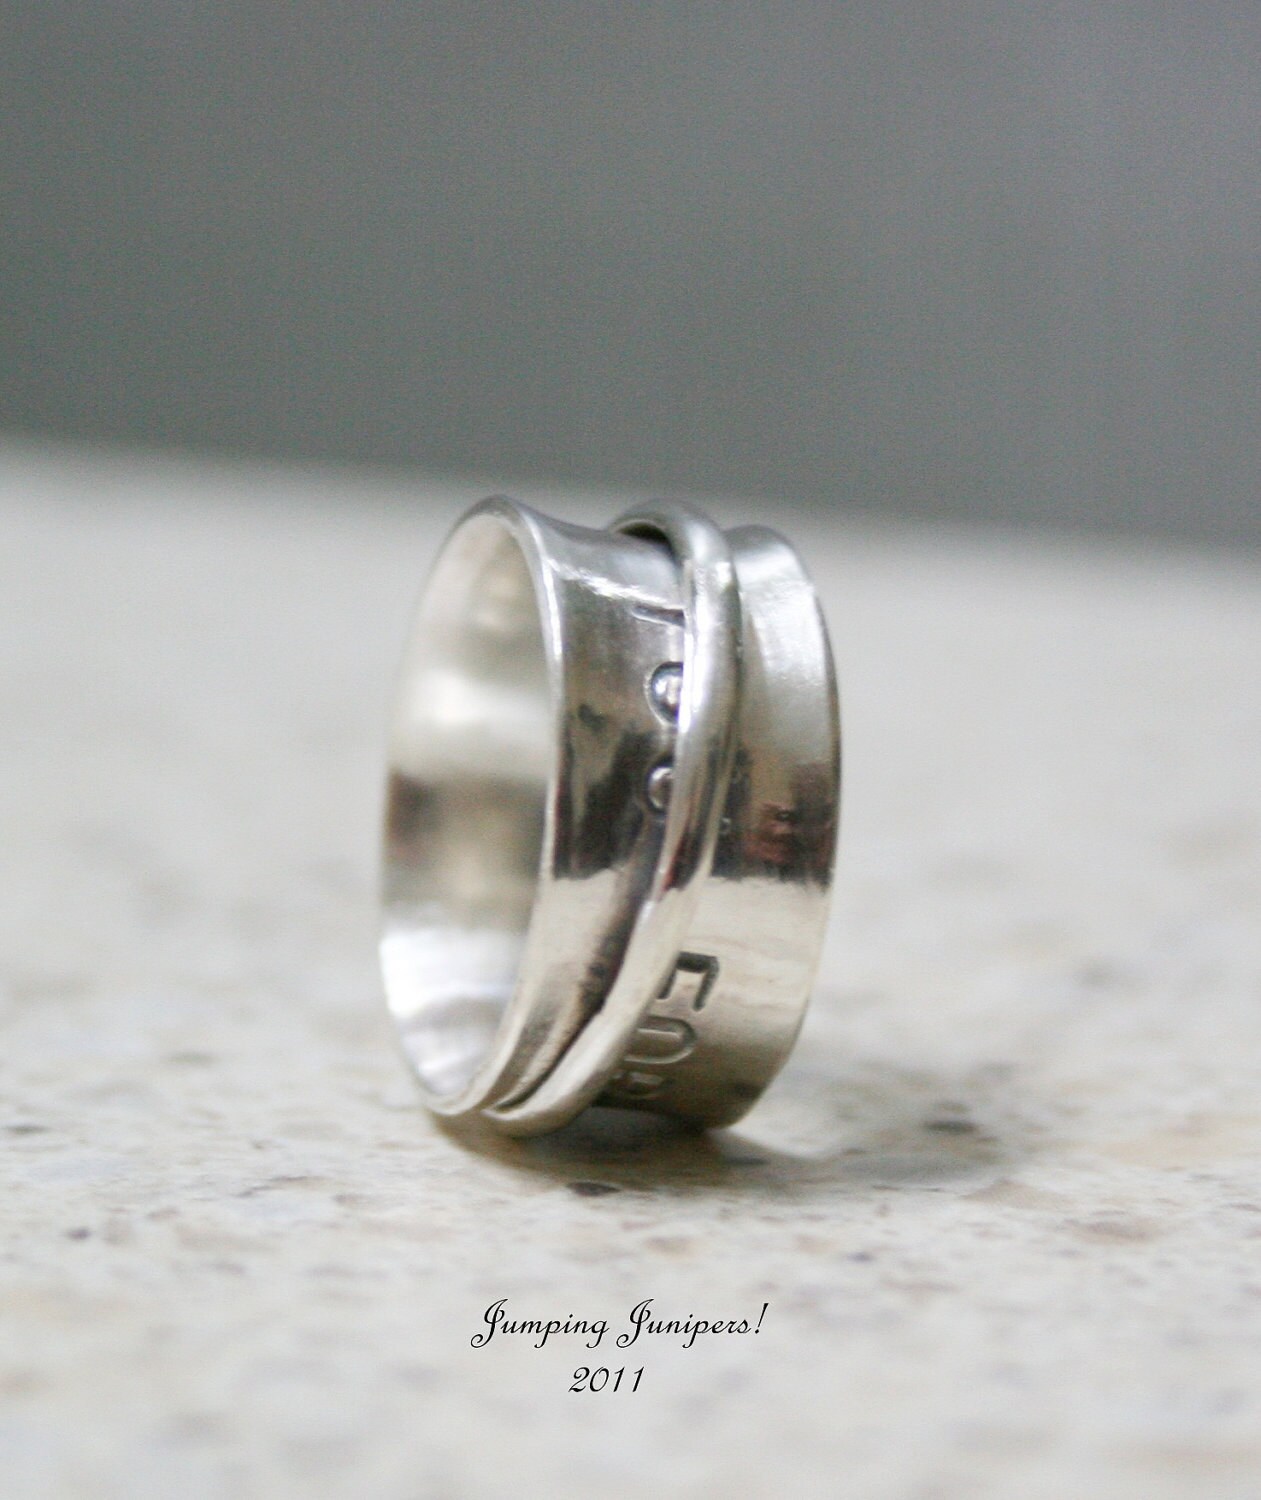
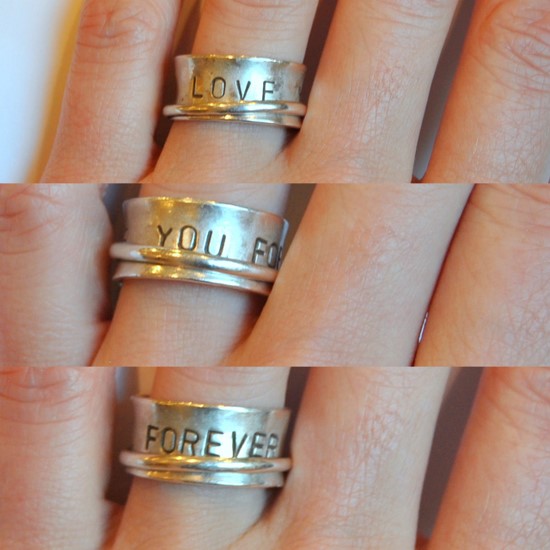
Right before Christmas last year, I found this ring from Jumping Junipers on etsy. A handmade, customizable stamped ring with a thin spinner band . . . I thought it was so simple and beautiful and perfect.
I wanted it for Christmas. I wanted it really badly. But I couldn't think of a message I wanted stamped onto it. What was the perfect word or phrase to capture forever, to carry around with me everywhere I go, and to be a daily reminder of something vital? I played around with a few ideas, but nothing felt right. So Christmas of 2010 came and went without this ring, because I couldn't decide on the perfect phrase for it.

Every few months, I'd remember the ring and brainstorm again, but I never came up with anything that felt right. Should I go with a trite, overused, nearly meaningless but safe/popular phrase? Maybe a loved one's name? A virtue or trait I need to work on and be reminded of?

After (literally) months of thinking, I finally came up with the perfect idea.

Did your mom read you this book when you were little? Maybe you've read it to your kids?
My mom read this to me countless times when I was young, and I loved it. If Forrest ever sits still long enough to hear a book read to him, he'll hear it plenty, too. The mother in the story sings a song over and over to her baby boy as he grows up:

I'll love you forever,
I'll like you for always,
As long as I'm living
my baby you'll be. 

 It finally hit me--there was my phrase. There was the perfect memento I was searching for . . . it would be a constant reminder of the family who raised me and, now, the husband and baby I love forever. I believe that families can be together forever, and what better message could there be for me to wear and be reminded of every day?
(And it needs a bath. Never mind, move along.)
I decided I'd have Jeff buy it for me for Christmas this year. The only thing that could make my special ring more special was pretending he had picked it out for me. I made it to September before I broke down and ordered it for myself. Close enough!

It may not have been handmade by someone who loves and cares for me, but I love the handmade touches on this ring--it has the exact message I'd spent months planning, I love the character it gets from its little imperfections, and I love knowing that it was created just for me. I've hardly taken it off since it arrived a few months back, and I love the constant reminder to be patient and loving and kind with the people who matter the most.

(I should point out that Ros, the owner and designer at Jumping Junipers, has this style of ring on hold for the holidays to catch up on existing orders, but there are dozens of gorgeous jewelry items in her shop, and I think this beautiful ring is worth waiting for. I can't even tell you how much I love mine.)

(Also, I didn't get anything in exchange for writing this. I just love my ring a ridiculous amount.)

Monday, May 9, 2011

Pleated Necktie Necklace

I wanted to point out something new I'm doing, in case you haven't noticed. You know how there are, like, a kazillion amazing blogs out there? And you're always looking for great new ones to read? Here's my little way to help you find some of them--check out my sidebar there . . . I'd like you to meet my Blog Crush of the Week. Every week, I'm going to feature one of my favorite, recently-discovered blogs that I think you'll love, too! Last week was Sarahndipities. This week it's Natty By Design. You'll love them both, I promise. 100% money back guarantee. So keep your eye on that spot if you want to find new blogs that you will love to add to your reading list!

Speaking of my sidebar, how would you like to have your ad on this here bloggy? Have an etsy shop to promote? A blog that deserves some extra attention? A home business you think is da bomb? If you're interested, shoot me an email and we'll set it up . . . I'm now taking sponsors! maybematildaquilts(at)gmail(dot)com

All right, on to the real stuff. In case you missed this project last week over at Running with Glitter, here's my tutorial for the quirky and cool Pleated Necktie Necklace!

 I used one of my husband's old castoff ties (by the way, is your husband's closet stuffed with really awful old neckties that make you want to scratch out your eyeballs? Jeff's collection is a doozy.) to make a fun pleated necktie necklace:


I think it's pretty dang cool, if I may say so myself, and I wish I could take credit for the idea but I stumbled across this picture on Pinterest (are you addicted? Is there a support group I can join?) and had to wipe the drool off my keyboard. It is awesome:


Since I couldn't find it for sale anywhere (correction! Here is it, in this etsy shop! If you have a few dollars to spare, go buy it from them! Unfortunately, I don't . . . dang husband wanting to be a doctor, racking up the student loans . . . but I do have a lot of old ties. I love to support handmade, but sometimes, well, sometimes I just plain can't), I went to town on Jeff's old tie and I think it came out pretty well!

Want one? Sneak into your husband's closet while he's otherwise occupied and get to work!

(Click "read more" to learn how I made mine!)

Monday, May 2, 2011

Sweet Button Earrings

I don't want to intimidate you guys with this project. It took hours. There was blood, there was sweat, there were tears. I don't know if you'll be able to handle it, so maybe it would be best just to click away now, move on to another tutorial . . . something a little simpler.

Nah, I'm just kidding, there was one step. Maybe if I really try, I can break it into 3 so you'll be more impressed with these 5-minute sweet button earrings!
Don't you love quick projects? I really, really do--they leave me a lot more time to play with this cute thing:
 Although I doubt a picture tutorial is really necessary (did you look at the picture? Do you know how to make them now? Probably . . . but humor me, okay?), click read more for the very minimal instructions!

Thursday, April 28, 2011

Pleated Necktie Necklace at Running With Glitter

How do you like my latest necklace?

I know, it's pretty rad (I'm not entirely sure that I'm the sort of person who can pull off the word "rad," but I'm giving it a shot anyway. Did it work?).

I'm guest posting today over at the lovely Kelly's blog, Running With Glitter, with the tutorial to make it! So head on over, check it out, and tell her I say hi!
Running With Glitter
 And get excited, because Kelly's bringing her awesomeness this way next week with a cool project for you!


Friday, March 11, 2011

Little Bow Tie Necklace

After sewing quite a bit this week (a lot more than I intended for such a simple dress!) I needed a quick, easy project that would work up fast without needing any alterations (I've had my fill of those for a while). So I came up with this little bow tie necklace that fits the bill quite nicely.


It's fast and simple, and I think it's pretty dang cute! This style is selling at Urban Outfitters for $28, but my version didn't cost a dime since I used an old necklace chain I already had and leftover fabric scraps. 

You can make your bow whatever size you’d like—I wanted mine to be on the small side, so the measurements I give here will make a bow about 3” wide and 1 1/2” tall, but you can adapt it to whatever size sounds good to you. I think it would be really cute big, like 5 inches across, but I definitely wasn't brave enough to wear something that bold!

Click read more below if you'd like to make your own!
Related Posts Plugin for WordPress, Blogger...