Maybe Matilda: blanket
Showing posts with label blanket. Show all posts

Friday, December 4, 2015

New King Bed + Beddy's Bedding

When we got our new mattress a few weeks ago, we upgraded from a queen to a king size. I knew it would mean needing to purchase a new bed frame and headboard and all, but this was a sacrifice I was willing to make. And by 'sacrifice,' I mean I was super excited at the prospect of shopping for some new stuff. Such a sacrifice!

I loved the style of our old bed (which you can see HERE if you'd like). It had that cottage-y farmhouse look that I love. I actually considered buying the exact same style in a king, but Jeff convinced me to branch out and try something new. I was genuinely sad, though, that a king bed would mean that I could no longer use the queen size bedspread that I crocheted. I'm saving it in case we ever end up with a guest bedroom.

But no regrets at all in switching to a new mattress size. Sleeping on a king bed has been glorious. Absolutely GLORIOUS. And I'm loving the new look in our room.

tufted upholstered king headboard white bedding blue pillows

I still have a few things to check off the list--namely finding something to go over the bed, and hanging up the mirror that is currently just propped on the dresser--but we've all been so sick for the past few weeks that I'm considering even this much work a major accomplishment.

cream tufted upholstered headboard

I'll put a source list for everything down at the bottom of this post in case you also want to do a little shopping. I was really excited to find this beautiful tufted headboard for such a good price (just over $200). When I ordered it, there were no reviews online and nowhere to see it in person before buying, so I was a bit nervous. But it is wonderful in person and I've been really happy with it.

I also painted our nightstands (which I've never been crazy about and still hope to replace before too long), and they definitely fit the room better now. Doesn't everything look better painted white?

white painted nightstands

By far--and I mean BYYYY FAAAAAR--the best, most comfortable, most convenient, and overall happiest part of this little makeover is the bedding. The wonderful, wonderful bedding.

You may remember that I worked with Beddy's a few months ago to set Forrest up with a big boy bed and bedding--you can see that post HERE. And I raved and raved about how awesome his zipper bedding was, and I was jealous that it was so quick and simple for him to make his bed while I wasted my time adjusting covers and straightening bedspreads and smoothing multiple layers.

(By the way, 6 months later, he still totally rocks at making his bed all by himself, and I can't overemphasize how nice it is to have that one little chore off my to-do list each day!)

My jealousy of his bedding just grew and grew, until finally I begged Beddy's to help me out with bedding for my new bed. And guys, it might have been the best decision of my life so far.

chic white beddy's king size ruffle zipper bedding

I want to let you in on a little secret here. If you see a blogger work with a company once, cool. It's probably a company that blogger likes and is happy to promote. But if you see a blogger work with a company multiple times, it means they are crazy head over heels and can't shut up about how awesome that company/product is, and if you happen to know the blogger in real life, you will definitely be hearing about it in every conversation you have. This is definitely the latter situation.

This bedding is miraculous. See for yourself. Not only is it crazy cute with the ruffles and smooth panels (and I love how the ruffles mean it never needs adjusting throughout the day, unlike a certain crochet bedspread that needed constant tweaking if anyone even touched it, let alone sit down on the bed), but it is unbelievably comfortable to boot. The bottom sheet is an incredibly smooth and comfortable cotton, and the top layer is lined with minky fabric. I basically just want to sleep naked all the time for maximum minky-to-skin contact. I've resisted, you know, but the struggle is real.

minky lined zipper bedding

A panel pulls out on each side so you're never chilly or exposed in the night. And in the morning, you just tuck the panels inside and zip the whole thing up. That's it. All the bedding is connected, from the bottom sheet to the top minky quilt, so it always looks perfectly tight and tucked, and you just zip up the sides to make your bed in the morning. And a cute pleated ruffle hides the zipper, too. THEY'VE THOUGHT OF EVERYTHING. EVERYTHING! 

zipper bedding from beddys

They also sent a matching ruffle bed skirt, which is super cool because the ruffle fabric continues up a few extra inches onto the inner material. This means that even if something shifts--if the mattress moves a bit, or if the bed skirt should happen to get tugged down a little--only that pretty ruffle fabric is ever visible. I've always been so bugged when a bed skirt's unattractive inner material shows, so I think this is basically genius.

I'm not exaggerating when I tell you that I have never in our 9 years of marriage seen Jeff make a bed. Ever. I have always made our bed, and when he has occasionally helped it has been more trouble than it's worth because he has zero attention to cosmetic details like smooth sheets or tucked sides, and it would drive me nuts.

But he has made this bed multiple times (because pulling a zipper is fun, right?), and it always looks perfect. Is this real life?

white blue master king bed

Make sure to check out Beddy's for their amazing zipper bedding that, it turns out, is absolute perfection for little kids and big kids. I love them so much I could cry.

Source list:
Headboard: Walmart $209
Bedding: Beddy's Chic White
White pillows: came with the bedding
Light blue pillows: Ikea
Dark blue pillows and bolster pillow: I made them; fabric from Hobby Lobby
Lamps: Ikea
Lampshades: Walmart
Nightstands: old hand-me-downs from my parents
Throw pillow at foot of bed: made by me; find the pattern HERE

A huge and genuine thank you to Beddy's for providing me with the bedding for this post. All opinions are my own and I received no other compensation besides the product.

Friday, April 17, 2015

Friday List: Crocheters of Instagram

Well, it has been ages since I’ve crocheted, and now that we’re headed toward summer, it’s probably going to stay that way for a while. Crocheting in the winter? Cozy and pleasant and warm. Crocheting in the heat? Sticky and sweaty and disgusting. But I can still appreciate it on instagram, so that’s something.

For today’s Friday List, I want to share a few of my favorite crocheters on instagram—lots of beautiful crochet inspiration to be found here!

Awesome crochet accounts on instagram

1. EBLittleCreations: Oh, just the cutest dang amigurumi you’ve ever seen. From bears to turtles to mermaids to cacti, she crochets it all, and does it so very well. I’ve only been following this account for a few weeks but I love her versatility and the charm of her little creations. You can also find Erika at her Etsy shop here.

2. CypressTextiles: I’m a little on the boring side when it comes to color choices in crochet, but that doesn’t mean I can’t appreciate amazing color when it’s done well. Rachele’s color choices are always inspiring, and she designs such creative and unique blankets. See more of her work (including patterns) at her site here.

3. DarlingBeBrave: Right off the bat, you’ll love Megan’s bright and minimalistic photography, but of course her crochet is fantastic as well. I love her chunky and cozy designs. Visit her blog here and Etsy shop here.

4. RebekahLaw: I think Rebekah’s cute patchy monkey pictures prompted me to follow her account, but she also does the cutest range of animals and dolls (those dinosaurs?! #cutest). You can find her on facebook here.

5. HeyBanjoPants: I’m not sure how Lauren packs so much personality into her animals. She consistently picks out color combos I would never choose in a million years, yet her work always turns out beautifully and makes me wonder why I’m so nervous around color? Plus she is hilarious and wonderful and quite possibly my soul mate. Find her Etsy shop here.

6. LinaMarieDolls: Michelle’s dolls are always gorgeous, with the prettiest little details from their hairstyles to their accessories. Although her dolls sell in the blink of an eye, you can visit her Etsy shop here.

I’d love to hear some of your favorite instagram accounts, too!

Monday, February 2, 2015

My favorite crochet projects in the history of ever.

I started crocheting shortly after Forrest was born, which makes this roughly a 4 1/2-year old hobby for me. I’ve often thought that it would have been cool to keep track of everything I’ve made—for myself, for my kids, for friends’ kids, for my etsy shop customers. Those are some numbers I would be super interested in seeing.

But of course, I didn’t keep track, and have absolutely no idea what the tally on all the various items I’ve made might be.

I do, however, have photos of many of my crochet projects, and thought I’d spotlight a handful of favorites today.

In no particular order, here are some of my very favorite crochet projects from the past 4 years of crocheting:

All Star Crochet Baby Blanket // www.maybematilda.com

Forrest’s All Star Baby Blanket: You can find the original post about this blanket HERE, but to summarize it for you, I not-so-secretly hoped that this blanket would replace his precious blankie—the one made by someone other than me that he loves dearly and snuggles nearly 24 hours a day—but he could not care less about it. Nonetheless, it is still one of my favorite projects ever. I love the classic Americana style as well as the colors, and it was a fun project to make. Find this pattern as part of a crochet pattern book here.

Sidewalk Shawl // www.maybematilda.com

Sidewalk Shawl: Visit my original post on this project HERE. This shawl was challenging but so enjoyable to make, and I think it came out beautifully. Sadly, it’s spent its entire life folded up on a closet shelf. I just don’t know how to use/wear something like this in real life, but that doesn’t stop it from being one of my coolest projects yet. Find the pattern here.

Striped crochet giraffe // www.maybematilda.com

Stripey Giraffe: Visit my original post about this gal HERE. I can’t say I love the process of crocheting amigurumi much—the tight crochet is torture on the hands, and they are boring as he!! to work on—but the finished products are just so sweet. I made this giraffe for Darcy before she was born, and am not at all surprised to tell you she doesn’t give a hoot about it and has never paid it any attention. My children are so unappreciative. Find the free pattern here.

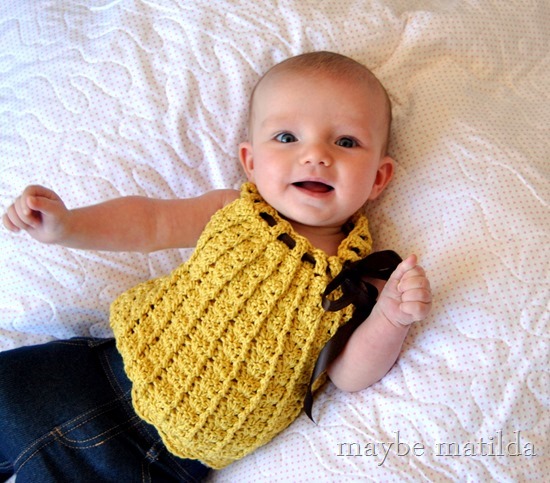
Sweet little crochet baby tank // www.maybematilda.com

Baby tank top: Visit the original post HERE. This darling little tank top quickly became a favorite. Sadly, she outgrew it rather quickly, but I love the unique design and simple construction, and look forward to making another one for Darcy this spring. Find the pattern here.

Granny blanket // www.maybematilda.com

Granny Flower Garden Baby Blanket: Visit the original post for this project HERE. When I first began crocheting, I remember swearing up and down that I’d never make a multi-colored granny-style afghan, which I could only picture as the outdated, uncomfortable, scratchy blankets that no one wants to cuddle up under at grandparents’ houses. But after seeing some examples of how fresh and modern they can be when made with bright colors, I was converted. Find the pattern for these sunburst granny squares here.

Grandma's Lacy Ripple bedspread // www.maybematilda.com

Grandma’s Lacy Ripple blanket: Visit the original post HERE. I am hoping against hope that I never—never, for the rest of my life—get tired of seeing this blanket on my bed, because far too much work went into it to ever replace it. I can’t say much for its warmth (while wrapped up in my sofa blanket made with this same pattern, my brother-in-law Alan asked recently if here was a way to crochet blankets without giant gaping holes that might actually provide some warmth?) but I do love how it looks. Find the pattern here.

ruffles and dots blanket

Ruffles and Dots baby blanket: Visit the original post HERE. I can hardly believe that smiling chubster up there is Forrest. Some years have passed, but this is still one of my favorite baby blankets to make (and I’ve made many blankets using this pattern, in all sorts of fun colors, although the green has always been a favorite). Simple and cuddly and sweet, I think this is a timeless style that has such a fun, modern feel when made in a bright color. Find the pattern here.

Wednesday, January 7, 2015

WIN the Blog Hop Crochet Along Afghan!

WIN this beautiful crochet-along afghan! // www.maybematilda.com
Today kicks off the final giveaway of the Blog Hop Crochet Along! We have pieced together all twenty of the bloggers’ squares from our crochet along into one beautiful afghan that one of you will win!

Most of these squares were actually crocheted by their designers and then mailed across the globe to be put together - this pretty afghan is truly a collaborative effort!


Thanks to all of our bloggers for participating:

 
This giveaway ends 1/14/15 at midnight PST and is open WORLDWIDE! Enter in the Rafflecopter below. Good luck!
 
a Rafflecopter giveaway

Tuesday, July 8, 2014

A Belated Granny Blanket

Props, props, and more props to those of you out there who can manage to plan out a DIY gift, start working on the gift, finish working on that gift, and actually give that gift right on time for the occasion for which the gift is being given. (<—that sentence there? Me and my keyboard don’t totally understand that concept of ‘succinct.’)

My sister Bekah got married at the start of June and since she weighs roughly 42 pounds and suffers from Perpetually Cold Skinny Person Syndrome (PCSPS, if you will), I thought maybe a cozy handmade blanket would make a nice wedding gift for her (it is the only known cure for PCSPS). She and her now-husband will be furnishing and decorating their first apartment together, so I figured I’d kill two birds with one stone and keep the poor skinny thing warm plus give her a throw blanket to decorate the new place with. And I even started nice and early, over a month in advance of the wedding. Then the big day came, the big day went, and almost exactly one month after the hubbub has died down, I finally finished their blanket. Better late than never or something like that.

Blue, pink, and green granny square blanket // www.maybematilda.com

You know what I think the problem is? It’s all those dang ends. I actually had the blanket itself finished almost in time for the wedding (almost is pretty okay, right? not awesome, but pretty okay), but dragged my feet when it came to sewing the ends in for weeks and weeks. I hate, despise, abhor, loathe weaving yarn ends in. The worst worst worst worst WORST part of any crochet project. I need to train Forrest to do it for me. I could pay him in Cheetos and Netflix. This could work. It’s high time he start earning his keep around here, and weaving in my yarn tails sounds like the ideal way to do it.

Blue, pink, and green granny square blanket // www.maybematilda.com

In a slight departure from the typical granny square afghan, I alternated colorful squares with plain white squares. I love that it adds a bit of a brighter, fresher feel to the blanket. And I really like how the thick granny stripe border turned out. I actually had planned on making that border about 3 times wider than it is, but I ran out of the green yarn and couldn’t get my hands on more at any of my local stores. So instead of continuing without it (or waiting for it to arrive by mail), I just finished it off. Maybe I’ll ask for the blanket back and tack on a few more rows of border in time for their 1st anniversary (that’s too optimistic, considering my sluggish turnaround time on this blanket . . . 4th anniversary it is!).

Blue, pink, and green granny square blanket // www.maybematilda.com

And I can already feel it coming . . . someone will ask for the pattern for these squares. And I am so, so sorry about this, but since it’s been so long since I started the blanket, I have no idea where I found the square pattern anymore. I’ve combed through my Pinterest boards and Ravelry favorites and can’t find it, and my googling has gotten me nowhere. I apologize. If anyone recognizes this particular square and knows where I can find the pattern, let me know and I’ll post it here! {Update: woohoo, a reader found it! This pattern appears to be identical to the one I used. Find it HERE. Thank you for the help, Megan!}

Blue, pink, and green granny square blanket // www.maybematilda.com

I used Vanna’s Choice for this blanket in White, Aqua, and Sapphire, and Vanna’s Choice Baby in Sweet Pea and Pink Poodle. Vanna’s Choice is consistently among my favorite yarns for just about every project. Wonderful color choices, affordable, soft (but not so overly soft/slippery that it won’t hold a shape), and it wears very nicely over time. (They are not paying me to say any of this, by the way. I just love my Vanna and would wholeheartedly recommend it.)

Feels good to finally get that blanket off my couch and into the newlyweds’ possession. And I’ve learned my lesson—next time I plan to start a project that produces zillions of dreaded ends to sew in, I’ll give myself a generous 4+ month window.

Monday, February 17, 2014

Granny Stripe Blanket Tutorial Part 3: Scalloped Border

Woohoo, we’re on the final installment of my pattern and photo step-by-step tutorial to make this sweet little granny stripe baby blanket! I’m glad we’ve made it this far. I’m not going to lie to you, friends, I’ve gotten tired of photographing and writing up steps for this blanket. But I will never get tired of this classic, simple style. So pretty.

Pattern and photo step-by-step tutorial to make this cute crochet granny stripe blanket!

If you’re just joining in, or need to jump back, feel free to revisit the first two parts of this series using the links below . . .

Part 1: Blanket Pattern
Part 2: Timesaving Tips and Tricks

Today we’ll finish it up with a nice wide border, ending with some sweet little scallops.

After working through parts 1 and 2, you should have a nice little blanket, completed and ready to add a border. I ended mine when it was something like 30-32 inches square.  My border adds another 4 or so inches. I think this is a nice size for a baby blanket—easy to carry around or play on or snuggle with.

To start the border, either chain 1 with the color you used last, or, if you want your border to be in the color you aren’t currently using, fasten off the last stripe color and join in the border color at the corner of your final row, and chain 1. Work 1 single crochet in each stitch, all the way across this top edge of the blanket. (I like to work the final single crochet of each cluster into the little opening between each cluster instead of just through the top two loops of the stitch. I think it looks neater this way. You can see where I work this stitch in the photo below.)

sc border

Work your single crochets all the way across the top edge of the blanket. When you get to the corner, work 3 single crochets all in the same corner space before continuing on. This will allow you to work evenly around the corner so your border stays nice and flat instead of curling up.

3sc in corner

Now we’re on the side of the blanket, and there aren’t obvious stitches to work our single crochets into like there were along the top edge. You’ll work 2 single crochets around each double crochet (or chain) that starts/ends each row.

DSC_0008-001

If your border looks a little wavy or uneven at this point, don’t worry. As you add more rows, it evens out beautifully.

Once again, work 3 single crochets into the corner of the blanket. Continue working single crochets across the bottom edge of the blanket (which is the starting chain—just place one single crochet in each chain across the bottom), work 3 single crochets into the corner, then continue up the remaining side with 2 single crochets around each dc/ch. Finish up with 3 single crochets in the final corner, and slip stitch to the starting chain 1 of the border to join.

Chain 1 and continue working around until you’ve reached the width you’d like for your border. (Remember to always work 3 single crochets into the point of each corner! Other than the corners, work 1 single crochet into each single crochet around.) When you’re happy with the width, slip stitch to your starting chain 1 to join.

finished sc border

On to the scalloped edge! Don’t chain again before beginning this final row. The last thing we’ve done is slip stitched to join the start and end of the final row of single crochets.

Without chaining, skip the first stitch of the row, and work 5 double crochets all into the next stitch.

first shell of scalloped border

Skip the next stitch, then slip stitch into the following stitch. This slip stitch will ‘anchor’ this first scallop down.

starting scalloped border

Skip the next stitch, and work 5 double crochets all into the next stitch; skip next stitch and slip stitch into the following stitch. Continue all the way around the blanket (you don’t have to change anything to work around the corners; just continue with the pattern of skipping a stitch, placing 5 dcs in the next, skipping a stitch, then slip stitching into the following stitch). So, to summarize, each scallop will have 5 double crochets all worked into the same space, with one skipped stitch on each side, and a slip stitch between each scallop.

scalloped border

As you work your way around and get closer to the start of your scalloped row, you may find that you’ll need to fudge it a little to get your final scallops to fit in nicely. Just do your best to fit them all in as evenly as you can. No one will ever notice if you skip more than one stitch between the final few scallops, or pack them in a little more tightly with fewer skipped stitches. For my last scallop, I had to put two scallops right next to each other without skipping the spaces between them. It’s okay.

When you reach your first scallop, slip stitch to join. Fasten off and weave in all ends. You’re done!

Tutorial and photo step-by-step to crochet this sweet granny stripe baby blanket!

I just love how these sweet granny stripe blankets look. They have such a timeless look, but depending on the colors you choose, you can really make them look so fresh and modern.

Pattern and photo tutorial to crochet a beautiful granny stripe baby blanket

I love how it looks in this crisp turquoise and silver. And it looks awfully nice in Darcy’s nursery! Although I hope it doesn’t stay there for long . . . I’ve put it for sale in my shop, if anyone is interested. You can find it here.

Well, I hope this tutorial is simple and clear enough to follow, even if you’re new to crochet! If you finish a blanket using it, I would love to see it. Tag me in a picture on instagram (I’m @maybematilda), or post your picture to my facebook page!

Monday, February 10, 2014

Granny Stripe Blanket Tutorial Part 2: Timesaving Tips

Last Monday, I shared a photo step-by-step to get you started making a sweet little granny stripe baby blanket (you can find that post HERE). Today, I want to show you two neat little timesaving tips you can use while you’re working to speed things up and save yourself a lot of weaving in at the end. I HATE weaving yarn tails in at the end of a project—it is absolutely, positively, definitely my least favorite part of crocheting. So these two tricks will help cut down on the amount of tails you end up with at the end. Big win in my book.

Part 1: Blanket Pattern
Part 3: Border

Pattern and photo tutorial to make this granny stripe baby blanket!

Timesaving Tip #1: Crocheting tails in as you go

This is a nifty little method to incorporate the tail as you’re crocheting, so you won’t have to sew it in later. If you do this little trick, you can weave the tails in while you’re working, and it’s just as secure as it would be if you waited until the end of your blanket and sewed it in as you normally would. I love being able to cut out that step.

Okay, so here we are, ready to change colors for the next stripe of our blanket. We’ve joined in the silver yarn and chained 3 to begin our next row. To work that silver tail in as you go, pull the silver yarn tail to the front of your work and use your thumb to hold it down snug against the first 3 double crochet cluster of the previous row.

How to crochet yarn tails in as you work so you don't have to weave them in at the end

Begin your next double crochet as normal—you’ll be working right over the silver tail, trapping it under the stitch. But don’t finish the double crochet just yet—stop halfway through the stitch (you’ll still have 2 loops on your hook). See how the stitch is worked right over the silver tail?

How to crochet yarn tails in as you work so you don't have to weave them in at the end

Now bring the silver tail up and drape it over the silver working yarn, from front to back. I hope this is clear in the picture below . . . this process was a little difficult to photograph. (And I tried 3 times to shoot a video and they were all disastrous, so photos it is.) To summarize so far, the silver tail went underneath the double crochet, and now, halfway through the double crochet, it is coming up and over the working yarn. Hold the tail at the back of your work for now.

How to crochet yarn tails in as you work so you don't have to weave them in at the end

Finish your double crochet stitch as you normally would, by grabbing a loop of the working yarn and pulling it through the two remaining loops on your hook. The silver tail should now be coming out of the halfway point of that stitch—see how in the picture below, the tail is coming right out of the middle of the double crochet?

How to crochet yarn tails in as you work so you don't have to weave them in at the end

To continue from here, drape the silver tail over the working yarn again, this time bringing it from back to front over the working yarn (the opposite of what we did in the previous step when we draped it from front to back). So it’s now coming up and over the working yarn, and should be pulled forward to the front of the work again. By draping it over the working yarn as we work the stitch, we’re carrying it up along with the stitch as it’s made, essentially weaving it in, just like we would at the end if it were just a dangling yarn tail. Hold it down snug with your thumb against the next 3dc cluster of the previous row.

How to crochet yarn tails in as you work so you don't have to weave them in at the end

Now we’ll just repeat what we did already from the start—work the first 2 double crochets of this 3dc cluster right over the silver tail. Stop halfway through the third double crochet.

How to crochet yarn tails in as you work so you don't have to weave them in at the end

Repeat the front to back, then back to front draping process that we did before. Bring the tail from front to back over the working yarn, finish the stitch as normal, then bring the tail from back to front again over the working yarn. The yarn tail will always go underneath all three stitches of each cluster, then it will be draped and carried up with just the final stitch of each cluster.

Continue this process until you’ve run out of yarn tail. It’s best to stop when the yarn tail is underneath the stitches rather than mid-stitch. See the picture below—the little stubby end of the silver tail is coming out of the sixth dc cluster of the row, and instead of trying to carry it up into the final double crochet of the cluster, I just left it there. And since it’s been carried under and up and through all those clusters, it’s just as secure as it would have been if I’d waited until I was finished with the blanket and sewn it in. Neat, huh? Having fewer tails to sew in really makes me happy.

How to crochet yarn tails in as you work so you don't have to weave them in at the end


Timesaving Tip #2: Carrying colors

Another super easy trick is to eliminate many of the yarn tails altogether by carrying the colors up the side of the work instead of cutting them at the end of each row. This really only works if you’re planning to do a border around your blanket, which will hide your ‘carried’ yarn. If you’re not going to add a border, I wouldn’t recommend this. And this works best if you’re doing short stripes (like my blanket with two rows in each color), and only switching back and forth between two colors.

So here we are at the end of our silver stripe, ready to switch back to blue for the next stripe. But wouldn’t it be nice if we didn’t have to cut the blue to rejoin it, and cut the silver to join it in again for its next stripe? So many tails to weave in. I hate tails so stinking much.

How to carry yarn up the side of your work instead of cutting it

So let’s not cut anything. Instead, we’ll just bring our blue working yarn up and pull it through the silver loop already on our hook.

How to carry yarn up the side of your work instead of cutting it

You have to be quite careful with your tension here. Pull the silver yarn snug, and play around a bit with the blue yarn to see how it looks if you leave that yarn you carried too loose (it’ll gap open against the side of your work, and be harder to hide effectively with a border later), and how it looks if you pull it too tight (it’ll make your blanket pucker and scrunch up if it’s pulled too tightly). You want it to be just snug enough that the edge of your blanket lies flat without the carried yarn looking too loose.

DSC_0153

Now you’ll make your chains and just continue crocheting normally. See how the blue yarn that we carried up is lying nicely against the edge of the work?

How to carry yarn up the side of your work instead of cutting it

Let’s fast forward two rows . . . here we are, ready to switch back to silver. We’ll do exactly the same thing we did before. Bring up that silver yarn that’s dangling two rows down, and pull it through the blue loop already on your hook, and continue working normally.

How to carry yarn up the side of your work instead of cutting it

So at the end of each color stripe, just bring up the other color yarn and begin working with it again without cutting anything. One side of your blanket will have all the carried yarn along the edge—see how at the end of each color, you can see the other color being carried along?

How to carry yarn up the side of your work instead of cutting it

That’s why I wouldn’t recommend using this little trick unless you’re adding a border to your blanket. When we add our border, we’ll crochet right over those carried yarns, and you won’t even be able to see them anymore—perfect!

Next week, we’ll finish it up when I share the tutorial for the cute scalloped border!

Monday, January 20, 2014

Granny Obsession

Who doesn’t love a nice granny, really? So classic and timeless and snuggly.

We’re all on the same page, right? We’re talking granny stripes. Everyone loves a human granny, too, I’m sure, but the granny variety I’m currently obsessing over is the crocheted version.

It started with Darcy’s baby blanket. I wanted to make her something very simple and sweet, so I went with a traditional granny square blanket in a pretty sage green (a lovely color that is, sadly, completely butchered by this crappy cell phone picture) and tossed a few cream stripes in to keep it interesting.

Green and cream granny square blanket

I worried that maybe I’d get bored with this blanket over time—it is a very clean, simple look—but in the months since I made it, I’ve really come to love it more and more. And I needed more granny goodness in my life.

So I started on this little brown and cream number, and it was such a delight to make.

Brown and cream crochet granny stripe baby blanket

There’s just so much to love about granny stripes and squares. They’ve got that simple, classic look. They have endless variation possibilities. Depending on the colors you choose, they can be bold and dramatic, or soft and sweet, or modern and edgy. They’re quick to work up, and don’t require a vast amount of knowledge or experience. What’s not to like?

A simple and sweet brown + cream granny stripe blanket.

I love how the brown and cream blanket turned out  . . . the colors are understated and simple, but it has such a great classic look. I added a scalloped edging, and I love what it adds to the blanket. I’m really happy with how it turned out. (If you’re interested, it’s in my etsy shop now!)

I also loved the idea of a simple granny square blanket in a neutral color, with a bold punch via a cool and unexpected border. So I played around and came up with another baby blanket.

A simple granny square blanket with a bold mixed stitch border

I love this finished look. Starts out as a simple, standard granny square blanket, but BAM. That’s an exciting border if ever I’ve seen one.

Fun mixed stitch border for a crochet baby blanket

It was surprisingly liberating to just start out a mixed stitch border without a plan in place—I just picked whatever color and stitch felt right at the time. I normally really plan things out before I begin, so it was very different for me to just wing it here. And very gratifying to have it turn out nicely, too! I can’t wait to make another with a set of brighter colors for the border—I’m picturing springy pinks and greens.

And a work in progress—after the chocolate and cream granny stripe blanket, I thought it might be fun to do one in a single color scheme. I dug all these purples out of my stash and am making a conscious effort to be a little more random than usual and not plan out the stripe sequence.

Purple granny stripes!

It’s shockingly difficult to not stress about how the overall stripe pattern will look and just choose a shade of purple for each row without worrying if it’s too soon to repeat that shade, or if another shade might look better there . . . but the effect has been fun so far. I clearly need to loosen up, if total control over something as ridiculous as stripe sequence is this difficult for me to give up.

I’m thinking of writing up patterns for the mixed stitch border blanket and the granny stripe with the scalloped border, so you may be seeing more of them in the future. If you love grannies as much as I do, hopefully you won’t mind.

Related Posts Plugin for WordPress, Blogger...