Maybe Matilda: gift
Showing posts with label gift. Show all posts

Wednesday, March 9, 2016

Non-Candy Easter Basket Gift Ideas

Now, right off the bat: I have no problem with candy. None whatsoever. We eat plenty of it around here, and there will definitely be candy in our kids' Easter baskets.

Just wanted to get that out of the way in case anyone was getting ready to feel judged or looked down on. No sugar-hating here.

But I know lots of parents like to walk the non-candy path for Easter, or add a little toy or gift to their kids' Easter goodie baskets, so I thought I'd gather up a few fun items that we've either used in the past, or are looking at this year, that are perfect for tucking into an Easter basket.
great springy ideas for non-candy gifts to tuck into kids' easter baskets

1. I love including Easter outfits in the kids' baskets. They'll be receiving an Easter outfit anyway, so why not fold it up and stick it into their basket so it feels more like a present? I love these striped shorts and this cute poplin top for little guys.

2. I already bought Darcy's Easter dress but can't find it online anywhere (sad!). The one I chose for her looks pretty similar to this darling embroidered chambray dress (LOVE it!), and how cute would it be with a floppy straw hat on top?

3. Of course I can't leave books out. These three picture books are bright, cheerful, and perfect for spring: Cloudette by Tom Lichtenheld, My Garden by Kevin Henkes, and Duck & Goose by Tad Hills.

4. I've written a few times about my undying love for Beddy's awesome zipper bedding, and let me assure you, that love burns on (and sizzles yet brighter every morning that Forrest makes his own bed neatly without my help, and my own bed takes like 10 seconds to zip up). You can see their bedding in Forrest's room HERE, and in my bedroom HERE.

Beddy's has just come out with an adorable new product -- Beddy's Buddies. They are soft and squishy plush monsters that come with a hardcover picture book encouraging kids not to be afraid of monsters under their beds. They sent a set of monsters to my kids, and I'm not exaggerating when I tell you that their monsters have been dragged everywhere we've gone since the day they arrived.

beddys buddies

They're big, fuzzy, and super snuggly, and would be so cute as an Easter basket item! You can save 20% on your buddy + book combo with coupon code BUDDIES.

beddys buddies

beddys buddies

5. I love giving something that gets the kids outside to take advantage of spring weather (like bubbles, sidewalk chalk, or a big bouncy ball), and this sprinkler looks like so much fun! And it has over 400 5-star reviews, so it feels like a pretty safe purchase.

Do you have any Easter basket traditions in your family?

Monday, November 9, 2015

3 Ingredient Peanut Butter Bars (with free 'fall' leaf cut file!)

This shop has been compensated by Collective Bias, Inc. and its advertiser. All opinions are mine alone. #SpreadTheMagic#CollectiveBias

The good news: we have quite a bit of Halloween candy hanging out in our pantry right now. 

The bad news: all the good stuff is long gone and we're left only with the varieties no one wants to finish off. I'm looking at you, candy corn. Candy corn an embarrassment to other self-respecting candies. I hated it passionately until a college roommate taught me to mix it with salted peanuts . . . suddenly, it was transformed into something entirely different. I gained a new respect for candy corn that day. It is abominable on its own, but can actually be pretty great mixed with peanuts.

If you have leftover candy corn that you don't know what to do with, here's the solution. Turn those awful little candies into some of the yummiest peanut butter bars you've ever tasted--delicious, rich, quick, and easy. And yes, it's hard to believe, but there really is candy corn hiding in there. 

3 ingredient peanut butter bars

Yep, only 3 ingredients necessary for these yummy bars. You don't even have to turn on your oven, and you'll spend all of 5 minutes getting this ready. (Although, fair warning, you do have to let it cool and harden before you can dig in.)

The best part is, they taste unbelievably similar to some of my favorite chocolate and peanut butter candies. So even though all the best Halloween candy is long gone, its spirit lives on in these bars.

3 ingredient peanut butter bars made with candy corn!!

Our 3 ingredient line up for these bars: candy corn (which we'll melt down into a gooey and delectable concoction), chocolate chips for a creamy top layer, and Peter Pan's NEW Simply Ground peanut butter, which I picked up last week at Walmart. 

Now, I have a long-running love affair with peanut butter. I descend from a proud family tradition of experimenting with every nut butter we can find, fighting over who would get the last peanut butter candy, occasionally making our own nut butters at home, and eating it all straight from the jar with a spoon. And this new peanut butter? Well, color me impressed. 

Because creamy peanut butter? Great. Can't get enough. Crunchy peanut butter? Awesome. But I'm not sure I've ever before had a store bought peanut butter living in that perfect middle ground between creamy and crunchy, with a wonderful freshly-ground texture that isn't too crunchy nor too smooth. And it's absolutely perfect for these bars--I've experimented with both creamy and crunchy when making this recipe in the past, and while they've always turned out yummy, neither has offered quite the texture that I wanted. The Simply Ground gives the bars just enough texture and crunch (and without having to stir it in the jar--I hate doing that). Just take a look at it.

3 ingredient peanut butter bars made with candy corn!!

See what I'm saying? Love it.

Anyway. Back to the bars. 

You'll microwave a bowl of candy corn, stirring every 30 seconds or so, until it's melted and smooth. Don't overheat it! 
3 ingredient peanut butter bars made with candy corn!!
Then stir in the peanut butter until smooth. You'll want to work quickly, as the melted candy corn will start to harden back up quickly as it cools.

Spread it into a 9x9" square pan, lined with foil and lightly sprayed with nonstick spray. I find it easiest to lightly spray my hands and just use my fingers to press and spread it into the pan.

3 ingredient peanut butter bars made with candy corn!!

Melt the chocolate chips in the microwave, and spread it over the top of the bars.

3 ingredient peanut butter bars made with candy corn!!

Pop it in the fridge to cool. When the chocolate has hardened, use the foil to remove the bars from the pan, peel the foil away and toss it out, then cut into pieces.

3 ingredient peanut butter bars made with candy corn!!

I had to get some of this goodness out of the house ASAP, so I packaged some up to deliver to neighbors. I love the festive fall orange color of the bars, so I echoed that with an orange fall leaf gift tag, wrapped around each package with twine.

3 ingredient peanut butter bars made with candy corn!!

I love how easy it is to package up a cute tasty gift for neighbors. I designed the tag in Silhouette Studio, and cut them out with my Silhouette. If you'd like to make these tags yourself, you can download the cut file for your personal use and enjoyment HERE

1. Just cut the design with your Silhouette and remove the letters.

2. Place some bars in a bag, and wrap the top shut with twine. 

3. Punch a hole in the top of the leaves (I realized too late I could have had the Silhouette cut the hole for me--d'oh!), and thread a leaf onto the twine, then tie off in a knot.

So simple, but so cute!

3 ingredient peanut butter bars made with candy corn!!

3 Ingredient Peanut Butter Bars

1 cup candy corn
1 cup peanut butter
1 cup milk chocolate chips

Line a 9x9" square pan with foil, and spray lightly with nonstick spray. Set aside.

In a medium-size microwave-safe bowl, melt candy corn in the microwave, removing to stir every 30 seconds. Don't overheat the candy corn--heat it just until melted. Add peanut butter and stir to combine. If you're having a hard time mixing it in thoroughly, heat the peanut butter and candy corn combo in the microwave for a few more seconds to loosen it up.

Pour candy corn and peanut butter mixture into prepared pan and spread evenly. It's quite thick and sticky, so this could be a bit tricky, but the easiest way to handle it is to spray your hands with nonstick spray and then press it into place.

Melt chocolate chips in the microwave, stirring every 30 seconds until smooth and creamy. Spread evenly over bars. Refrigerate bars about 1 hour or until hardened. Remove from pan, remove foil, and cut into pieces.
___________________________________________________

And more good news: if you want to try out new Simply Ground peanut butter, you can grab a digital coupon HERE to save some money on your purchase! You can find it at Walmart in the aisle with peanut butter and other condiments.
simply ground peanut butter at walmart

(Cute little shopping buddy not available for purchase.)

What peanut butter flavor fits your personality? Take this quiz to find out!

Monday, December 8, 2014

Dare to Give Handmade Link Up and Double Pom Pom Hat Pattern

Welcome to my favorite week of Dare to DIY: Dare to Give Handmade! Today’s link up is right here at Maybe Matilda, so don’t forget to add YOUR handmade project. Make sure also to visit my cohosts, Newly Woodwards, Décor and the Dog, and Shift Ctrl Art, to see their lovely work. I wouldn’t complain about receiving a single one of their awesome gifts this Christmas.

For my handmade gift, I crocheted a darling little double pom pom hat for Darcy. Because if 1 pom pom is adorable, 2 pom poms are so cute it could kill you.
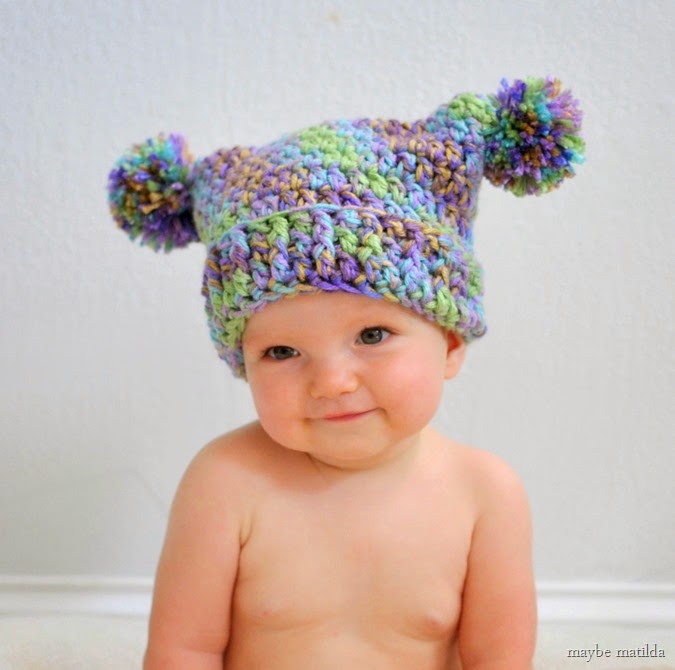
Free crochet pattern to make this adorable double pom pom hat!

Are you dead?

I’ve been particularly loving big, chunky, thick hats for my kids this year, and I wanted to come up with something kind of silly and fun for Darcy to wear. You could, of course, use a bulky weight yarn to crochet this hat. I almost never have bulky yarn just lying around, but I always have quite a supply of worsted weight, so I crocheted this hat with 2 strands Red Heart super saver variegated yarn. The label was lost long ago, but I believe the name was Wildflower. I don’t use variegated yarns often, but that may change, considering how much I love how this hat turned out. I think this style is darling on babies and kids of any age, and would even be fun for an adult . . . with a sense of humor :-)

Free crochet pattern to make this adorable double pom pom hat!

As with many of my crochet tutorials that I post here, this is more of a ‘guide’ than a strict pattern. It can be adapted to any size and is wildly forgiving, and I’m not including specific stitch counts because it is so easy to change to whatever size you decide to make it.

All you’ll need to know in order to size it properly for the person you’re gifting to is their head size. And since you may not have all your friends’ head measurements memorized, I’d recommend you visit THIS LINK for a hat size chart based on age.

Also, please don’t be afraid of the foundation single crochet that I use to start this hat. It isn’t difficult, and it offers SO much more stretch than the traditional starting chain, which is perfect for a project like this where we start with the brim and work our way up. Stretchy brims are definitely a good thing.

Double Pom Pom Hat

Materials:
- bulky weight yarn or 2 strands of worsted weight yarn (I can’t give much detail on how much yarn you’ll need—it will depend on the hat size you make—but for the pictured hat made for a 1-year old baby, I used almost 1 full skein of Red Heart Super Saver.)
- K hook (10 mm)
- blunt large-eye needle for sewing tails in
- optional: pom pom maker (I love this Clover set—worth every penny)

Abbreviations:
fsc = foundation single crochet
dc = double crochet
sl st = slip stitch
fpdc = front post double crochet
bpdc = back post double crochet
ch = chain

Notes:
Hat is worked from brim up. Do not turn your work at the end of each row. The finished hat will be roughly square shaped, with 2 pointed corners at the top, where you will place your pom poms. Leave a long yarn tail at the end of your work to sew the top of the hat closed.

1) Start with a row of fsc long enough to reach easily around the head of the person you’re crocheting for. Visit THIS page for average head sizes. So if you are making this hat for, say, a 9-month old baby, work fsc until your piece measures about 18 inches in length.

Sl st to join your work in a loop (make sure the loop is flat and has not twisted!).

2) Ch 2,  dc in each stitch around. Join with sl st to top of starting ch.

3) Ch 2, *fpdc in next stitch, bpdc in next stitch. Repeat from * around. Join with sl st to top of starting ch.

4) Repeat row 3, working fpdc in each fpdc of previous row and bpdc in each bpdc of previous row.

5) Ch 2, dc around in back loop only of each stitch. Join with sl st to top of starting ch.

6) Ch 2, dc around. Join with sl st to top of starting ch.

7-?) Repeat row 6 until desired hat ‘height’ is reached. Visit THIS page for hat height suggestions based on age. Add roughly 2 inches to suggested hat heights, since this style is meant to sit high on the head and fit loosely. Fasten off when desired height is reached, leaving long yarn tail.

Use ending yarn tail to stitch the top of the hat closed. Simply lay the hat flat with the seam centered in the back, and sew back and forth with the ending yarn tail to create a long, flat seam. The hat will look square. Sew in all yarn tails.

Using a pom pom maker, make 2 large pom poms. Sew pom poms to top corners of hat.

Free crochet pattern to make this adorable pom pom hat!

As with all patterns/tutorials from my site, feel free to make some, give some, sell some! Just please include a link back to my site as your pattern source if you decide to sell online :-)

Check out my cohosts’ awesome handmade gifts:

Dare to Give Handmade gifts

Pom Pom Hat by Maybe Matilda // Homemade Candy with Ombre Dyed gift bags by Shift Ctrl Art // Crochet Tote by Newly Woodwards // Stovetop Potpourri by Décor and the Dog

I can’t wait to see YOUR handmade gifts! What have you created to give as gifts this Christmas? Link your projects below! Please remember to link back to one of the Dare to DIY cohosts—Décor and the Dog, Newly Woodwards, me, and Shift Ctrl Art :-)

Friday, December 13, 2013

Handmade Gift Features + Our Christmas Cards

Another excellent week of Dare to DIY, this time showing off your handmade gifts that you came up with for the holidays! Here were 2 of my favorites . . .

I loved this infinity scarf made by Anne at Planting Sequoias. She used old, unloved sweaters and turned them into fun, colorful infinity scarves. A compelling reason to take up hoarding, no? Read more about her project HERE.

Wool Sweaters into Infinity Scarves! 

And I thought this pillow was just adorable, too! Cec from Ceci Bean used plain ol’ felt to create this chic chevron pillow. So simple, but so pretty and fun. Read more about it HERE.

I loved seeing all the handmade gift ideas—there was so much great creativity at the link party! Make sure to swing by NewlyWoodwards on Monday to participate in the last link party of the series . . . Dare to Deck the Halls!

Now, here’s where I’d normally share a sneak peek of my project for next week’s link party. But, ummmmm . . . I haven’t started anything yet. And I don’t really have any ideas brewing, either, so hopefully inspiration will strike over the weekend, or else I’ll be awfully embarrassed come Monday when I have nothing to contribute to the party I’m co-hosting.

But worry not, I have something else to show instead . . . I’d love to share my Christmas cards this year! The folks at Tiny Prints offered to give 50 free Christmas cards as a giveaway along with one week of Dare to DIY, and were kind enough to also give some cards to the Dare to DIY co-hosts! It was my first experience with Tiny Prints, and I’m so impressed. There is a huuuuuge selection of holiday cards on their site, they are all absolutely beautiful, and they span such a great array of styles, so there is definitely something for everyone, to fit every style. It was a little tough to decide on just one card with such a huge selection, but I settled on a design from their Woodland themed card collection, and am thrilled with how they turned out.

Love these Christmas cards from Tiny Prints!

How cute are they?! How awesome that I was able to find a card that I love the look of and it also just happens to coordinate beautifully with the colors in our picture! The cards are so lovely in person, and such great quality—the paper is so heavy and sturdy, there’s even a coordinating design on the back of the card, and I love the matching envelope liners. Awesome, awesome cards. If you’re still in the market for holiday cards (or New Year’s cards, or birth announcements, or ANY kind of photo card), I would absolutely recommend checking out Tiny Prints!

I’ll see you Monday at NewlyWoodwards for Dare to Deck the Halls!

Monday, March 25, 2013

More Last Minute Easter Crochet

So, at about this time in 2011, I wrote a post sharing some cute crochet patterns that would make awesome last minute Easter gifts. And for some reason, it got and continues to get a good amount of attention (weird—I’m always kind of surprised when any of the garbage I write here gets attention), so I figured I’d do another one this year with newer pattern ideas!

Now, first things first: I get at least one email a week asking for the pattern to the chick in a bunny suit I made and linked to in the previous Easter post:

The good news: it’s a super cute, super fast little project that will work up in no time, perfect for tucking into an Easter basket.

The bad news: it used to be free, and now it’s not. But it’s only $3, and you can find it right HERE in the Dawnie Dolls etsy shop. (The photo above is my version of the project, which I took some liberties with, so make sure to check out the listing pictures to see how making one exactly as written will turn out!)

Now that’s out of the way, here are my top 5 picks for quick, adorable Easter crochet patterns (all free!) that would be perfect to start and finish in one or two days and add to an Easter basket! (Note: while a few of these are on my to-do list, I haven’t made any of them yet, so I can’t comment on the patterns themselves or finished projects made using them!)

Easter Peeps crochet pattern

If there is a Peeps fan in your house, this Easter Peeps pattern would be so cute and funny to make for them! I have no fondness for Peeps, so the crocheted version looks much better to me than the real deal.

Easter Egg crochet pattern

I love the idea of making a dozen colorful little Easter eggs to use for decorating or filling baskets. Sure beats dyeing eggs every year—not my favorite holiday activity. Get the free Easter egg crochet pattern HERE!

Free Cute Easter Bunny crochet pattern

I love the unique look of these little Easter bunnies! So colorful and cheerful, and the lack of appendages would make them SO quick to work up. Get the pattern HERE.

Easter chick crochet pattern

Doesn’t this little Easter chick look so sweet? It’s hard to tell how big he turns out, but I’m guessing he’s little enough to tuck into an Easter egg. Awwww! Get the pattern HERE.

And last but not least:

I love the Boxy Skirt Bunny! They look cute in every color combo, and look like they’d be a lot of fun to customize and play around with. Get the pattern (a Ravelry download) right HERE.

Have you crocheted anything for Easter this year?

Wednesday, February 13, 2013

Crochet Dog Stuffies for Valentine’s Day

I’m not all that into Valentine’s Day. I mean, it’s nice, and I always appreciate getting a card or candy or flowers or something, but my husband and I don’t typically make a big deal out of it. We went to Chili’s last weekend . . . that’ll probably count as our Valentine’s date. Chili’s! The ribs! The romance!

But now that we have this little boogerface stinking up our house, I kind of want to make it a fun day for him. So we’ll be spending today baking up Valentine’s goodies, and I can’t wait to give him his present tomorrow . . .

Crochet Amigurumi Dog by maybe matilda

A little crochet puppy! He’s cute, huh? The sweater gets me. It gets me every time I look at him. Forrest is pretty into puppies (and kitties aka ‘titties’; yes, that’s right, titties) at the moment—his new favorite game is coming up to me while I’m on the couch, meowing or barking at me, then saying, “gent-oh? gent-oh?” (which is how we try to remind him to pet nicely, I think he thinks ‘gentle’ just means ‘pet’) and waiting to be petted or have his belly rubbed. It’s pretty sweet. I hope he likes his little puppy dog.

And I couldn’t resist showing him off to my sister ahead of time, and she liked him a lot, too, so guess what she is also getting tomorrow?

Girly Puppy Amigurumi by maybe matilda

The girly version! I like this one even better than the one I made for my son. I like the colors better, and I did a better job with placing the facial features. I almost don’t want to give her away.

Amigurumi Dogs

I used the Amigurumi Dog pattern from Lion Brand Yarn, and they were a cinch to work up. Relatively quick (although making all the separate pieces is kind of slow and tedious, I’ll admit), but overall a very simple pattern. I wasn’t crazy about the ears in the pattern, so I went for a more folded-over look instead. I like how they turned out.

Crochet Puppy by maybe matilda

A moody close-up. She’s pondering the state of the economy, or maybe thinking about something deep like . . . I don’t know . . . the poetry of . . . Ginsberg? (The only name that comes to mind . . . it’s early, I’m still waking up, cut me a break.)

I tossed up some listings in my shop for custom versions of these little puppies—you can find the boy puppy HERE and the lady puppy HERE, and message me for a discount if you plan to buy two or more! As always, feel free to play around the colors when you order . . . I’ve got a nice big yarn stash, just begging to be used in whatever creative color combos you come up with.

Did you make any Valentine’s gifts this year?

Friday, January 4, 2013

Handmade Gift Exchange Goodies

You probably already know that Linda at Craftaholics Anonymous puts together a handmade gift exchange twice a year.  If you want to participate, you’re given the name of someone to create a handmade gift for, and someone else creates a handmade gift just for you. A fun way to make some new friends, try a new (or revisit an old) craft, and give and get something exciting.

I participated in the exchange last June. Yes, over 6 months ago. And although participants are encouraged to blog about the gifts they gave and received, I never got around to it. I’m such a rebel.

So now, 7 months later, I’m ready to show you the gifts I made for my partner in the gift exchange. Maybe next week I’ll post about a dinner recipe I made 6 months ago, or an outfit I wore on the 4th of July, just to keep up the retroactive blogging streak. I was given Jenna’s name for the exchange and had fun getting to know her by email and stalking her blog to feel out her style—at the time of the exchange, she was pregnant and didn’t yet know the gender of the baby (her cute little girl was born in November!), so I came up with these goodies for her and the new baby.

DIY goodies

I started out making a ruffle scarf for Jenna—I am so far past remembering where I may have found instructions for any of these projects, but I’ll give you the gist of this one: knit/jersey material cut into a scarf shape, shirred with elastic thread in the bobbin, sewn in three straight lines up the length of the scarf. Done. It was so quick and simple, and I thought it came out really cute. (If you want more detailed instructions on this one, let me know in the comments—I’d be happy to remake one for myself and post more details!)

DIY ruffle scarf

And of course a crocheted hat for the new baby was a given (I’m sure she didn’t see this one coming at all!). Since she didn’t know the baby’s gender, I went with a neutral style that looks equally cute on little boys and little girls—a cream-colored bear hat. One of my favorite hat patterns to make.

Handmade Crochet Baby Bear Hat

I was so excited to check her blog recently and see a picture of her new daughter Reese wearing the hat! Isn’t she a doll? I can’t tell you how happy it makes me to see my items being worn in real life. If you ever happen to buy or receive something from me, please send me a picture of it in action, I love it. I once saw a lady in a store wearing what appeared to be one of my headwraps and although I was too shy to ask her about it, I’ve remained secretly delighted by the possibility that I made that for her ever since. Needless to say, I am in love with this picture of little Reese in her hat.

I finished up the package with a set of embellished magnet clothespins for the fridge. I thought these came out so cute that I made a matching set for myself. Once again, I have no idea where I found instructions for these, but they’re just as easy as the ruffle scarf was: cut cute papers to fit on clothespin, adhere with mod podge, cut strip of magnet to fit back, attach magnet with glue. Quick to make, and they are so cute on the fridge. Way more stylish than the free magnets from pizza places and realtors.

DIY Paper Embellished Clothespins

It was such a fun way to get to know someone new and try some DIY projects I might not otherwise have thought of. And I loved the thoughtful gift I received as well—it’s being put to good use in Forrest’s room, and maybe in another 7 months I’ll get around to sharing his bedroom. Always the timely and prompt blogger, right here.

Tuesday, December 18, 2012

Handmade Gift Idea: Make a Coloring Book from Family Photos

(This was originally posted a few weeks ago on Eat. Sleep. Make. as part of their Stuff Your Stockings series—check it out for more great handmade gift ideas.)
 
You know how I love making handmade gifts for loved ones for Christmas, but there is a slight problem when it comes to a certain little cherub I know: he has hated just about everything I've ever made him.
Snapshot_20120803_13
I know. With a face like that, it’s hard to believe, but it's the sad truth. Over and over throughout the past 2 years, I've spent hours and days and weeks making something special for him--whether a crocheted baby blanket or handmade clothing or toys or crocheted sweaters--that he promptly tosses and shouts at and becomes infuriated with when I finally present them to him. It's depressing, and I must be a slow learner, because I keep trying and getting rejected.
 
So for this Christmas  I thought maybe I'd fool him into thinking I didn't make his homemade gift. I'm hoping that if he thinks I didn't make it myself, maybe he'll like it better. So I took a different route and stepped away from my typical crocheted and sewn creations, and tried my hand at something new, something he wouldn't recognize as a DIY project at all . . . a personalized coloring book made just for him using photos of himself and loved ones.
 
How to make your own personalized coloring book
 
This project was as easy and quick as a DIY project can possibly be, required almost no skill or knowledge whatsoever (other than the ability to upload pictures to a website, print them out, and drive yourself to an office supply store), and looks absolutely adorable. And I think he'll even like it. (Fingers crossed.) Ever since he was born, I've wanted to make a little book of his family members, near and far, so he could learn their names and faces (especially for family members who live far away and don't see him often), so I went with a "Who Loves Forrest?" theme and included pictures of his grandparents, aunts and uncles, and cousins for him to color in this book.
 
Here's how I made Forrest's coloring book:
 
1. Head over to Coloring Page Creator and set up an account (it's all completely free!). I believe you can also make a coloring book without actually setting up a membership and joining the site, but it probably won't save your work if you have to step away from the computer.
 
2. Start uploading the pictures you'd like to include in your book, and the site will automatically transform them into black and white coloring pages. I learned that some photos work better than others--it's best to stick with close-up shots that don't have a lot of background action happening. For instance, take a look at this picture of Forrest with his Uncle Jake: it's a tight, close shot of faces without much happening in the background, and it turned into a really crisp, clean coloring page:
Make your own personalized coloring pages
And compare that to this one, which is kind of busy with all the trees in the background and grass in the foreground--it still made a decent coloring page, but it's busier, distracting, and not as crisp-looking. I'm  glad it's part of the book since he is crazy about his "Elmo and Papa" (grandma + grandpa) and will be out of his mind with excitement to color them, but you can see that certain pictures transfer to black and white outlines a little more nicely than others.
DIY Coloring Pages made from Family Photos
3. Click the "Create a Coloring Book" tab and add your pictures to your book! When it's all set up how you'd like it, you can save and download the book as a PDF.
 
4. Print your pages. Here's what I liked so much about the site Coloring Page Creator--there are quite a few websites out there that will turn your photos into coloring pages, but I loved that I could print them out right at home without their logo on the pages. Many sites automatically include a watermark or a logo or their site name printed somewhere on the page. I loved that with this site, there was nothing added to the pictures at all. Just your photo, as a coloring page, period. (And they're not paying me to recommend them, by the way--they don't know who I am--I just was very happy with the site and with the end result!)
 
5. Bind your book. If you'd like, you can certainly staple the pages together or bind them however you'd like at home (I think it would be neat to slip them into those plastic sheet protectors so it becomes, more or less, a 'dry-erase' book--kids could color right on the plastic protector with markers, then wipe it off and start over later). I headed over to Office Depot and paid about $4.50 to have my pages spiral bound with a clear, hard plastic cover. Then I just packaged it up with new markers and it's ready to stick under the Christmas tree!
 
DIY Coloring Book
 
(To make the "Who Loves Forrest?" text and image for the front, I just uploaded a photo of Forrest and my husband to PicMonkey, added the text, saved it, and then uploaded that image to Coloring Page Creator. Easy as pie, and it makes a nice cover page!)  

Hopefully I’ll finally fool him into enjoying something I made for him. As long as he doesn’t read this post, I should be okay.

Thursday, December 6, 2012

Top Picks from Dare to Give Handmade

Thank you all for linking up to the Dare to DIY Give Handmade link up!  There were so many great projects that we decided to compile our favorites into one big handy dandy post.  If you’re still searching around for handmade ideas to make and give this year, look no further. You’re all set.

20 Handmade Christmas Gift Ideas

Check out all 20 gorgeous handmade items (links to posts below the collage):

 House Drawing by Planting Sequoias * Card Table Playhouse by Anything Pretty

Dog Silhouette by A Peachtree City Life * Wine Gift Bags by Bowl of Cherrys

Wine Cork Trivet by B&B Build a Life * Christmas Joy Felt Pillow by Our Next Great Adventure

Owl Coasters by Boxy Colonial  * Vanilla Brown Sugar Body Scrub by Wills Casa

Sharpie Mugs by Shannaigans * Travel Jewelry Holder by Naptime DIY

Gold Leaf Agate Coasters by Desert Domicile * Lilly Doll by Home in the Country

Festively Red Spread by Little Rays of Sunshine * R2D2 Stocking by Creative Chaos Art

Geometric Necklace by Ceci Bean * Mason Jar Snow Globes by The Sweetest Digs

Woodbead Necklace by Decor and the Dog * Crochet Blanket by Maybe Matilda

Dish Towels by NewlyWoodwards * State Necklace by Two Twenty One

We will be pinning all of these handmade gifts to the Dare to DIY Projects board.  You can also find all of the co-hosts on Pinterest: Decor and the Dog, Maybe MatildaNewlyWoodwards, and Two Twenty One.

Hopefully you’re plugging along on those Christmas projects. I have quite a few handmade gifts in mind that I haven’t even started yet. Maybe someday I’ll get all organized and under control . . . nah, probably not. Can you even imagine?

Next week’s challenge is Dare to Deck the Halls. You ready?

(And in case you need just one more handmade gift idea, check, out my guest post today on Eat. Sleep. Make—a simple DIY gift for kids on their Stuff Your Stockings series!)

Related Posts Plugin for WordPress, Blogger...
