Most of these squares were actually crocheted by their designers and then mailed across the globe to be put together - this pretty afghan is truly a collaborative effort!
Wednesday, January 7, 2015
WIN the Blog Hop Crochet Along Afghan!
Most of these squares were actually crocheted by their designers and then mailed across the globe to be put together - this pretty afghan is truly a collaborative effort!
Thursday, November 13, 2014
Puffed Flower Square
Today’s my second go at sharing a granny square for the Blog Hop Crochet Along! It’s been so fun to see all the bloggers’ unique designs, and I’ve loved following along in the facebook group to see all the participants’ take on the patterns. Thanks to all who are joining in—it’s so fun to see everyone’s work!
I’m calling today’s pattern the Puffed Flower Square. I love the smooshy puffy flower in the center of all that traditional granny square goodness.
But before we get to the pattern, here’s the recap on the crochet along so far:
Today I am excited to be joining The Blog Hop Crochet Along! Nine other bloggers and I are teaming up to a new afghan square pattern every day for a month. Crochet along with us and you will have a gorgeous new afghan just in time for the holiday season!
Here's how it is going to work:
- Every day (M-F) a new square pattern will be posted on one of our ten blogs.
- You can join in the fun by crocheting each day's square on that day whenever you have time.
- Share your progress and post photos of your squares in our facebook group.
- By the end of the Crochet Along you will have twenty 12" squares all ready to be pieced together into a beautiful afghan just in time for the holiday season.
- Finally, we will be hosting some fabulous giveaways! You could win Lion Brand yarn to make your own afghan, $100 CASH money, OR our COMPLETED AFGHAN! That's right, we are going to be piecing all of our squares together and shipping an afghan out to one very lucky winner.
Hopeful Honey - Persia Lou - Little Monkeys Crochet
Fiber Flux - Loopsan One Dog Woof - Maybe Matilda
Dream a Little Bigger - Whistle & Ivy - Gleeful Things
We would love if you crocheted along with us. If you'd like to add a button to your blog or website you can grab this one here:Today I am sharing the Puffed Flower Square. You can find links to all the other patterns at the end of this post. The links will be updated daily!
{Pattern Goes Here}
[Blogger InLinkz script]
[Wordpress InLinkz script]
For my square today, I used an I hook, but feel free to use another size if you prefer, and just add or eliminate rows to end up with a 12” square.
Puffed Flower Square
Beg puff st: (yo, insert hook in st, draw up a loop) 2 times, yo, pull through all loops on hook.
Puff st: (yo, insert hook in st, draw up a loop) 3 times, yo, pull through all loops on hook.
1: Start with a magic ring; work 12 sc into ring. Join with sl st to first sc and pull yarn tail to close center. Change colors if desired.
2: Ch 3 (counts as first dc), beg puff st, ch 1, *puff st, ch 1*, repeat from * to * around, sl st to starting ch to join. Fasten off, join new color in any ch 1 space. (12 puffs, 12 ch 1 spaces)
3: Ch 3, beg puff st in ch space from previous round, ch 2, *puff st, ch 2* around in each ch space from previous round, sl st to starting ch to join. Fasten off, join new color in any ch space. (12 puffs, 12 ch 2 spaces)
4: Ch 3, beg puff st in ch space from previous round, ch 3, *puff st, ch 3* around in each ch space from previous round, sl st to starting ch to join. Fasten off, join new color in any ch space.
5: (Ch 3, dc 2, ch 3, dc 3) all in same space; this creates the first corner. *Sk puff st, dc 3 in ch sp, sk puff st, dc 3 in ch sp, sk puff st, (dc 3, ch 3, dc 3) in ch sp.* Repeat around, sl st to starting ch to join.
6-11: Sl st to ch 3 in corner of previous round, then (ch 3, dc 2, ch 3, dc 3) in corner of previous round. Work 3 dc in spaces between each (dc 3) of previous round, and (dc 3, ch 3, dc 3) in each corner space of previous round. Change colors whenever desired, and if necessary, add or eliminate rows to reach 12”.
Monday, November 3, 2014
Flower Garden Granny Square
Today I am excited to be joining The Blog Hop Crochet Along! Nine other bloggers and I are teaming up to share a new afghan square pattern every day for a month. Crochet along with us and you will have a gorgeous new afghan just in time for the holiday season!
Here's how it is going to work:
- Every day (M-F) a new square pattern will be posted on one of our ten blogs.
- You can join in the fun by crocheting each day's square on that day whenever you have time.
- Share your progress and post photos of your squares in our facebook group.
- By the end of the Crochet Along you will have twenty 12" squares all ready to be pieced together into a beautiful afghan just in time for the holiday season.
- Finally, we will be hosting some fabulous giveaways! You could win Lion Brand yarn to make your own afghan, $100 CASH money, OR our COMPLETED AFGHAN! That's right, we are going to be piecing all of our squares together and shipping an afghan out to one very lucky winner.
Hopeful Honey - Persia Lou - Little Monkeys Crochet
Fiber Flux - Loopsan One Dog Woof - Maybe Matilda
Dream a Little Bigger - Whistle & Ivy - Gleeful Things
We would love if you crocheted along with us. If you'd like to add a button to your blog or website you can grab this one here:
Today I am sharing the Flower Garden square. You can find links to all the other patterns at the end of this post. The links will be updated daily!
A talented gardener I am not. Once, while moaning about my black thumb to my sister (who spent a few summers working at a local nursery), she recommended I get a succulent, claiming they were nearly impossible to kill, and surely their hardiness would make them the perfect houseplant for me and my lack of gardening ability. You know what I had a few weeks later? A dead succulent.
Since I seem doomed to never have a real, live flower garden to enjoy, I’ve made a crochet version instead, with plentiful blooms, a blue-gray sky, and puffy cheerful little clouds. I’ll try not to find a way to kill it.
It starts with a simple ‘filler’ or solid square, then the flowers and clouds are appliqued on top. It’s a fun way to add some color and dimension to a blanket.
Flower Garden Granny Square
I used a J hook and Lion Brand Wool-Ease yarn to make my 12” square. I crochet rather loosely, so you may want to take this into account when planning your square. With this pattern, you can easily add extra rows or leave rows off to reach your desired square size.
Ch 4, join with sl st to form circle.
1: Ch 5 (this will count as first dc and ch2). (DC 3 into circle, ch 2) three times. Work 2 dc into ring and join with a sl st to the 3rd chain of starting ch 5.
2: Sl st into the ch sp. Ch 5 and dc 2 into the same ch sp. *Dc into the next 3 sts, (dc 2, ch 2, dc 2) in the ch sp. Repeat from * three times, then dc into the last 3 sts, dc in the ch sp. Join with a sl st to 3rd ch of ch 5.
3: Sl st into the ch sp. Ch 5, dc 2 into the same ch sp. *Dc into the next 7 sts, (dc 2, ch 2, dc 2) in the ch sp. Repeat from * three times, then dc into the last 7 sts, dc in the ch sp. Join with a sl st to 3rd ch of ch 5.
4: Sl st into the ch sp. Ch 5, dc 2 into the same ch sp. *Dc into the next 11 sts, (dc 2, ch 2, dc 2) in the ch sp. Repeat from * three times, then dc into the last 11 sts, dc in the ch sp. Join with a sl st to 3rd ch of ch 5.
5: Sl st into the ch sp. Ch 5, dc 2 into the same ch sp. *Dc into the next 15 sts, (dc 2, ch 2, dc 2) in the ch sp. Repeat from * three times, then dc into the last 15 sts, dc in the ch sp. Join with a sl st to 3rd ch of ch 5.
6: Sl st into the ch sp. Ch 5, dc 2 into the same ch sp. *Dc into the next 19 sts, (dc 2, ch 2, dc 2) in the ch sp. Repeat from * three times, then dc into the last 19 sts, dc in the ch sp. Join with a sl st to 3rd ch of ch 5.
7: Sl st into the ch sp. Ch 5, dc 2 into the same ch sp. *Dc into the next 23 sts, (dc 2, ch 2, dc 2) in the ch sp. Repeat from * three times, then dc into the last 23 sts, dc in the ch sp. Join with a sl st to 3rd ch of ch 5.
8: Sl st into the ch sp. Ch 5, dc 2 into the same ch sp. *Dc into the next 27 sts, (dc 2, ch 2, dc 2) in the ch sp. Repeat from * three times, then dc into the last 27 sts, dc in the ch sp. Join with a sl st to 3rd ch of ch 5.
9: Sl st into the ch sp. Ch 5, dc 2 into the same ch sp. *Dc into the next 31 sts, (dc 2, ch 2, dc 2) in the ch sp. Repeat from * three times, then dc into the last 31 sts, dc in the ch sp. Join with a sl st to 3rd ch of ch 5. Fasten off and weave in ends.
Flowers:
These are the same flowers I used on my camera strap cover tutorial, so visit this link if you’d like to see a photo tutorial. You can easily vary the sizes of the finished flowers by using different size hooks for your flowers.
Start with magic ring. Ch 1, sc 1 into ring.
(Ch 1, 2 dc in ring, ch 1, sc in ring) 5 times. Sl st to join first and last petals, pull starting yarn tail to tighten ring, and use tail to sew flower to the square.
Clouds:
To make the clouds, we’ll start with a chain and crochet across it, working into just one loop, then turn the chain and work back along in the opposite direction, working into the remaining loops. This pattern is for the larger cloud; to create the smaller cloud, I simply started with a chain half the length, and left out a few ‘bumps’ as needed.
Ch 11, work 3 sc in 2nd ch from hook, sc across, work 3 sc in last ch. Turn chain to work back across opposite side. Sc across, and sl st to start to join.
Ch 1, work 2 sc in each of the first 3 st, sc in next 8 st, work 2 sc in each of next 3 st, sc in next 10 st, sl st to join.
Ch 1, sc in same st. Sk next st, 5 dc in next, sk st, sl st in next, sk st, 4 hdc in next, sk st, sl st in next. Sk 2, 6 trc in next, sk 2 st, sl st in next. (Sk 1, work 5 dc in next, sk 1, sl st in next) twice. Sk 1, work 4 hdc in next, sk 1, sl st in next. Sk 2, 6 trc in next, sk 2, sl st to join. Fasten off, and use yarn tail to attach to square.
[Blogger InLinkz script]
[Wordpress InLinkz script]
Wednesday, June 25, 2014
Darcy’s Vintage Shell Shrug (Free Crochet Pattern!)
Our church service doesn’t start until 1 in the afternoon. One. In. The. Afternoon. This is the source of much complaining in our house, because it sure would be nice to just wake up, get ready, go to church, come home, and still have a huge chunk of daytime to spend together. Church at 1, though, means trying to manipulate naptimes around church (which never works), finding a way to fill the morning that will leave plenty of time to get ready and head out when the time comes (which usually means wasting the morning entirely), coping with endless nap-deprived whining at church (inevitable but always aggravating), then feeling like you hardly have much of a day left after getting home from church (dinner then straight to bed for grouchy children).
One perk, however—one of the very few perks—of afternoon church is noticing in the morning that Darcy’s new (and by new I mean thrifted, because hello, have you met our budget? we don’t do ‘new’) dress would look cute with a little beige shrug, and realizing that I have more than enough time to start and finish it well before heading off to church.
I first came up with this shrug pattern way back in February—my mom is quite the talented seamstress and sewed a darling dress for Darcy. It fit her perfectly in February, but since it was sleeveless, I worried she’d be chilly and came up with this shrug pattern to complement the dress. Since the dress has such a sweet floral pattern and soft, muted colors and that high ribbon waistline, I get a very ‘Austen-y’ vibe from it, and wanted to design a shrug that would go with that vibe. I think it worked out pretty nicely.
It’s such a cute addition to girly little outfits, and I love how it has come out both times I’ve made it. It works up so quickly, looks so sweet, and I think the shell pattern is really lovely. Although I haven’t made it in a child or adult size yet, I don’t see any reason it couldn’t be easily adapted to a bigger size (and if you do this, would you let me know how it goes? I’d love to see it on an older kid or an adult!). I’m including the short, abbreviated pattern way down at the bottom of this post so feel free to get your scrolling finger ready if you’re a seasoned crocheter, but if you would benefit from a more in-depth approach, I hope you’ll find the step-by-step photos helpful.
And as is always the case with patterns/tutorials on my blog, feel free to sell any items you make! I’d love a link back to my blog as your pattern source if you decide to sell online, please and thank you and have a nice day.
Darcy’s Vintage Shell Shrug
- You can use any weight yarn for this project (obviously, worsted or thinner yarns will make a more lightweight shrug while a bulky yarn will be, well, bulky). For the white shrug pictured above on itty bitty little 4-month old Darcy, I used Martha Stewart Extra Soft Wool Blend in Bakery Box White. This yarn was wonderful for this shrug—deliciously soft and comfortable against baby’s skin, and offered a bit of warmth for spring wear without being overwhelmingly hot as the weather heated up. For the beige shrug (worn with the coral dress on big chunky 8-month old Darcy), I used LB Collection Cotton Bamboo in Magnolia. It was fantastic for this project, too—the cotton yarn really shows off the stitch pattern nicely, and it’s very lightweight and comfortable on warmer days. I would highly recommend either of those options (or whatever other yarn you fancy!). For a baby-sized shrug, one skein of either of these yarns will be plenty.
- Gauge is unimportant in this pattern—use whatever hook size works well for your choice of yarn. I would recommend using a larger size hook than you typically might in order to keep the shell pattern open and airy. I used a J hook for the shrugs pictured here.
- The shrug is made by making a large-ish rectangle in the shell stitch, then bringing the ends together and partially sewing them to create sleeves. The cuffs and collar are added afterward. See the pictures for details—hopefully they will make the construction sufficiently clear!
- I have made this in a 3-6 month and 6-12 month size, so I’ll include the details for those sizes in the pattern below. I think it should be easy to adapt to bigger sizes, and if you do so, I’d love to hear/see how it turned out!
Row 1: Start by working foundation single crochet in multiples of 6 + 1. If you aren’t sure how to do foundation single crochet, today is a great day to learn it. A chain followed by a row of single crochet won’t give the shrug enough stretch and will probably be uncomfortable and fit poorly, so head over to YouTube and learn! For Darcy’s 3-6 month size shrug, I started with 37 fsc (a multiple of 6 (36) plus 1 = 37). For the 6-12 month size shrug, I started with 43 (multiple of 6 (42) plus 1 = 43).
Row 2: Begin shell stitch. Chain 1 and turn, then work 1 single crochet in the first single crochet of the foundation row. Skip 2 stitches, then work 5 dc in the next stitch. These 5 double crochets all worked into one stitch make your first shell.
Skip 2 stitches, then work 1 single crochet in the following stitch (this “anchors” the shell). Skip 2 stitches, then repeat across the remainder of the row, working 5 double crochets into the next stitch, skipping 2 stitches, and working 1 single crochet into the following stitch.
Row 3: Chain 3 and turn your work. (This chain acts as the first double crochet of the row.)
Work 2 double crochets into the same stitch that the chain of 3 emerges from.
Skip 2 stitches, then work 1 single crochet into the next stitch (this is the center of the 5 double crochet shell of the previous row).
Skip 2 stitches, then work 5 double crochets in the following stitch (which is the single crochet between shells of the previous row).
Repeat across the remainder of the row, working 1 single crochet in the center of each shell of the previous row, and working 5 double crochets into the stitch between shells of the previous row. When you reach the end of the row, end with 3 double crochets in the final stitch.
The shells of each row will be staggered with the shells of the previous row, which is hopefully clear in the picture above. ^^
Row 4: chain 1 and turn, then start with 1 single crochet in the first stitch of the row. Continue with your shell pattern (skip 2 stitches, work 5 double crochets in following stitch, skip 2 stitches, work 1 single crochet in following stitch, repeat).
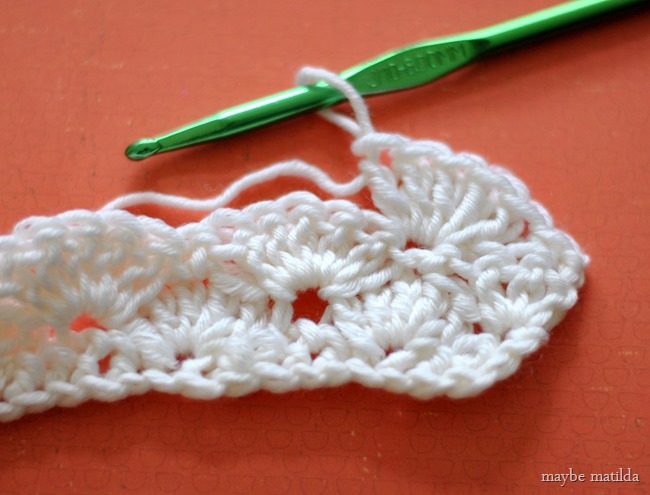
You will continue with the shell pattern, repeating rows 3 and 4, until your rectangle is the right length. To figure out what length you need, just hold the rectangle against the back/shoulders and fold the short ends together around your arms—they need to meet comfortably around your arms. For the 3-6 month size shrug, I ended up with measurements of 10.5 inches on the long end and 7 inches ‘tall.’ For the 6-12 month size shrug, it was roughly 12 inches across and 8.5 inches ‘tall’.
When you’ve reached the right ‘height’ for your shrug, you’ll need to even out the shell pattern to get a smooth/straight edge.
(In the pictures below, my previous row was a repeat of row 3. If you ended on a repeat of row 2 or 4, the evening out will be slightly different, but it should be fairly obvious what to do once you see the pattern. Or just add another row so you end with row 3.)
Start with a chain 1 and turn your work. Slip stitch in the first double crochet of the previous row, single crochet in the next double crochet, half double crochet in the next double crochet, and work a double crochet in the single crochet between shells of the previous row. This mimics the height of the shell and straightens it out. Then work up the next shell of the row by placing a half double crochet in the first stitch, then a single crochet in the next, and a slip stitch in the center of the shell. Work back down the other side of the shell by following that same pattern in reverse: single crochet in the following stitch, then half double crochet in the next, and double crochet in the stitch between shells. See how that works?
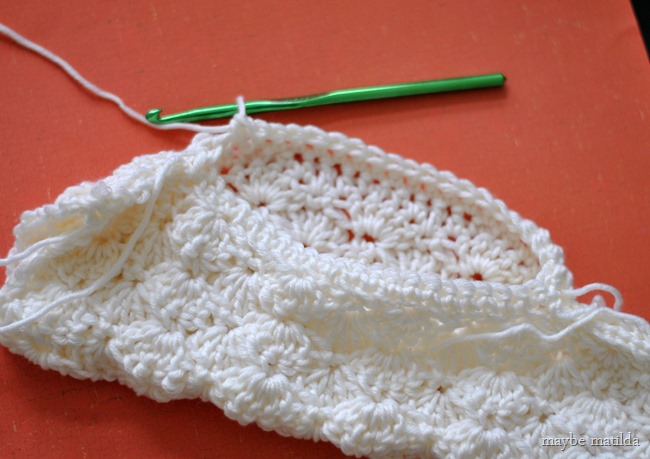
Repeat across the row. Lay the rectangle out flat and bring the long ends together (‘hot dog style’) and slip stitch just across the first inch or two of the long ends to create sleeves. Fasten off and repeat on the other side.
Check the fit before continuing on—for a baby size, you really have to be careful not to sew too far when making the sleeves. In the picture below, for instance? I sewed too far! I actually had to go back and undo it a bit to get the fit right. Be careful and check the fit before you move on.
Once again, use this picture as a guide of how to sew it and not how far to sew it. For the 3-6 month size shrug, this was too much! I went back and undid it, leaving only about an inch sewn together and that was perfect for Darcy. It’s easier to go back and sew more than to pick it apart.
Now on to the collar and cuffs!
Join your yarn somewhere in that inner circle of the shrug (I started at the seam, but you don’t have to), chain 1, and single crochet evenly around the entire circle. Slip stitch to join with the starting chain, chain 1, and single crochet evenly around. Continue to reach the desired collar length (I did 3 rows). Repeat this process for the arm openings to create the sleeve cuffs. If you’d like, you can go down a hook size or more on the cuffs to create a more fitted cuff. I did 3 rows on the cuffs using a J hook, then 3 more rows with an H hook.)
Weave in all your ends, and you’re done!
And the shortened, photo-free version of the pattern.
Darcy’s Vintage Shell ShrugRow 1: fsc in multiple of 6 + 1 to desired measurement—measure from one elbow, up arm and across the back/shoulders, then down to the other elbow. (for 3-6 month size, I did 37 fsc; for 6-12 month size, I did 43 fsc). Ch 1, turn.
Row 2: (begin shell stitch) 1 sc in first st of foundation row, *skip 2 st, 5 dc in next st, skip 2 st, 1 sc in next st.* Repeat from * to * to end of row. Turn.
Row 2: Ch 3 (counts as first dc), work 2 dc in same st as ch 3, *skip 2 dc, 1 sc in next dc (center of shell of previous row), skip 2 dc, 5 dc in next sc.( Repeat from * to * to end of row, ending the row with 3 dc in the final sc. Turn.
Row 3: Ch 1, 1 sc in first st, *skip 2 dc, 5 dc in next sc, skip 2 dc, 1 sc in next dc.* Repeat form * to * to end of row, ending last repeat with 1 sc in top of the ch 3 turning chain.
Repeat rows 2 and 3 until desired length is reached. It must be long enough to cover the upper back/shoulders, and when the shorter ends are brought together (‘hot-dog style’), they must be able to touch around the upper arms. (See photos above.)
Even out shell stitch. If you ended on row 2: ch 1, turn. sl st in 1st dc, sc in next, hdc in next, dc in sc between shells, hdc in next, sc in next, sl st in next, sc in next, hdc in next, dc in next. Repeat across row.
Fold long ends together, sl st from edges in just a few inches to create the sleeves. Be careful and check the fit!!! You probably need to sl st less than you might think!
Join yarn at inside seam, ch 1, and sc evenly around to create collar. Join to ch 1 with sl st. Ch 1, sc in each st around. Repeat to desired collar length. (I did 3 rows.)
Repeat for sleeve openings. If desired, decrease by 1 or 2 hook sizes for a more fitted cuff. (I did 3 rows with J hook, then 3 more rows using H hook).
Weave in ends.
--------------------------------------------------------------
Please let me know if you have any questions! I’d love to see pictures of your finished work—share them on my facebook page! And to see more of my crochet projects/tutorials, click the crochet tab.
Monday, February 18, 2013
Quick + Easy Spring Chain Cowl
Is the weather getting a little more bearable in your neck of the woods? It’s getting better here . . . we even ventured outdoors for a walk yesterday afternoon! Sure, we only made it a block and a half, and okay, we required warm cookies and many episodes of Dora while wrapped in blankets to warm back up afterwards, but still. The end of winter is in sight!
So when I got my hands on some of Lion Brand Yarn’s new Zpagetti yarn, I knew just what to do with it. Turn it into an easy-to-make, easy-to-wear, lightweight spring cowl that will keep me warm until we can make park visits for longer than 20 minutes, but won’t make me sweaty once the weather gets warmer. Perfect!
The Zpagetti yarn is way cool—it’s made from garment manufacturing remnants, so each colorway is limited edition and unique. And since it’s a super bulky elastic and cotton blend, it’s very sturdy and great for dozens of home décor projects. It has the feel of a smooth, comfortable jersey or knit fabric, and I thought it would make for a great, stylish transition piece to wear into warmer spring weather. I love how soft and comfortable and wearable it is, I was really impressed with the feel and stretch of it, and it was seriously fun to crochet with.
You could of course make this cowl with any bulky yarn, although that might make it better suited to chillier winter weather, depending on the fiber content. If the Zpagetti isn’t an option for you, perhaps you could even try your hand at making a similar version yourself with knit or jersey fabric. But I’m loving the Zpagetti. Fun stuff.
Although portions of this cowl use crochet stitches, you certainly don’t need to know how to crochet! All you really need to be able to do is make a chain and a slip stitch. The absolute most basic basics of crochet. So don’t worry if this is new to you—there’s nothing to be scared of here.
Start by making a slip knot around your crochet hook. I used an N hook because that’s the biggest size I own—the yarn actually recommends a Q hook (mega!). The N worked fine for me.
(If you need help making a slip knot, visit this link for a how-to.)
Now, you’re just going to start making chains. This is pretty simple stuff, and you’ll be flying once you get the hang of it. Just wrap a loop of yarn around your hook, like so:
(Make sure you’re grabbing the yarn that leads to the ball, not the tail dangling from your slip knot!)
Then just pull that loop straight down and through the loop that’s already on your hook.
That’s it! You’ve made a chain. Now just keep chaining.
Chain chain chain. (Bet you’ll never guess what song was stuck on repeat in my head while I worked on this.)
You’ll go on and on and on. When you’ve got a big ol’ pile of chained-up yarn, start testing the length by draping it around your neck. Make sure you’re keeping it loose enough that you can pull it straight on and off—the little button cuff on the finished product is purely for show, so you’ll need to keep it loose enough to just slip on and off.
(Butterfly removable hand tattoo courtesy of my sister and the Valentines she gave us last week. Think I should make it permanent?)
If it isn’t big enough, chain some more. When you’re happy with the look, just make sure you have enough chains on your hook to reach back to the starting end. If you need to, add a few more chains or pull a few out so they’ll reach nicely.
To connect the ends, you’ll use a slip stitch. With your hook still in the ending chain’s loop, just insert your hook through one of the loops of the first chain:
Then grab a loop of yarn, just like you’ve been doing all along:
And pull that loop straight through both of the loops on your hook.
That’s a slip stitch!
To finish it off, make one last chain:
Then snip the yarn a few inches out and pull the chain all the way through.
You’ve got your cowl all finished! Now, if this marks the far reaches of your crochet experience, you can just wrap some of your extra yarn around a side of the cowl to hold it all together and secure it while you wear it. But if you know how to make single crochets (or are willing to try it out), then let’s make the button cuff.
Start by making a slip knot and 6 chains.
Now just work 5 single crochets back across the row, starting in the second chain away from the hook. If you need more details on this, you can visit this tutorial of mine, or this great one from One Dog Woof.
When you reach the end of the row, chain 1, turn your work, and single crochet back across. Repeat.
Keep going until your rectangle is long enough for the ends to meet when wrapped around your cowl.
Then just slip stitch the ends of the rectangle together—insert your hook through a loop on each end of the rectangle, grab a loop of yarn, and pull it straight through. Slip stitch down the ends until your rectangle is fully closed, then fasten off just as you did when finishing the chain cowl.
Once again, you’re at a good stopping point! If you like the look of just that little cuff, leave it as is and proudly wear your cute new springy cowl!
I thought some little buttons would be the perfect way to finish it off. You can of course sew these buttons on—I was in no mood to search through my mess of a craft room for a needle and thread, and my hot glue gun just happened to be left out on the counter from an earlier project, sooooo . . . I just hot glued them on. As long as you keep the glue along the outer edges of the button so it doesn’t squelch up through the buttonholes, no one’s the wiser.
There you have it! A quick, easy, comfortable and lightweight spring cowl. I love the cheerful red color, I think the little button cuff is a fun finish, and I love the feel of the jersey-like yarn.
(With most crochet projects, you’ll want to weave in the ends of your yarn to hide and secure them. I didn’t have a needle large enough, so I just made sure all the ends were pulled as tight as I could make them, then cut the yarn off about 1/2 inch away from the knot, and hot glued the ends down.)
Yarn provided by Lion Brand Yarn.
Monday, January 21, 2013
Crochet Valentine Hearts Photo Tutorial
I am a woman of my word. I promised a step-by-step photo tutorial for these little heart cuties, and I am here. to. DELIVER!
(Hey look, I did that blogger thing where I made a nice pinnable image for you!)
These itty bitties are so leetle and so sweet and so quick and simple. Now, first things first: this is not my own pattern. I found the pattern HERE at Heloise V. This tutorial is to help you out in making the smallest heart pattern on her site. She also has instructions for medium and large adaptations, as well as a pattern for adorable little applique flowers, so hop over and check out her fun site! The size variations in my photos are due to different hook sizes, but all 3 were made using the same, smallest heart pattern.
Second things second: although this isn’t a difficult crochet pattern, you’ll of course have an easier time if you are already familiar with crochet basics. Visit my Crochet tab at the top of the page to find some basic crochet tutorials and step-by-steps to help you learn. If you get stuck at any point, just look up the stitch you’re stuck on in google, and you’ll find a zillion and one videos to help you out.
Aren’t they darling? I’m smitten.
You can use any old scrap yarn you have lying around, and any size hook that is appropriate for your yarn (if you’re using worsted weight yarn, anywhere from an F through a K should work nicely). I used a G hook for the tiniest pink heart in my photos (it’s about an inch and a half across), an I hook for the medium size bright pink one, and a K hook for the largest maroon heart. They were all made with the same pattern, all are made of worsted weight yarn, and the only thing that I changed from one heart to the next was the hook size, so play around and experiment with different hook sizes to find a size you love!
You’ll need to start with a magic circle. To be honest, I find this tough to capture in pictures and to explain, so please refer to this tutorial and this video if you need help.
Make your magic circle and chain 3.
Now you’re going to work 3 treble (or triple) crochets into the circle. Yarn over your hook twice:
Then insert your hook into the circle and pull up a loop, then yarn over again:
You’ll now have 4 loops (plus the yarn over) on your hook (as pictured above). Pull the yarn over through just the first two loops on your hook, then yarn over again:
You’ll now have 3 loops on your hook, plus the yarn over. Pull the yarn over through just the first two loops again, exactly as you did in the previous step. Yarn over again:
You’ll now have two loops left on your hook, plus the yarn over. Can you guess what’s coming next? I bet so. Pull the yarn over through the two remaining loops on your hook.
There’s your first treble crochet! Now just repeat those steps for two more treble crochets:
By now, you should have your chain 3 on the right, then your three treble crochets, as pictured above.
Next up, we need to work 3 double crochets. Yarn over your hook just once:
Insert your hook into the circle, pull up a loop, and yarn over again:
Pull the yarn over through the first two loops on the hook, and yarn over again:
Then pull the yarn over through the two remaining loops on your hook:
There’s your double crochet! Now work two more double crochets.
From right to left in the picture above, you should have your chain 3, 3 treble crochets, and 3 double crochets. (My chain 3 is kind of hiding my first treble crochet in that picture. Don’t worry about it, it’s in there, I promise.)
Now chain 1 by yarning over the hook and pulling it straight through the loop on your hook.
Work one treble crochet into the circle. Refer to the pictures up top if you don’t remember how. This treble will be the ‘tip’ of your heart.
Chain 1 again.
Now you’re basically going to repeat the first half of the pattern, backwards, to form the second half of the heart. First up is 3 double crochets. Refer to the double crochet pictures above if you need help.
Then you’ve got 3 more treble crochets. You’re probably a pro at these by now.
Now just chain 2:
Then slip stitch into the circle to finish it up. Just insert your hook into the circle, pull up a loop, and pull the loop straight through the loop already on your hook.
And you’ve got your little heart! Mostly!
See the loose ‘tail’ yarn at the top? Pulling that will tighten your heart and cinch it closed (the magical part of the magic circle—it disappears like magic!). Give it a good firm pull until your heart is completely closed in the center.
Ah, that’s more like it. Fasten off your yarn by pulling a loop through the loop on your hook (just like working a chain), snipping your yarn a few inches away from the hook, and pulling the loop completely through. Tighten it up and weave in the ends, and you’re done!
In case you want to see all the stitches labeled on the heart, enjoy this pictographic brilliance:
So, to sum up, the hearts are simply made by . . .
Magic circle, ch 3, 3 trc, 3 dc, ch 1, 1 trc, ch 1, 3 dc, 3 trc, ch2, sl st.
(trc = treble crochet; dc = double crochet; ch = chain; sl st = slip stitch)
Ta da!
Fun, huh? Once you’re comfortable with the stitches, you’ll be able to whip these up in no time at all.
I used these hearts as little ornaments for a Valentine’s ‘tree’ in this post, and I have another fun project incorporating them that I’ll share in a bit.
Hope you enjoy! If you have any questions, leave them in the comments and I’ll do my best to answer them for you.

