Maybe Matilda: pattern
Showing posts with label pattern. Show all posts

Monday, January 12, 2015

Crochet Bow Headband Pattern in 3 Sizes

Good morning one and all! No need to adjust your monitors: I did not cut off 8 inches of hair or give myself bangs over the weekend. These pictures (and the patterns) are two years old. I always intended to post the patterns, but kept remembering and then immediately forgetting about it. I’m happy to finally be scratching this 2-year old to-do item off my list today.

(With projects like this that take me 2 years to post, you can see why reading a book about early-onset Alzheimer’s would give me some concerns about my own memory.)

Crochet Bow Headband Pattern in 3 sizes: little bow, medium bow, and big bow! // www.maybematilda.com

Like many of my patterns, these are more of a rough guideline than a set-in-stone pattern. Totally easy to adapt to any head size, but they should fit most adults as written. I think these headbands are such a fun, playful accessory—make them in all sorts of colors and sizes to go with any outfit!

We’ll go in size order, from little to big. Scroll on for the patterns. All of the headbands use worsted weight yarn (some of my favorites are Hobby Lobby’s I Love This Yarn, and Vanna’s Choice), and an H hook.

And since they require such a very small amount of yarn, they are a great way to use up little odds and ends that you already have—no need to race out and buy something new (unless, of course, the yarn-shopping urge strikes, as it often does for me).

Little Bow Headband // free crochet pattern at www.maybematilda.com

Little Bow Headband

Note: To adapt this pattern for different head sizes, simply use more or fewer chains in the first step to get the right size loop to fit properly around your head. Visit THIS link for average head sizes based on age, and chain whatever number makes a loop of the right size.

For the headband:

Ch 60, sl st to first ch to make a loop (make sure the chain is not twisted!).

Row 1: Ch 1, sc in each st around. Sl st to first st, fasten off, and weave in ends.

Alternately, for a stretchier headband, simply work foundation single crochet until piece is the proper length to fit your head, slip stitch to the first sc to create a loop, fasten off, and weave in ends.

For the bow:

Ch 22.

Rows 1-4: Ch 1, sc across, turn.

Fasten off, leaving a very long yarn tail. Use this tail to sew the two short ends together to form a loop. Pinch the center of the loop to create a bow shape, and wrap the remaining yarn tail tightly around the center quite a few times. Fasten it securely, then sew the bow to the headband.


Get the free pattern to make this cute crochet bow headband! // www.maybematilda.com

Medium Bow Headband

Note: To adapt this pattern for different head sizes, simply use more or fewer chains in the first step to get the right size loop to fit properly around your head. Visit THIS link for average head sizes based on age, and chain whatever number makes a loop of the right size.

For the headband:

Ch 60, sl st to first ch to form a loop (make sure the chain is not twisted!).

Rows 1-3: Ch 1, sc in each st around, sl st to join. (Do not turn at the end of each row.)

Fasten off, weave in ends.

For the bow:

Ch 27.

Rows 1-5: Ch 1, sc across, turn.

Fasten off, leaving a very long yarn tail. Use this tail to sew the two short ends together to form a loop. Pinch the center of the loop to create a bow shape, and wrap the remaining yarn tail tightly around the center quite a few times. Fasten it securely, then sew the bow to the headband.


Get the free pattern to make this cute crochet bow headband! // www.maybematilda.com

Big Bow Headband

Note: To adapt this pattern for different head sizes, simply use more or fewer chains in the first step to get the right size loop to fit properly around your head. Visit THIS link for average head sizes based on age, and chain whatever number makes a loop of the right size.

For the headband:

Ch 60, sl st to form loop (make sure chain is not twisted!).

Rows 1-6: Ch 1, sc in each st around, sl st to join. (Do not turn at the end of each row.)

Fasten off, weave in ends.

For the bow:

Ch 33.

Rows 1-8: Ch 1, sc across, turn.

Fasten off, leaving a very long yarn tail. Use this tail to sew the two short ends together to form a loop. Pinch the center of the loop to create a bow shape, and wrap the remaining yarn tail tightly around the center quite a few times. Fasten it securely, then sew the bow to the headband.


As with all of my crochet patterns and tutorials, feel free to sell your work! I would love a link back to my blog as your pattern source. And I’d love to see pictures of anything you make with my patterns! Share them on my facebook page, or tag me on instagram (I’m @maybematilda).

Find more of my crochet patterns on my Maybe Matilda Crochet pinterest board!

Monday, December 8, 2014

Dare to Give Handmade Link Up and Double Pom Pom Hat Pattern

Welcome to my favorite week of Dare to DIY: Dare to Give Handmade! Today’s link up is right here at Maybe Matilda, so don’t forget to add YOUR handmade project. Make sure also to visit my cohosts, Newly Woodwards, Décor and the Dog, and Shift Ctrl Art, to see their lovely work. I wouldn’t complain about receiving a single one of their awesome gifts this Christmas.

For my handmade gift, I crocheted a darling little double pom pom hat for Darcy. Because if 1 pom pom is adorable, 2 pom poms are so cute it could kill you.

Free crochet pattern to make this adorable double pom pom hat!

Are you dead?

I’ve been particularly loving big, chunky, thick hats for my kids this year, and I wanted to come up with something kind of silly and fun for Darcy to wear. You could, of course, use a bulky weight yarn to crochet this hat. I almost never have bulky yarn just lying around, but I always have quite a supply of worsted weight, so I crocheted this hat with 2 strands Red Heart super saver variegated yarn. The label was lost long ago, but I believe the name was Wildflower. I don’t use variegated yarns often, but that may change, considering how much I love how this hat turned out. I think this style is darling on babies and kids of any age, and would even be fun for an adult . . . with a sense of humor :-)

Free crochet pattern to make this adorable double pom pom hat!

As with many of my crochet tutorials that I post here, this is more of a ‘guide’ than a strict pattern. It can be adapted to any size and is wildly forgiving, and I’m not including specific stitch counts because it is so easy to change to whatever size you decide to make it.

All you’ll need to know in order to size it properly for the person you’re gifting to is their head size. And since you may not have all your friends’ head measurements memorized, I’d recommend you visit THIS LINK for a hat size chart based on age.

Also, please don’t be afraid of the foundation single crochet that I use to start this hat. It isn’t difficult, and it offers SO much more stretch than the traditional starting chain, which is perfect for a project like this where we start with the brim and work our way up. Stretchy brims are definitely a good thing.

Double Pom Pom Hat

Materials:
- bulky weight yarn or 2 strands of worsted weight yarn (I can’t give much detail on how much yarn you’ll need—it will depend on the hat size you make—but for the pictured hat made for a 1-year old baby, I used almost 1 full skein of Red Heart Super Saver.)
- K hook (10 mm)
- blunt large-eye needle for sewing tails in
- optional: pom pom maker (I love this Clover set—worth every penny)

Abbreviations:
fsc = foundation single crochet
dc = double crochet
sl st = slip stitch
fpdc = front post double crochet
bpdc = back post double crochet
ch = chain

Notes:
Hat is worked from brim up. Do not turn your work at the end of each row. The finished hat will be roughly square shaped, with 2 pointed corners at the top, where you will place your pom poms. Leave a long yarn tail at the end of your work to sew the top of the hat closed.

1) Start with a row of fsc long enough to reach easily around the head of the person you’re crocheting for. Visit THIS page for average head sizes. So if you are making this hat for, say, a 9-month old baby, work fsc until your piece measures about 18 inches in length.

Sl st to join your work in a loop (make sure the loop is flat and has not twisted!).

2) Ch 2,  dc in each stitch around. Join with sl st to top of starting ch.

3) Ch 2, *fpdc in next stitch, bpdc in next stitch. Repeat from * around. Join with sl st to top of starting ch.

4) Repeat row 3, working fpdc in each fpdc of previous row and bpdc in each bpdc of previous row.

5) Ch 2, dc around in back loop only of each stitch. Join with sl st to top of starting ch.

6) Ch 2, dc around. Join with sl st to top of starting ch.

7-?) Repeat row 6 until desired hat ‘height’ is reached. Visit THIS page for hat height suggestions based on age. Add roughly 2 inches to suggested hat heights, since this style is meant to sit high on the head and fit loosely. Fasten off when desired height is reached, leaving long yarn tail.

Use ending yarn tail to stitch the top of the hat closed. Simply lay the hat flat with the seam centered in the back, and sew back and forth with the ending yarn tail to create a long, flat seam. The hat will look square. Sew in all yarn tails.

Using a pom pom maker, make 2 large pom poms. Sew pom poms to top corners of hat.

Free crochet pattern to make this adorable pom pom hat!

As with all patterns/tutorials from my site, feel free to make some, give some, sell some! Just please include a link back to my site as your pattern source if you decide to sell online :-)

Check out my cohosts’ awesome handmade gifts:

Dare to Give Handmade gifts

Pom Pom Hat by Maybe Matilda // Homemade Candy with Ombre Dyed gift bags by Shift Ctrl Art // Crochet Tote by Newly Woodwards // Stovetop Potpourri by Décor and the Dog

I can’t wait to see YOUR handmade gifts! What have you created to give as gifts this Christmas? Link your projects below! Please remember to link back to one of the Dare to DIY cohosts—Décor and the Dog, Newly Woodwards, me, and Shift Ctrl Art :-)

Friday, October 3, 2014

Chunky Scalloped Cowl Crochet Pattern (and yarn giveaway!)

I don’t think I will ever, for as long as I live, get tired of wearing scarves and cowls. They have so much going for them—they’re an easy burst of color or pattern or texture to amp up an outfit, the perfect transition pieces to carry you into or out of cooler weather, and if you crochet (or knit!) they are so quick and easy and inexpensive to make yourself. Lion Brand  invited me to take part in their #scarfie project (selfie + handmade scarf = scarfie!) by sharing a photo of myself in a scarf I made, and it was the perfect push to do something I’ve been meaning to do for a few weeks anyway: get myself all set for fall with a new cozy cowl. And this one I came up with is peeeerfect, if I may say so myself.

Free crochet pattern to make this cute chunky scalloped cowl! Quick, easy project for beginning crocheters!

I love me a scallop, that’s for sure. I toss them on just about everything (baby blankets, hats, tops), so naturally I couldn’t resist making myself a scalloped cowl. It had to be done. And I was happy to do it.

Free crochet pattern to make this cute chunky cowl! Perfect beginner project, quick and easy.

I used Lion Brand Wool-Ease Thick & Quick (color: Grass), so it was very fast to work up (there are only 10 rows here, people), and my cowl is so thick and warm and chunky. Perfect for chilly fall days.

Free crochet pattern to make this cute chunky cowl! Perfect beginner project, quick and easy.

I’d like to take a little minute here to predict that it will take my dad about 12 minutes from the moment I post this to call me with a triumphant I told you so!!! because after yeeeeeeeears of mocking him for pairing denim pants with a denim/chambray top, I’ve crossed to the dark side and I have no regrets.

On to the pattern! Feel free to add or eliminate chains for a looser or more snug fit (just chain in multiples of 4), and add or eliminate rows to make your cowl ‘taller/shorter.’

Chunky Scalloped Cowl
Uses just over 1 ball of Lion Brand Wool-Ease Thick and Quick (or another super bulky weight yarn of your choice!) (I used roughly 120 yards total)
N hook
written in US crochet terminology

ch: chain
sl st: slip stitch
hdc: half double crochet
dc: double crochet
sk: skip
st: stitch

Ch 56 and join to first ch with sl st to form a circle (make sure your chain isn’t twisted!)

Row 1: Ch 2, hdc in each st around. Join to top of starting ch with sl st. (56)

Rows 2-8: Repeat row 1. (56)

Row 9: (Do not ch!) *Sk next st, work 5 dc in next, sk next st, sl st in next st* Repeat from * to * around. Fasten off.

Row 10: Join yarn with sl st at opposite end of cowl at the seam. Working in the free loop of the foundation chain, repeat row 9. Weave in all ends.

Free pattern to make this easy, chunky crochet cowl!Top: Walmart // Jeans: Ross  //  Boots: c/o Sole Society

If you make this cowl, I would love for you to share a picture on my facebook page, or tag me in an instagram shot of you wearing it. And make sure to use the #scarfie hashtag when sharing your fall and winter scarf/cowl projects!

Would you like a chance to win Lion Brand Wool-Ease Thick & Quick to make this (or another!) cowl for fall? Yes, I thought you might. Two winners will get two balls each—perfect for making yourself a cozy fall scarf. Enter using the rafflecopter below! (giveaway open to US only)

a Rafflecopter giveaway

I was compensated by Lion Brand for this post and project, and received free product to work with. Thank you for supporting/tolerating Maybe Matilda sponsors who help make posts like this possible!

Wednesday, June 25, 2014

Darcy’s Vintage Shell Shrug (Free Crochet Pattern!)

Our church service doesn’t start until 1 in the afternoon. One. In. The. Afternoon. This is the source of much complaining in our house, because it sure would be nice to just wake up, get ready, go to church, come home, and still have a huge chunk of daytime to spend together. Church at 1, though, means trying to manipulate naptimes around church (which never works), finding a way to fill the morning that will leave plenty of time to get ready and head out when the time comes (which usually means wasting the morning entirely), coping with endless nap-deprived whining at church (inevitable but always aggravating), then feeling like you hardly have much of a day left after getting home from church (dinner then straight to bed for grouchy children).

One perk, however—one of the very few perks—of afternoon church is noticing in the morning that Darcy’s new (and by new I mean thrifted, because hello, have you met our budget? we don’t do ‘new’) dress would look cute with a little beige shrug, and realizing that I have more than enough time to start and finish it well before heading off to church.

Free crochet pattern and step-by-step photo tutorial for this sweet vintage-style shrug! Adaptable to any size, from baby through adult.

Free crochet pattern and step-by-step photo tutorial for this sweet vintage-style shrug! Adaptable to any size, from baby through adult.

I first came up with this shrug pattern way back in February—my mom is quite the talented seamstress and sewed a darling dress for Darcy. It fit her perfectly in February, but since it was sleeveless, I worried she’d be chilly and came up with this shrug pattern to complement the dress. Since the dress has such a sweet floral pattern and soft, muted colors and that high ribbon waistline, I get a very ‘Austen-y’ vibe from it, and wanted to design a shrug that would go with that vibe. I think it worked out pretty nicely.

Free pattern and photo step-by-step tutorial to crochet this sweet vintage-style shell shrug!

It’s such a cute addition to girly little outfits, and I love how it has come out both times I’ve made it. It works up so quickly, looks so sweet, and I think the shell pattern is really lovely. Although I haven’t made it in a child or adult size yet, I don’t see any reason it couldn’t be easily adapted to a bigger size (and if you do this, would you let me know how it goes? I’d love to see it on an older kid or an adult!). I’m including the short, abbreviated pattern way down at the bottom of this post so feel free to get your scrolling finger ready if you’re a seasoned crocheter, but if you would benefit from a more in-depth approach, I hope you’ll find the step-by-step photos helpful.

And as is always the case with patterns/tutorials on my blog, feel free to sell any items you make! I’d love a link back to my blog as your pattern source if you decide to sell online, please and thank you and have a nice day.

Darcy’s Vintage Shell Shrug
- You can use any weight yarn for this project (obviously, worsted or thinner yarns will make a more lightweight shrug while a bulky yarn will be, well, bulky). For the white shrug pictured above on itty bitty little 4-month old Darcy, I used Martha Stewart Extra Soft Wool Blend in Bakery Box White. This yarn was wonderful for this shrug—deliciously soft and comfortable against baby’s skin, and offered a bit of warmth for spring wear without being overwhelmingly hot as the weather heated up. For the beige shrug (worn with the coral dress on big chunky 8-month old Darcy), I used LB Collection Cotton Bamboo in Magnolia. It was fantastic for this project, too—the cotton yarn really shows off the stitch pattern nicely, and it’s very lightweight and comfortable on warmer days. I would highly recommend either of those options (or whatever other yarn you fancy!). For a baby-sized shrug, one skein of either of these yarns will be plenty.

- Gauge is unimportant in this pattern—use whatever hook size works well for your choice of yarn. I would recommend using a larger size hook than you typically might in order to keep the shell pattern open and airy. I used a J hook for the shrugs pictured here.

- The shrug is made by making a large-ish rectangle in the shell stitch, then bringing the ends together and partially sewing them to create sleeves. The cuffs and collar are added afterward. See the pictures for details—hopefully they will make the construction sufficiently clear!

- I have made this in a 3-6 month and 6-12 month size, so I’ll include the details for those sizes in the pattern below. I think it should be easy to adapt to bigger sizes, and if you do so, I’d love to hear/see how it turned out!

Row 1: Start by working foundation single crochet in multiples of 6 + 1. If you aren’t sure how to do foundation single crochet, today is a great day to learn it. A chain followed by a row of single crochet won’t give the shrug enough stretch and will probably be uncomfortable and fit poorly, so head over to YouTube and learn! For Darcy’s 3-6 month size shrug, I started with 37 fsc (a multiple of 6 (36) plus 1 = 37). For the 6-12 month size shrug, I started with 43 (multiple of 6 (42) plus 1 = 43).

fsc

Row 2: Begin shell stitch. Chain 1 and turn, then work 1 single crochet in the first single crochet of the foundation row. Skip 2 stitches, then work 5 dc in the next stitch. These 5 double crochets all worked into one stitch make your first shell.

first shell stitch

Skip 2 stitches, then work 1 single crochet in the following stitch (this “anchors” the shell). Skip 2 stitches, then repeat across the remainder of the row, working 5 double crochets into the next stitch, skipping 2 stitches, and working 1 single crochet into the following stitch.

first row of shell stitch

Row 3: Chain 3 and turn your work. (This chain acts as the first double crochet of the row.)

ch3, turn

Work 2 double crochets into the same stitch that the chain of 3 emerges from.

half shell

Skip 2 stitches, then work 1 single crochet into the next stitch (this is the center of the 5 double crochet shell of the previous row).

1 sc in center of shell

Skip 2 stitches, then work 5 double crochets in the following stitch (which is the single crochet between shells of the previous row).

5 dc

Repeat across the remainder of the row, working 1 single crochet in the center of each shell of the previous row, and working 5 double crochets into the stitch between shells of the previous row. When you reach the end of the row, end with 3 double crochets in the final stitch.

2 rows of shell stitch

The shells of each row will be staggered with the shells of the previous row, which is hopefully clear in the picture above. ^^

Row 4: chain 1 and turn, then start with 1 single crochet in the first stitch of the row. Continue with your shell pattern (skip 2 stitches, work 5 double crochets in following stitch, skip 2 stitches, work 1 single crochet in following stitch, repeat).
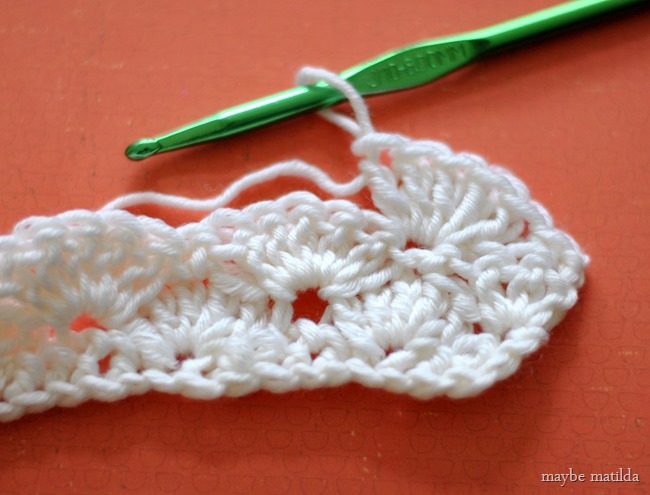
row 3

You will continue with the shell pattern, repeating rows 3 and 4, until your rectangle is the right length. To figure out what length you need, just hold the rectangle against the back/shoulders and fold the short ends together around your arms—they need to meet comfortably around your arms. For the 3-6 month size shrug, I ended up with measurements of 10.5 inches on the long end and 7 inches ‘tall.’ For the 6-12 month size shrug, it was roughly 12 inches across and 8.5 inches ‘tall’.

When you’ve reached the right ‘height’ for your shrug, you’ll need to even out the shell pattern to get a smooth/straight edge.

(In the pictures below, my previous row was a repeat of row 3. If you ended on a repeat of row 2 or 4, the evening out will be slightly different, but it should be fairly obvious what to do once you see the pattern. Or just add another row so you end with row 3.)

Start with a chain 1 and turn your work. Slip stitch in the first double crochet of the previous row, single crochet in the next double crochet, half double crochet in the next double crochet, and work a double crochet in the single crochet between shells of the previous row. This mimics the height of the shell and straightens it out. Then work up the next shell of the row by placing a half double crochet in the first stitch, then a single crochet in the next, and a slip stitch in the center of the shell. Work back down the other side of the shell by following that same pattern in reverse: single crochet in the following stitch, then half double crochet in the next, and double crochet in the stitch between shells. See how that works?

even out shell pattern

Repeat across the row. Lay the rectangle out flat and bring the long ends together (‘hot dog style’) and slip stitch just across the first inch or two of the long ends to create sleeves. Fasten off and repeat on the other side.

slip st to make sleeve openings

Check the fit before continuing on—for a baby size, you really have to be careful not to sew too far when making the sleeves. In the picture below, for instance? I sewed too far! I actually had to go back and undo it a bit to get the fit right. Be careful and check the fit before you move on.

sleeves

Once again, use this picture as a guide of how to sew it and not how far to sew it. For the 3-6 month size shrug, this was too much! I went back and undid it, leaving only about an inch sewn together and that was perfect for Darcy. It’s easier to go back and sew more than to pick it apart.

Now on to the collar and cuffs!

Join your yarn somewhere in that inner circle of the shrug (I started at the seam, but you don’t have to), chain 1, and single crochet evenly around the entire circle. Slip stitch to join with the starting chain, chain 1, and single crochet evenly around. Continue to reach the desired collar length (I did 3 rows). Repeat this process for the arm openings to create the sleeve cuffs. If you’d like, you can go down a hook size or more on the cuffs to create a more fitted cuff. I did 3 rows on the cuffs using a J hook, then 3 more rows with an H hook.)
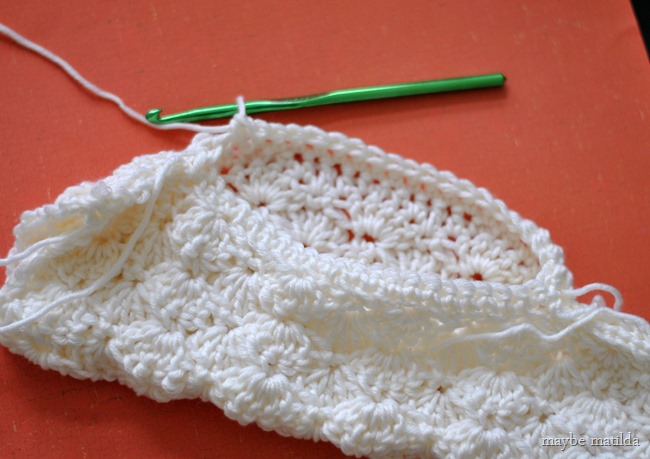
collar

Weave in all your ends, and you’re done!

Free pattern and step-by-step photo tutorial to crochet this sweet little shrug!

And the shortened, photo-free version of the pattern.

Darcy’s Vintage Shell Shrug

Row 1: fsc in multiple of 6 + 1 to desired measurement—measure from one elbow, up arm and across the back/shoulders, then down to the other elbow. (for 3-6 month size, I did 37 fsc; for 6-12 month size, I did 43 fsc). Ch 1, turn.

Row 2: (begin shell stitch) 1 sc in first st of foundation row, *skip 2 st, 5 dc in next st, skip 2 st, 1 sc in next st.* Repeat from * to * to end of row. Turn.

Row 2: Ch 3 (counts as first dc), work 2 dc in same st as ch 3, *skip 2 dc, 1 sc in next dc (center of shell of previous row), skip 2 dc, 5 dc in next sc.( Repeat from * to * to end of row, ending the row with 3 dc in the final sc. Turn.

Row 3: Ch 1, 1 sc in first st, *skip 2 dc, 5 dc in next sc, skip 2 dc, 1 sc in next dc.* Repeat form * to * to end of row, ending last repeat with 1 sc in top of the ch 3 turning chain.

Repeat rows 2 and 3 until desired length is reached. It must be long enough to cover the upper back/shoulders, and when the shorter ends are brought together (‘hot-dog style’), they must be able to touch around the upper arms. (See photos above.)

Even out shell stitch. If you ended on row 2: ch 1, turn. sl st in 1st dc, sc in next, hdc in next, dc in sc between shells, hdc in next, sc in next, sl st in next, sc in next, hdc in next, dc in next. Repeat across row.

Fold long ends together, sl st from edges in just a few inches to create the sleeves. Be careful and check the fit!!! You probably need to sl st less than you might think!

Join yarn at inside seam, ch 1, and sc evenly around to create collar. Join to ch 1 with sl st. Ch 1, sc in each st around. Repeat to desired collar length. (I did 3 rows.)

Repeat for sleeve openings. If desired, decrease by 1 or 2 hook sizes for a more fitted cuff. (I did 3 rows with J hook, then 3 more rows using H hook).

Weave in ends.

--------------------------------------------------------------

Please let me know if you have any questions! I’d love to see pictures of your finished work—share them on my facebook page! And to see more of my crochet projects/tutorials, click the crochet tab.

Monday, February 17, 2014

Granny Stripe Blanket Tutorial Part 3: Scalloped Border

Woohoo, we’re on the final installment of my pattern and photo step-by-step tutorial to make this sweet little granny stripe baby blanket! I’m glad we’ve made it this far. I’m not going to lie to you, friends, I’ve gotten tired of photographing and writing up steps for this blanket. But I will never get tired of this classic, simple style. So pretty.

Pattern and photo step-by-step tutorial to make this cute crochet granny stripe blanket!

If you’re just joining in, or need to jump back, feel free to revisit the first two parts of this series using the links below . . .

Part 1: Blanket Pattern
Part 2: Timesaving Tips and Tricks

Today we’ll finish it up with a nice wide border, ending with some sweet little scallops.

After working through parts 1 and 2, you should have a nice little blanket, completed and ready to add a border. I ended mine when it was something like 30-32 inches square.  My border adds another 4 or so inches. I think this is a nice size for a baby blanket—easy to carry around or play on or snuggle with.

To start the border, either chain 1 with the color you used last, or, if you want your border to be in the color you aren’t currently using, fasten off the last stripe color and join in the border color at the corner of your final row, and chain 1. Work 1 single crochet in each stitch, all the way across this top edge of the blanket. (I like to work the final single crochet of each cluster into the little opening between each cluster instead of just through the top two loops of the stitch. I think it looks neater this way. You can see where I work this stitch in the photo below.)

sc border

Work your single crochets all the way across the top edge of the blanket. When you get to the corner, work 3 single crochets all in the same corner space before continuing on. This will allow you to work evenly around the corner so your border stays nice and flat instead of curling up.

3sc in corner

Now we’re on the side of the blanket, and there aren’t obvious stitches to work our single crochets into like there were along the top edge. You’ll work 2 single crochets around each double crochet (or chain) that starts/ends each row.

DSC_0008-001

If your border looks a little wavy or uneven at this point, don’t worry. As you add more rows, it evens out beautifully.

Once again, work 3 single crochets into the corner of the blanket. Continue working single crochets across the bottom edge of the blanket (which is the starting chain—just place one single crochet in each chain across the bottom), work 3 single crochets into the corner, then continue up the remaining side with 2 single crochets around each dc/ch. Finish up with 3 single crochets in the final corner, and slip stitch to the starting chain 1 of the border to join.

Chain 1 and continue working around until you’ve reached the width you’d like for your border. (Remember to always work 3 single crochets into the point of each corner! Other than the corners, work 1 single crochet into each single crochet around.) When you’re happy with the width, slip stitch to your starting chain 1 to join.

finished sc border

On to the scalloped edge! Don’t chain again before beginning this final row. The last thing we’ve done is slip stitched to join the start and end of the final row of single crochets.

Without chaining, skip the first stitch of the row, and work 5 double crochets all into the next stitch.

first shell of scalloped border

Skip the next stitch, then slip stitch into the following stitch. This slip stitch will ‘anchor’ this first scallop down.

starting scalloped border

Skip the next stitch, and work 5 double crochets all into the next stitch; skip next stitch and slip stitch into the following stitch. Continue all the way around the blanket (you don’t have to change anything to work around the corners; just continue with the pattern of skipping a stitch, placing 5 dcs in the next, skipping a stitch, then slip stitching into the following stitch). So, to summarize, each scallop will have 5 double crochets all worked into the same space, with one skipped stitch on each side, and a slip stitch between each scallop.

scalloped border

As you work your way around and get closer to the start of your scalloped row, you may find that you’ll need to fudge it a little to get your final scallops to fit in nicely. Just do your best to fit them all in as evenly as you can. No one will ever notice if you skip more than one stitch between the final few scallops, or pack them in a little more tightly with fewer skipped stitches. For my last scallop, I had to put two scallops right next to each other without skipping the spaces between them. It’s okay.

When you reach your first scallop, slip stitch to join. Fasten off and weave in all ends. You’re done!

Tutorial and photo step-by-step to crochet this sweet granny stripe baby blanket!

I just love how these sweet granny stripe blankets look. They have such a timeless look, but depending on the colors you choose, you can really make them look so fresh and modern.

Pattern and photo tutorial to crochet a beautiful granny stripe baby blanket

I love how it looks in this crisp turquoise and silver. And it looks awfully nice in Darcy’s nursery! Although I hope it doesn’t stay there for long . . . I’ve put it for sale in my shop, if anyone is interested. You can find it here.

Well, I hope this tutorial is simple and clear enough to follow, even if you’re new to crochet! If you finish a blanket using it, I would love to see it. Tag me in a picture on instagram (I’m @maybematilda), or post your picture to my facebook page!

Thursday, December 26, 2013

Quick Striped V-Stitch Cowl (Free Crochet Pattern!)

I hope everyone had a great Christmas yesterday! (Which is actually today, as I write this and am scheduling it to go up on the 26th, because blogging on Christmas day totally makes sense to me and is not at all a waste of family holiday time.)

This will come as a big shock to exactly zero people, but I have a rather large yarn stash. And while I love my sweet precious stash, I think it’s time I start finding ways to use it up instead of always going shopping for new yarn every time I have a new project to crochet (I think this could make a good 2014 goal for me, actually—using up my yarn/fabric stash instead of letting it continue along its current course of slowly but steadily swallowing my house whole). So when I got the urge to make myself a new winter cowl recently, my goal was to come up with a pattern that would utilize what I already have instead of giving me yet another excuse to go yarn shopping. And if you need to go yarn shopping to make this? I 100% endorse that. I love yarn shopping. But it happens to be a great way to clear out some scrap yarn, if you’ve got some to spare.

Free pattern (and photo step-by-step) to make this cute crochet cowl!

This cowl is really quick and simple to make, and has tons of potential for all sorts of variety--just find some colors (any colors!) you like together, and do as many or as few stripes as you want.  And you can easily make this cowl as long or short and as wide or thin as you’d like . . . totally easy to adapt to fit whatever you want it look like.

If you’re a pattern-reading pro, you’ll find the short version of the pattern just below. But if you have trouble deciphering patterns with all their abbreviations, or could use a few pictures along the way to help you figure things out, scroll down a bit more for the step-by-step, fully written-out, plain English version of the pattern with photos for each step.

Get the free crochet pattern to make this cute striped cowl!

As for supplies, you’ll just need some odds and ends of worsted weight yarn (as many or as few colors as you’d like), and an appropriate size hook for the yarns you’re using (I used an I hook, but feel free to go up or down a size or two if that’s what you already own) as well as a blunt large-eye needle for weaving in the yarn tails. Enjoy!

Quick Striped V-Stitch Cowl (short version)

(V-stitch = dc, ch 1, dc, all in same st)

Ch multiples of 3 to desired cowl length (see photos above for examples; purple cowl used a starting chain of 90, blue used a starting chain of 96); sl st to first ch to join (make sure ch is not twisted!).

Row 1: Ch 3, dc in same st as join (this makes first V-stitch), *sk 2 st, (dc, ch1, dc) in next st* Repeat from * to * around. Join with sl st in 2nd ch of starting ch. Fasten off.

2: Join new color in ch1 space of first V-stitch of previous row, ch 3 and dc in same sp; (dc, ch 1, dc) in ch 1 sp of each V-stitch around. Join with sl st in 2nd ch of starting ch. Fasten off.

Repeat row 2 to reach desired cowl width. Weave in ends.

Free pattern to make this quick striped crochet cowl! Cute and easy!

Step-by-Step Photo Tutorial

Start out by making a chain in multiples of 3. (The chain length determines how long your finished cowl will hang, so check the length as you go by wrapping it around your neck, cowl-style, to see your progress. As long as you end up with a number that is a multiple of 3, and it is a length you are happy with, you’re good to go! For the purple-ish cowl in the pictures, I had a starting chain of 90; for the blue cowl, I had a starting chain of 96. Just make sure you end up with a multiple of 3! You can make it super long to wrap around your neck more than once for ultimate coziness, or keep it shorter for a more snug-fitting cowl, like I did.) If you need a refresher on how to make a starting chain, visit THIS post.

Starting chain to make quick V-stitch cowl

When your starting chain is the length you want your cowl to be, you need to join the two ends to make a loop. Make sure your chain is lying FLAT—there can’t be any twists or turns in it. Join the two ends with a slip stitch by inserting your hook under one or both loops of the FIRST chain (the one directly next to the knot at the start, shown below):

Photo Tutorial for Quick Striped V-Stitch Crochet Cowl

Then grab a loop of yarn and pull it all the way through to complete your slip stitch.

Photo Tutorial for Quick Striped V-Stitch Crochet Cowl

Now you’re going to begin making your first V-stitch by making 3 more chains

Photo Tutorial for Quick Striped V-Stitch Crochet Cowl

Then work a double crochet into the same stitch that your chain of 3 is coming up out of—this is still the chain that you worked into to join your starting chain into a loop. (If you need a refresher on how to make a double crochet, visit THIS post.)

Photo Tutorial for Quick Striped V-Stitch Crochet Cowl

This counts as your first V-stitch! It’s slightly different from a typical V-stitch since we had to use a chain to get started, but you won’t be able to see a difference once your cowl is completed. All the rest of your V-stitches will be made as follows: skip the next 2 stitches in your chain, and work one double crochet, then one chain, then another double crochet all into the third stitch. Got it? That’s how you make a V-stitch. Just skip 2 stitches, and work a double crochet, chain one, double crochet all into the third stitch, and continue repeating that all the way around the loop. It should look like this:

Photo Tutorial for Quick Striped V-Stitch Crochet Cowl

When you’ve worked all the way around, you should have 2 more empty chains before your first V-stitch (which began with the chain of 3 at the start of this row):

Photo Tutorial for Quick Striped V-Stitch Crochet Cowl

To close up this row, you’ll join the first and last V-stitches of the row by working a slip stitch into the 2nd chain of that beginning chain 3 (which is the right ‘leg’ of your first V-stitch).

Photo Tutorial for Quick Striped V-Stitch Crochet Cowl

Then fasten off this color by making one more chain, snipping the yarn a few inches out to leave a tail you can sew in later, and pulling the tail through. You’re done with your first row, and first color stripe. (If you need a reminder of how to fasten off, see THIS post.)

Photo Tutorial for Quick Striped V-Stitch Crochet Cowl

Starting with this second row, and throughout the rest of the cowl, we’ll be working into the chain 1 spaces of each V-stitch from the row before. So instead of actually working under/through any loops, you’ll just put your hook right into the chain 1 space at the center of each V, as shown below. Join in your new color, and start your row just like you started the last one—chain 3, then work a double crochet, all into the chain 1 space of a V-stitch.

Photo Tutorial for Quick Striped V-Stitch Crochet Cowl

Then continue making V-stitches on top of each V-stitch from the row before by making one double crochet, one chain, and another double crochet, all into the chain 1 space of the V-stitch below. So your V-stitches should be stacked on top of each other, as shown in the picture below.

Photo Tutorial for Quick Striped V-Stitch Crochet Cowl

Work your way around, and finish the row the same as you did on Row 1—work a slip stitch into the 2nd chain of the first chain of 3 (the right ‘leg’ of the first V-stitch in the row), and fasten off this color.

Photo Tutorial for Quick Striped V-Stitch Crochet Cowl

Every row from here on out is just a repeat of Row 2. Change colors on each row for a cute striped look! I did 13 rows total for my cowls, but feel free to do as many or as few rows as you’d like, trying it on as you go to see if you like the look of a wider or thinner cowl. When you’re happy with it, just finish your final row and fasten it off, then use a large-eye blunt needle to sew all the ends in (visit THIS post if you need to learn how to sew in the tails).

Let me know if you have any questions; I’ll do my best to help! And if you make one of these cowls, I would LOVE to see a picture. Post it to my facebook page, or tag me on an Instagram photo so I can check it out!

Related Posts Plugin for WordPress, Blogger...
