Maybe Matilda: baby
Showing posts with label baby. Show all posts

Monday, April 18, 2016

Mother's Day Truths


This post is sponsored by the theatrical release of Mother’s Day, in theaters April 29. #MothersDayMovie

Motherhood is the greatest gift, the biggest challenge, just the MOST of every emotion you can possibly fathom. And no matter how well prepared you may feel as you wait for your little one’s 
arrival, no matter how many books you’ve read or mom friends you’ve chatted with or viral Facebook articles you’ve shared on your wall, you simply cannot imagine the reality of daily motherhood until you experience it yourself. You will be endlessly surprised and frustrated by the things you’ll learn and experience.

mothers day

No one else’s kids will ever be half as cute as your kids. Or even a third as cute. Or a quarter as cute. Your kids’ cuteness will absolutely demolish the cuteness of every other child you will ever behold. And every mother will think this about every child she has, whether they are actually beautiful or entirely average looking or even kinda goofy. 

Somehow, motherhood will simultaneously be the best and the very worst part of your life. You will understand deep in your soul that being a mother is the best, most meaningful, most beautiful thing you will ever experience in life. And I guarantee that less than five minutes after this realization hits your core, you will be at your wit’s end, fully prepared to set your children in a box on the side of the road with “free, no returns” scribbled on the side. And you will spend the next 18 years with these two extremes somehow co-existing in your heart. The good outweighs the bad—of course it does—but nothing else in your life will drive you to the brink of insanity with such merciless efficiency.

mothersday

You’ll never feel like you’re doing a good job. You might feel like you’re doing an okay job, if you’re lucky. My oldest is only five, so perhaps the confidence comes later (I can only hope!). But so far, I’ve spent five years second-guessing my every decision, weighing myself up against other mothers (and consistently coming up short), and ending most days with a miles-long mental list of parenting regrets.

But they’ll let it go and love you anyway. I’m always amazed by how quick my kids are to forgive me 100% when I’ve screwed up and shouted at them for the fiftieth time in the span of an hour. They may sulk for a few minutes or use your mom guilt to manipulate you into buying them a donut at the grocery store (and it will work, every time), but they will always be ready with a hug and a sticky kiss. You’ll remember the mistakes you made today far longer than your kids will.

You’ll freak out as they grow up. And they’ll grow up so fast, just like everyone warned you they would. I do not consider myself a “baby person.” I always say that if I could just give birth to a 3-year old, I’d happily skip the baby stage entirely. And even so, I cry when I look at the pictures I took 3 or 6 or 12 months ago, wondering how is it possible that they’ve gotten so big?! 

But they’ll get better with age. This has been true so far. And I hope and pray with all my little heart that this continues for their whole lives. I am scared silly by the thought of my sweet babies growing into lumbering, sulky, emotional teenagers, but am comforted (slightly!) by the knowledge that each new stage my kids enter is my new favorite, and they just keep getting sweeter and cuter and more fun the older they get.

With Mother’s Day coming up, I can’t wait to see Mother’s Day in theaters April 29th. Three women. Three stories. This Mother’s Day, let go of your fears. Embrace the ones you love.


COME CELEBRATE THE MOTHER OF ALL HOLIDAYS. See #MothersDayMovie in theaters on April 29, starring Jennifer Aniston, Kate Hudson, Julia Roberts, and Jason Sudeikis!  https://www.facebook.com/SeeMothersDay/

This is the day that connects us all, and I’m so excited to watch this movie with my own mom! It’s a big-hearted comedy with a star-studded ensemble cast, and I bet it’s going to be the perfect way to celebrate.

mothers day


Tuesday, October 13, 2015

Pacapod Bags -- kinda genius, if you ask me.

One fun thing about blogging is that I sometimes get a chance to experience products I might never have experienced otherwise. And if there's one thing this mom likes to take for a test ride, it's diaper bags. This is a really cool one, and I'm excited to show you some of its clever features.

But first: let's take a moment to acknowledge that I am A) wearing normal, everyday clothes in these pictures, and B) not  in some charming photo location, and C) not made up to look like some supermodel supermom. I'll admit that a bit of insecurity set in while planning this post--I thought to myself, "The nice people who sent me this bag will probably be disappointed when they see this post with a very normal-looking mom in very normal-looking clothes standing against her very normal-looking living room wall. They probably hoped for some Pinterest-sensation wowza photos." 

And then, a lightbulb moment. They ostensibly visited this blog before writing to see if I'd like to test out their bag. I assume they peeked around and realized within about 3 seconds of browsing that I am not a Pinterest-sensation wowza supermodel type of blogger. If anything, I actively resist pretending I'm that person, because yuck--who has the time to keep up that kind of charade?

And more than almost anything else in a mother's life, a diaper bag is, above all, utilitarian. And I think that is represented here today. I didn't fuss up for the sake of photos, or try to put on some show for you (or for Pinterest) here. This is real, everyday life--at home, in my living room, using a useful product in a very practical, useful way. And that's about as good as it gets for me :-)

Pacapod diaper bag review

Pacapod diaper bag review

So, let's break it down. What you see before you here is the Pacapod Cromwell bag. I love its sleek look and outer buckles. The gold hardware is a nice, trendy touch, and the fabric would be incredibly easy to wipe down and clean. It's so spacious inside, and that slim outer pocket is a handy touch. I love that it doesn't look like a typical diaper bag--I'm not sure I'd have guessed it was a baby bag if I saw it out in the wild.

What really sets Pacapod bags apart, though, is that it has a 3-in-1 organization system. You have, of course, the typical large diaper bag, but . . . 
Pacapod Diaper Bag Review
. . . it also has a completely separate section on the outside of the bag that zippers open to reveal a changer pod (complete with a changing pad and inner compartments to store diapers, wipes, and rash cream), and a feeder pod (which is insulated to keep milk and snacks cold and hygienic). These separate pods fit perfectly into their zipper section, and can be removed and handed off to whoever else wants to take their turn with a feeding or a diaper change (might as well be optimistic, right?).

I love how easy it is to keep things organized here--no loose diapers floating around in the inner part of the bag, no mad search to hunt down a bottle cap or the tube of rash cream. It's all tucked away exactly where it belongs, and easy to find and utilize when you need it.

Pacapod Diaper Bag Review

The bag also comes with a longer strap so you can wear it crossbody, as well as shorter, removable straps to hang it from a stroller.

My only complaint about the bag is that I wish it had more interior organization in the main portion of the bag--it's a large space and easy to 'lose' items inside of. Although I imagine that could very easily be remedied with a bag organizer, the likes of which you can find for all of $5 or so online, which makes this a relatively minor complaint. Just something to be aware of, if you're shopping around and comparing bags.

The pod system is totally genius, especially if you are bottle-feeding a baby. My kids are old enough that the feeder pod isn't an absolute necessity for me, but I think it would have been a life saver when Darcy was little. Such a clever design.

Visit Pacapod to see more of their bag designs, and check out this video if you'd like to see the bag in action.

Friday, May 15, 2015

Friday List: Minimalist Baby Essentials

I got rid of almost all our baby stuff while packing for our move. We didn’t have a lot—mainly outgrown clothes—and I debated whether I ought to lug it along for another couple of moves just in case we decide to have another baby someday, or go ahead and donate it now to save ourselves the trouble of moving unnecessary boxes time and time again. As a fairly serious purger, that inner debate didn’t last terribly long. I ditched the baby stuff (with the exception of one box of sentimental items—a few favorite outfits, handmade baby gifts, etc.).

If we ever decide to have another kid, we’ll basically be starting from scratch. But that honestly doesn’t feel like a huge deal to me, because I discovered that there isn’t a ton of baby stuff that I felt was vital. I know a lot of moms who accumulate lots of baby gear and use and love it all. I definitely walked the minimalist route and stuck to the baby basics, and never really felt like I was suffering.

Without further ado, my minimalist baby essentials:

Minimalist Baby Essentials

 Fabric-free high chair: I have to admit, high chairs with cushions and covers baffle me. That’s just more laundry to wash. Am I missing something? Comfort, I suppose? If my baby wants to be comfortable with a cushy upholstered seat, she’s welcome to wash it herself. We went the all-plastic route, and I love the convenience of just wiping the high chair down after meals. When it gets really filthy, I carry it outside and hose it off in the yard. Classy, eh?

Velcro Swaddlers: Forrest and Darcy both slept better when they were swaddled, and were also Houdini babies who could break out of even the tightest blanket swaddle. I loved using these lightweight velcro swaddlers on them—they would stay swaddled all night, and I loved that they were light enough to use even on warm nights.

Exersaucer: This isn’t the exact one we had, but gosh, they all look pretty fun. I loved being able to stick a baby in there and have the freedom to get things done without worrying that baby would get into trouble. With all the little doodads, I didn’t feel like they needed tons of other toys. And once they were old enough to stand, my kids loved walking around the outside and playing with it from a different angle.

Crib Mirror: Possibly the best money we ever spent on a baby item right here. I bought this exact mirror for Forrest when he was about 4 months old, hoping that when he woke up in the night or too early from a nap, maybe it would keep him entertained and happy until he fell back asleep. He loved it, and I can’t tell you how many times I heard him wake up, giggle at his reflection and play with the little toys on the mirror, and fall back asleep on his own. Darcy never seemed quite as entertained by it as Forrest was, but that’s not to say she didn’t like it, too—she just isn’t as obsessed with herself, I guess.

Papasan Cradle Swing: A friend let us borrow this swing when Forrest was born, and thank heavens because it was literally—and I really do mean literally—the only place he would sleep for his first 3 months. He spent so much time swinging, and it was one of the only ways to make that poor colicky child happy. After returning the swing to our friend, we bought our own to keep for future children. Darcy was generally pleasant and didn’t require constant swinging to feel good about her life, so we didn’t end up using it as often as I’d expected. But for angry newborn Forrest, it was a godsend. I loved the option of having the seat upright or fully reclined for sleeping, and that it could swing front to back or side to side.

Monday, December 8, 2014

Dare to Give Handmade Link Up and Double Pom Pom Hat Pattern

Welcome to my favorite week of Dare to DIY: Dare to Give Handmade! Today’s link up is right here at Maybe Matilda, so don’t forget to add YOUR handmade project. Make sure also to visit my cohosts, Newly Woodwards, Décor and the Dog, and Shift Ctrl Art, to see their lovely work. I wouldn’t complain about receiving a single one of their awesome gifts this Christmas.

For my handmade gift, I crocheted a darling little double pom pom hat for Darcy. Because if 1 pom pom is adorable, 2 pom poms are so cute it could kill you.

Free crochet pattern to make this adorable double pom pom hat!

Are you dead?

I’ve been particularly loving big, chunky, thick hats for my kids this year, and I wanted to come up with something kind of silly and fun for Darcy to wear. You could, of course, use a bulky weight yarn to crochet this hat. I almost never have bulky yarn just lying around, but I always have quite a supply of worsted weight, so I crocheted this hat with 2 strands Red Heart super saver variegated yarn. The label was lost long ago, but I believe the name was Wildflower. I don’t use variegated yarns often, but that may change, considering how much I love how this hat turned out. I think this style is darling on babies and kids of any age, and would even be fun for an adult . . . with a sense of humor :-)

Free crochet pattern to make this adorable double pom pom hat!

As with many of my crochet tutorials that I post here, this is more of a ‘guide’ than a strict pattern. It can be adapted to any size and is wildly forgiving, and I’m not including specific stitch counts because it is so easy to change to whatever size you decide to make it.

All you’ll need to know in order to size it properly for the person you’re gifting to is their head size. And since you may not have all your friends’ head measurements memorized, I’d recommend you visit THIS LINK for a hat size chart based on age.

Also, please don’t be afraid of the foundation single crochet that I use to start this hat. It isn’t difficult, and it offers SO much more stretch than the traditional starting chain, which is perfect for a project like this where we start with the brim and work our way up. Stretchy brims are definitely a good thing.

Double Pom Pom Hat

Materials:
- bulky weight yarn or 2 strands of worsted weight yarn (I can’t give much detail on how much yarn you’ll need—it will depend on the hat size you make—but for the pictured hat made for a 1-year old baby, I used almost 1 full skein of Red Heart Super Saver.)
- K hook (10 mm)
- blunt large-eye needle for sewing tails in
- optional: pom pom maker (I love this Clover set—worth every penny)

Abbreviations:
fsc = foundation single crochet
dc = double crochet
sl st = slip stitch
fpdc = front post double crochet
bpdc = back post double crochet
ch = chain

Notes:
Hat is worked from brim up. Do not turn your work at the end of each row. The finished hat will be roughly square shaped, with 2 pointed corners at the top, where you will place your pom poms. Leave a long yarn tail at the end of your work to sew the top of the hat closed.

1) Start with a row of fsc long enough to reach easily around the head of the person you’re crocheting for. Visit THIS page for average head sizes. So if you are making this hat for, say, a 9-month old baby, work fsc until your piece measures about 18 inches in length.

Sl st to join your work in a loop (make sure the loop is flat and has not twisted!).

2) Ch 2,  dc in each stitch around. Join with sl st to top of starting ch.

3) Ch 2, *fpdc in next stitch, bpdc in next stitch. Repeat from * around. Join with sl st to top of starting ch.

4) Repeat row 3, working fpdc in each fpdc of previous row and bpdc in each bpdc of previous row.

5) Ch 2, dc around in back loop only of each stitch. Join with sl st to top of starting ch.

6) Ch 2, dc around. Join with sl st to top of starting ch.

7-?) Repeat row 6 until desired hat ‘height’ is reached. Visit THIS page for hat height suggestions based on age. Add roughly 2 inches to suggested hat heights, since this style is meant to sit high on the head and fit loosely. Fasten off when desired height is reached, leaving long yarn tail.

Use ending yarn tail to stitch the top of the hat closed. Simply lay the hat flat with the seam centered in the back, and sew back and forth with the ending yarn tail to create a long, flat seam. The hat will look square. Sew in all yarn tails.

Using a pom pom maker, make 2 large pom poms. Sew pom poms to top corners of hat.

Free crochet pattern to make this adorable pom pom hat!

As with all patterns/tutorials from my site, feel free to make some, give some, sell some! Just please include a link back to my site as your pattern source if you decide to sell online :-)

Check out my cohosts’ awesome handmade gifts:

Dare to Give Handmade gifts

Pom Pom Hat by Maybe Matilda // Homemade Candy with Ombre Dyed gift bags by Shift Ctrl Art // Crochet Tote by Newly Woodwards // Stovetop Potpourri by Décor and the Dog

I can’t wait to see YOUR handmade gifts! What have you created to give as gifts this Christmas? Link your projects below! Please remember to link back to one of the Dare to DIY cohosts—Décor and the Dog, Newly Woodwards, me, and Shift Ctrl Art :-)

Wednesday, September 10, 2014

Darcy’s Bedroom

I’m almost embarrassed to be posting this. I mean, first we’ve got #1: the likes of the Wills posting nurseries that blow all other nurseries out of the water and all it takes is a quick gander at Pinterest to reveal that Darcy’s room has no business being on the internet whatsoever. And #2: she’s almost 11 months old, and her room still isn’t ‘finished.’ But really, neither is any other room in this house and I’m thinking that this is par for the course when it comes to homeownership: nothing is ever finished (or—and this is a very likely explanation—we are just incredibly slow-moving and uninspired decorators). I think a colorful rug would be a nice addition to the room, as well as a lampshade that isn’t perpetually tilted and hey, let’s really shoot for the stars and maybe plan to rehang the closet door that fell off its tracks 2 weeks ago and is currently just leaning awkwardly into the closet, shall we?

Anyway. Darcy’s bedroom. You can see my ideas for the nursery way back when in THIS post. I wanted it to feel clean and light and bright, with pops of fun color. Not tooooo tremendously girly, but still feminine and playful and fun.

It’s an itty bitty little bedroom, so this tour will be very quick. You’ll be done scrolling through in like 2.4 seconds and can chuckle to yourself for another 3.7 seconds about my very unimpressive photography and go about your day. A home décor blogger I am not.

(The bunting is not missing pennants, btw—the ones that appear to be missing are actually white lace, so they didn’t really show up in the picture.)

colorful baby girl bedroom

colorful baby girl bedroom

colorful baby girl bedroom

colorful baby girl bedroom

colorful baby girl bedroom

- My angel mother did all the heavy lifting in getting Darcy’s room put together—she refinished the crib (it was once honey oak, a hand-me-down from a friend that has belonged to at least 4 children so far that I know of, probably more!), reupholstered the glider cushions, and painted the dresser. She also gave me the purple shelf and sewed the changing pad cover, as well as the little pillow on the glider. All I did was sew the curtains and crib skirt and provide the infant. I considered painting the glider white to match the crib, but let’s be honest, it would have just been me asking my mom to paint the crib for me, and the poor woman has done enough.

- Now that I’m thinking about it, we hardly paid for a single thing in this room. The crib was a hand-me-down. We picked up the glider off the side of the road on trash day a few years ago (ha!). The dresser was a flea market find, purchased and painted by my mom. I found the shelf in my mom’s barn and I sort of stole it. 2 of the prints above the dresser are leftovers from my mom’s shop, and the center print is from my sister’s etsy store. I guess all I really paid for was the fabric.

- The darling quilt on the crib was made by Jeff’s parents. They’ve made a quilt for each grandchild so far, and they are always adorable. Darcy’s quilt matches her room perfectly!

- The bunting is a leftover decoration from Bekah’s wedding, and the tissue pompoms (from Beau Coup) were first used at Bekah’s bridal shower, then at her wedding, and now have ended up in Darcy’s room. They’re starting to show some wear after being smooshed into bags and hauled back and forth from one event to another, but they’ve got life left in them still. I would not have expected to get so much use out of them, and I think they look so cute up in the corner there!

Friday, July 18, 2014

10 Minute No-Sew Barefoot Sandals

I kind of expected that I’d go a little nuts on baby shoes when expecting a girl. Shoes are, of course, the most adorable thing that can be purchased for a baby, and this is an indisputable universal fact. But here we are, almost 9 months into this whole raising-a-daughter thing and Darcy owns 3ish pairs of shoes. Impressive, no? None of these 3 pairs, however, matched her outfit for Bekah’s wedding, and you know how cheap I am, so I figured I’d see if I could DIY something that look cute with her outfit without pinching her fat little feet or costing much.

And my gosh, they turned out darling.

Get the tutorial to make these easy no-sew Glitter Bow Baby Barefoot Sandals!

Add barefoot baby sandals to the list of things I thought were ridiculous before having a baby girl, but now think are precious (it’s an ever-growing, embarrassing list).

I already owned the elastic I needed to make these shoes and only needed to buy a little bit of ribbon for the bows, so I’m not sure what the price would be if you were starting from scratch--I’m going to guess in the $2-5 range. Much less expensive than a pair of store bought shoes, totally comfortable for baby, and easy to customize to go along with whatever outfit you’re trying to match. And not turning on the sewing machine is always a plus in my book.

Get the tutorial to make these easy no-sew Glitter Bow Baby Barefoot Sandals!

To make these sweet little sandals, you’ll need:
- a small amount of fold-over elastic (I used about 16 inches total). My elastic was leftover from making a batch of baby headbands, and was purchased from Elastic By The Yard on Etsy. I suppose you could use regular elastic for these if that’s what you already own, but fold-over elastic is slim and a bit shiny, so it looks really nice for a project like this, plus it’s smooth and soft, so I bet it’s more comfortable for little feet.
- a small amount of glitter ribbon (or, you know, whatever ribbon you want). I got this gold glitter ribbon at Walmart, and bought 1/2 yard. I still have quite a bit left over.
- hot glue gun

Step 1: Cut a length of ribbon that can wrap comfortably around baby’s ankle and the bottom of her foot. For Darcy (currently almost 9 months), this was about 7-8 inches. Lay it out in a Z shape.

DIY no-sew barefoot baby sandals tutorial

Step 2: Bring the top end of the Z down and hot glue it to the middle of the center piece.

DIY no-sew barefoot baby sandals tutorial

Step 3: Bring the bottom end of the Z up and hot glue it over the top piece. Look, it’s an 8. Nifty.

DIY no-sew barefoot baby sandals tutorial

Step 4: Bow time! Hot glue a small piece of ribbon—about 3-4 inches—in a loop.

DIY no-sew barefoot baby sandals tutorial

Step 5: Cut a 2- or 3-inch length of ribbon in half lengthwise.

DIY no-sew barefoot baby sandals tutorial

Step 6: Pinch the loop into a bow shape and glue a small length of one of these strips around the center. Cut the second strip into 2 pieces and trim the ends into points.

DIY no-sew barefoot baby sandals tutorial

Step 7: Glue these two pointed strips to the bottom of the bow, then hot glue the bow onto the elastic.

DIY no-sew barefoot baby sandals tutorial

Ta-da! Quick and painless. Slip the upper loop around baby’s ankle, and the lower loop right underneath her foot. Baby girl be stylin’ and fancy.

DIY no-sew barefoot baby sandals tutorial

Wednesday, June 25, 2014

Darcy’s Vintage Shell Shrug (Free Crochet Pattern!)

Our church service doesn’t start until 1 in the afternoon. One. In. The. Afternoon. This is the source of much complaining in our house, because it sure would be nice to just wake up, get ready, go to church, come home, and still have a huge chunk of daytime to spend together. Church at 1, though, means trying to manipulate naptimes around church (which never works), finding a way to fill the morning that will leave plenty of time to get ready and head out when the time comes (which usually means wasting the morning entirely), coping with endless nap-deprived whining at church (inevitable but always aggravating), then feeling like you hardly have much of a day left after getting home from church (dinner then straight to bed for grouchy children).

One perk, however—one of the very few perks—of afternoon church is noticing in the morning that Darcy’s new (and by new I mean thrifted, because hello, have you met our budget? we don’t do ‘new’) dress would look cute with a little beige shrug, and realizing that I have more than enough time to start and finish it well before heading off to church.

Free crochet pattern and step-by-step photo tutorial for this sweet vintage-style shrug! Adaptable to any size, from baby through adult.

Free crochet pattern and step-by-step photo tutorial for this sweet vintage-style shrug! Adaptable to any size, from baby through adult.

I first came up with this shrug pattern way back in February—my mom is quite the talented seamstress and sewed a darling dress for Darcy. It fit her perfectly in February, but since it was sleeveless, I worried she’d be chilly and came up with this shrug pattern to complement the dress. Since the dress has such a sweet floral pattern and soft, muted colors and that high ribbon waistline, I get a very ‘Austen-y’ vibe from it, and wanted to design a shrug that would go with that vibe. I think it worked out pretty nicely.

Free pattern and photo step-by-step tutorial to crochet this sweet vintage-style shell shrug!

It’s such a cute addition to girly little outfits, and I love how it has come out both times I’ve made it. It works up so quickly, looks so sweet, and I think the shell pattern is really lovely. Although I haven’t made it in a child or adult size yet, I don’t see any reason it couldn’t be easily adapted to a bigger size (and if you do this, would you let me know how it goes? I’d love to see it on an older kid or an adult!). I’m including the short, abbreviated pattern way down at the bottom of this post so feel free to get your scrolling finger ready if you’re a seasoned crocheter, but if you would benefit from a more in-depth approach, I hope you’ll find the step-by-step photos helpful.

And as is always the case with patterns/tutorials on my blog, feel free to sell any items you make! I’d love a link back to my blog as your pattern source if you decide to sell online, please and thank you and have a nice day.

Darcy’s Vintage Shell Shrug
- You can use any weight yarn for this project (obviously, worsted or thinner yarns will make a more lightweight shrug while a bulky yarn will be, well, bulky). For the white shrug pictured above on itty bitty little 4-month old Darcy, I used Martha Stewart Extra Soft Wool Blend in Bakery Box White. This yarn was wonderful for this shrug—deliciously soft and comfortable against baby’s skin, and offered a bit of warmth for spring wear without being overwhelmingly hot as the weather heated up. For the beige shrug (worn with the coral dress on big chunky 8-month old Darcy), I used LB Collection Cotton Bamboo in Magnolia. It was fantastic for this project, too—the cotton yarn really shows off the stitch pattern nicely, and it’s very lightweight and comfortable on warmer days. I would highly recommend either of those options (or whatever other yarn you fancy!). For a baby-sized shrug, one skein of either of these yarns will be plenty.

- Gauge is unimportant in this pattern—use whatever hook size works well for your choice of yarn. I would recommend using a larger size hook than you typically might in order to keep the shell pattern open and airy. I used a J hook for the shrugs pictured here.

- The shrug is made by making a large-ish rectangle in the shell stitch, then bringing the ends together and partially sewing them to create sleeves. The cuffs and collar are added afterward. See the pictures for details—hopefully they will make the construction sufficiently clear!

- I have made this in a 3-6 month and 6-12 month size, so I’ll include the details for those sizes in the pattern below. I think it should be easy to adapt to bigger sizes, and if you do so, I’d love to hear/see how it turned out!

Row 1: Start by working foundation single crochet in multiples of 6 + 1. If you aren’t sure how to do foundation single crochet, today is a great day to learn it. A chain followed by a row of single crochet won’t give the shrug enough stretch and will probably be uncomfortable and fit poorly, so head over to YouTube and learn! For Darcy’s 3-6 month size shrug, I started with 37 fsc (a multiple of 6 (36) plus 1 = 37). For the 6-12 month size shrug, I started with 43 (multiple of 6 (42) plus 1 = 43).

fsc

Row 2: Begin shell stitch. Chain 1 and turn, then work 1 single crochet in the first single crochet of the foundation row. Skip 2 stitches, then work 5 dc in the next stitch. These 5 double crochets all worked into one stitch make your first shell.

first shell stitch

Skip 2 stitches, then work 1 single crochet in the following stitch (this “anchors” the shell). Skip 2 stitches, then repeat across the remainder of the row, working 5 double crochets into the next stitch, skipping 2 stitches, and working 1 single crochet into the following stitch.

first row of shell stitch

Row 3: Chain 3 and turn your work. (This chain acts as the first double crochet of the row.)

ch3, turn

Work 2 double crochets into the same stitch that the chain of 3 emerges from.

half shell

Skip 2 stitches, then work 1 single crochet into the next stitch (this is the center of the 5 double crochet shell of the previous row).

1 sc in center of shell

Skip 2 stitches, then work 5 double crochets in the following stitch (which is the single crochet between shells of the previous row).

5 dc

Repeat across the remainder of the row, working 1 single crochet in the center of each shell of the previous row, and working 5 double crochets into the stitch between shells of the previous row. When you reach the end of the row, end with 3 double crochets in the final stitch.

2 rows of shell stitch

The shells of each row will be staggered with the shells of the previous row, which is hopefully clear in the picture above. ^^

Row 4: chain 1 and turn, then start with 1 single crochet in the first stitch of the row. Continue with your shell pattern (skip 2 stitches, work 5 double crochets in following stitch, skip 2 stitches, work 1 single crochet in following stitch, repeat).
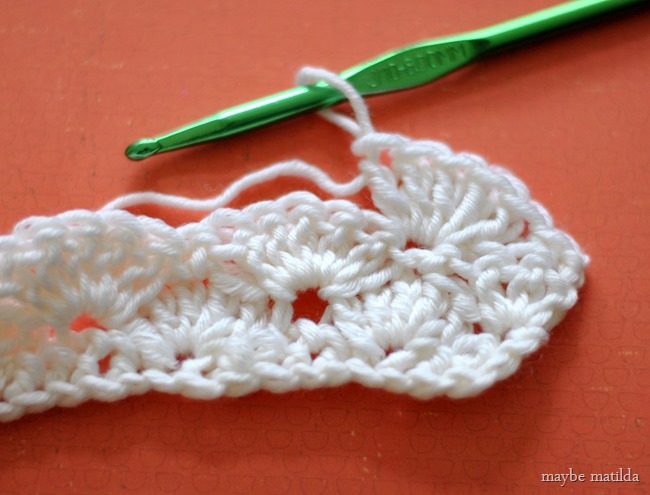
row 3

You will continue with the shell pattern, repeating rows 3 and 4, until your rectangle is the right length. To figure out what length you need, just hold the rectangle against the back/shoulders and fold the short ends together around your arms—they need to meet comfortably around your arms. For the 3-6 month size shrug, I ended up with measurements of 10.5 inches on the long end and 7 inches ‘tall.’ For the 6-12 month size shrug, it was roughly 12 inches across and 8.5 inches ‘tall’.

When you’ve reached the right ‘height’ for your shrug, you’ll need to even out the shell pattern to get a smooth/straight edge.

(In the pictures below, my previous row was a repeat of row 3. If you ended on a repeat of row 2 or 4, the evening out will be slightly different, but it should be fairly obvious what to do once you see the pattern. Or just add another row so you end with row 3.)

Start with a chain 1 and turn your work. Slip stitch in the first double crochet of the previous row, single crochet in the next double crochet, half double crochet in the next double crochet, and work a double crochet in the single crochet between shells of the previous row. This mimics the height of the shell and straightens it out. Then work up the next shell of the row by placing a half double crochet in the first stitch, then a single crochet in the next, and a slip stitch in the center of the shell. Work back down the other side of the shell by following that same pattern in reverse: single crochet in the following stitch, then half double crochet in the next, and double crochet in the stitch between shells. See how that works?

even out shell pattern

Repeat across the row. Lay the rectangle out flat and bring the long ends together (‘hot dog style’) and slip stitch just across the first inch or two of the long ends to create sleeves. Fasten off and repeat on the other side.

slip st to make sleeve openings

Check the fit before continuing on—for a baby size, you really have to be careful not to sew too far when making the sleeves. In the picture below, for instance? I sewed too far! I actually had to go back and undo it a bit to get the fit right. Be careful and check the fit before you move on.

sleeves

Once again, use this picture as a guide of how to sew it and not how far to sew it. For the 3-6 month size shrug, this was too much! I went back and undid it, leaving only about an inch sewn together and that was perfect for Darcy. It’s easier to go back and sew more than to pick it apart.

Now on to the collar and cuffs!

Join your yarn somewhere in that inner circle of the shrug (I started at the seam, but you don’t have to), chain 1, and single crochet evenly around the entire circle. Slip stitch to join with the starting chain, chain 1, and single crochet evenly around. Continue to reach the desired collar length (I did 3 rows). Repeat this process for the arm openings to create the sleeve cuffs. If you’d like, you can go down a hook size or more on the cuffs to create a more fitted cuff. I did 3 rows on the cuffs using a J hook, then 3 more rows with an H hook.)
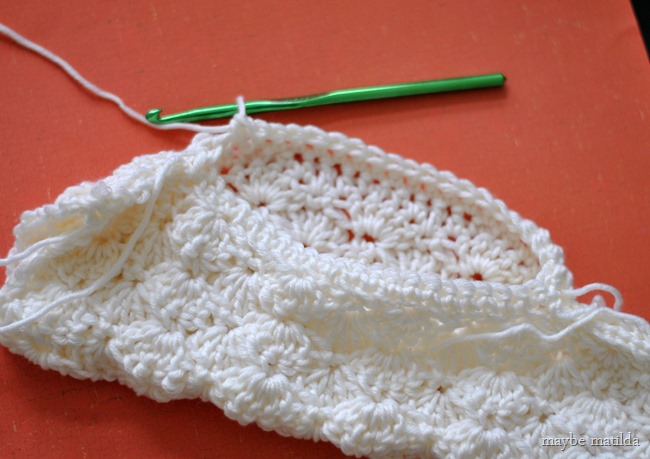
collar

Weave in all your ends, and you’re done!

Free pattern and step-by-step photo tutorial to crochet this sweet little shrug!

And the shortened, photo-free version of the pattern.

Darcy’s Vintage Shell Shrug

Row 1: fsc in multiple of 6 + 1 to desired measurement—measure from one elbow, up arm and across the back/shoulders, then down to the other elbow. (for 3-6 month size, I did 37 fsc; for 6-12 month size, I did 43 fsc). Ch 1, turn.

Row 2: (begin shell stitch) 1 sc in first st of foundation row, *skip 2 st, 5 dc in next st, skip 2 st, 1 sc in next st.* Repeat from * to * to end of row. Turn.

Row 2: Ch 3 (counts as first dc), work 2 dc in same st as ch 3, *skip 2 dc, 1 sc in next dc (center of shell of previous row), skip 2 dc, 5 dc in next sc.( Repeat from * to * to end of row, ending the row with 3 dc in the final sc. Turn.

Row 3: Ch 1, 1 sc in first st, *skip 2 dc, 5 dc in next sc, skip 2 dc, 1 sc in next dc.* Repeat form * to * to end of row, ending last repeat with 1 sc in top of the ch 3 turning chain.

Repeat rows 2 and 3 until desired length is reached. It must be long enough to cover the upper back/shoulders, and when the shorter ends are brought together (‘hot-dog style’), they must be able to touch around the upper arms. (See photos above.)

Even out shell stitch. If you ended on row 2: ch 1, turn. sl st in 1st dc, sc in next, hdc in next, dc in sc between shells, hdc in next, sc in next, sl st in next, sc in next, hdc in next, dc in next. Repeat across row.

Fold long ends together, sl st from edges in just a few inches to create the sleeves. Be careful and check the fit!!! You probably need to sl st less than you might think!

Join yarn at inside seam, ch 1, and sc evenly around to create collar. Join to ch 1 with sl st. Ch 1, sc in each st around. Repeat to desired collar length. (I did 3 rows.)

Repeat for sleeve openings. If desired, decrease by 1 or 2 hook sizes for a more fitted cuff. (I did 3 rows with J hook, then 3 more rows using H hook).

Weave in ends.

--------------------------------------------------------------

Please let me know if you have any questions! I’d love to see pictures of your finished work—share them on my facebook page! And to see more of my crochet projects/tutorials, click the crochet tab.

Monday, June 23, 2014

Do more, the kids are okay. (2-Camera Video Monitor Giveaway!!!)

You've had the experience of trying something new, then wondering how you ever survived before that thing came into your life, right? Me, too.

My KitchenAid mixer, for example.

My Shiseido eyelash curler.

Jeggings.

And now, to be added to the list of Didn't Know This Was a Necessity Until Now: video monitors for my babies' rooms.

I've always wanted a video monitor, thinking it would make life a tad more convenient. After a whopping week of owning two video monitors--one for each kid's room--I can barely even express how much easier and happier and more convenient it has made my life. I know, I'm totally gushing and it's probably obnoxious, but I am dead serious, and I can't help myself.

Take a gander at the Levana Keera monitor set, my new pride and joy and source of great parenting peace. I'd guess every parent has found themselves in that frustrating situation of hearing a noise coming from the baby's room while baby is supposedly sleeping, and doing the awkward back-and-forth shuffle outside the door where you creep up and listen and wonder if the baby actually needs your help? is something actually wrong in there? or can you go ahead and do whatever thing you've been looking forward all day to doing after the baby has been put to bed and trust that baby is okay and doesn't need anything? Yeah, I've been there. Soooooooo many times, and it drives me nuts when I desperately want to just relax, or read, or crochet, or do whatever it is I've been waiting all day to do, but instead I sit there worrying about every little peep I hear coming from the kids' rooms, wondering if they need something, or if they're feeling okay, or if a kidnapper is prying their window open right now to abduct my precious babies and drag them away to join a cult in the mountains (seriously, these are real concerns I have had when hearing noises come from the kids' rooms. Always the rational one.). I love that I can literally look into their rooms and check on them without having to creep up the stairs and eeeeaaaaaase their creaky doors open and risk them seeing me and having a full meltdown if I want to make sure they're doing all right.

A few weeks ago, Darcy and I both caught a little stomach bug. It didn't last terribly long, but it was a rough couple of days when we both felt gross and nauseous. Well, here's where one of the Keera's coolest features would have come in handy. The monitors can be put into "peep mode," where it basically sleeps until baby makes noise, causing the monitor to light up and alert you that something's going on. I sure would have liked one of these monitors when Darcy had that stomach bug, because then I would have known to head into her room at whatever point in the night she woke up, puked all over her crib, and went back to sleep. Seeing as I didn't have this monitor yet, though, the poor thing marinated in her own yuckiness until morning (this is one of the rare situations where I wouldn't mind a baby crying for help in the night. Forrest also had a habit as a baby of throwing up in his crib and not bothering to cry about it. So gross.).

I also love that I can use the microphone on the monitor to talk to the kids--an amazing feature. I did not realize before using a video monitor that Forrest spends an awful lot of time wandering around his room, collecting toys, and reading books before falling asleep. And when he starts heading toward his door to attempt an escape, or is just being too loud, I can talk through the monitor to him to tell him to lie back down or keep the noise level to a dull roar. So convenient.

This all boils down to less fretting over every little noise I hear, less worrying about whether they are safe and happy up in their bedrooms, and more relaxing when bedtime rolls around. More reading. More getting-my-feet-rubbed-while-watching-reruns-of-The-Office with Jeff. Because there is less creeping up the stairs to try and listen outside their doors. I can do more knowing that they're safe.

I really hope you are one of THREE lucky winners who will be getting a monitor set, because it will make your life so much more stress-free and peaceful. Go ahead and enter below. Best of luck to one and all. (Follow Levana on Facebook to keep up with their news.)

a Rafflecopter giveaway

This is a sponsored conversation written by me on behalf of Levana. The opinions and text are all mine.

Wednesday, June 11, 2014

How I Taught My Babies to Sleep

As I begin typing this post, Darcy is squawking herself awake from a rather crappy and very short nap, so I am clearly an expert on this topic and you should heed my every word.

Before I get going here, I just want to start with this: we all have our own approaches, the same things don’t work for every mom/baby/family, what works for me may not work for you (and vice versa!), and I hope we can all play nice, okay? I think we’ve all probably heard moms get a little nasty sometimes when talking about this (and similar) topic(s), so let’s all just agree to be kind and respectful and supportive of each other and our parenting choices. If you have something mean to say, feel free to say it in your head. Not in my comments section.

Now that we’ve got that part out of the way, shall we talk baby sleep? I’m convinced there is nothing on earth—NOTHING, I say—more frustrating and exasperating and emotionally/physically exhausting than trying to figure out baby sleep—how to make it happen. How to make more of it happen. How to make it happen at the times of day/night when you want it to happen.

How I taught my babies to sleep . . . one (very inexpert) mom's approach to sleep training.

Before anyone comments on the deathly toys in the crib—I know, I know, they shouldn’t be in there with her. But she loves them. So there you have it. The sleep sack Darcy is wearing here is the Merino Kids Organic Cotton Sleep Sack, sent as a gift for her by Merino Kids. When I first opened the package, I kind of laughed at how outrageously long it is, but now that we’ve used it a while, I actually really love it (and love that it has plenty of room for her to grow! I doubt we’ll ever have to replace it, either because she’s outgrown it or because it wears out—it is very high-quality and well-made). We’ve always used sleep sacks for the kids in lieu of blankets, and have a stash of the inexpensive long-sleeved fleece versions, which are quite pilly and yucky-looking after being handed down through 2 babies so far, so I’m thrilled to have a replacement that is so lovely. The fabric on this one is beautifully soft and high-quality, and although it’s a heavier material, it’s very breathable and has been perfect during the warm weather we’ve had lately.

After talking with a lot of other young mothers, it seems that many babies figure out how to sleep through the night on their own. I guess they just do it all by themselves? These miracle genius babies go to bed at night and don’t wake up until morning and mom doesn’t have to do much of anything to help them figure out how to sleep all night and that’s that? Hmm. That sounds nice. My babies don’t do that. They both had to be forced to sleep through the night. It seems like some babies learn how to do this quite nicely all on their own, and some need to be taught how to sleep through the night. My babies have definitely been the second kind.

I’ve read baby sleep books. I’ve read so so so many baby sleep books. I’m not going to sit here and list them all because A) since I read them all in a sleep-deprived zombie-mother postpartum haze, I doubt I can even recall all the titles, and B) only one book really made a difference for us, so I’ll focus on that one. We tried all the sweet and gentle approaches with no results whatsoever. I’m not saying they don’t work for anyone, but they absolutely didn’t work for us. With some of these very ‘nice’ sleep approaches, the situation even got worse—less sleep, more nighttime wakings, more fussing at bedtime than before. And despite my best efforts at establishing good sleep routines from day one, both Forrest and Darcy followed a really unfortunate pattern of actually getting slowly but steadily worse at nighttime sleep over their first few months. Very exasperating—I don’t know whether to blame myself for doing something fundamentally wrong from the start, or whether my uterus just doesn’t know how to gestate a quality sleeper.

How I taught my babies to sleep . . . one (very inexpert) mom's approach to sleep training.

The book that finally made a world of difference for us (and, I should add, out of all the many books I read, this was the only book that really helped matters at all) was Solve Your Child’s Sleep Problems by Richard Ferber. I worry that this will sound like some sort of sponsored thing if I rave about it too much—rest assured, Dr. Ferber has no idea who I am, although if I ever meet him, I fully intend to kiss that man on the mouth.

The basic theory behind the book is simple and straightforward (and, in my opinion, probably exactly what our grandparents and great-grandparents and great-great-grandparents and everyone who didn’t try to raise babies in our digital age of overbearing, hypercritical, and overly judgmental parenting did): your baby needs to learn to sleep without you. There. Not much to it, right? If they wake up in the night (which they will, because this is normal and natural and everyone wakes up in the night, even you, even if you don’t realize it), they need to have the skills and practice of putting themselves back to sleep without intervention from you. So if you are the lucky parent of babies like mine who were born without those skills (and never figured them out), you have to give them the opportunity to learn those skills. And sadly, this often means there will be some crying. Maybe a little crying, maybe a lot of crying. Either way, it will be sad and hard for both of you, but for me and my babies, it was a necessary evil to teach them the skills they needed in order to give everyone in the family a good night’s sleep.

Step-by-step, here’s what we did (for both babies):

1) Up until 4ish months? Survival mode, folks. Do what it takes to get through that seemingly never-ending sleep-deprived newborn stage. I swear to you, I did my darnedest to try and set good habits during this stage and it never seemed to make an ounce of difference. (Which isn’t to say one shouldn’t try . . . just that my babies don’t seem to understand how sleep works.)

2) I have heard that 6 months is a good age to begin sleep training. I couldn’t make it that far. Between 4 and 5 months with both babies, I hit my breaking point and just went gung-ho into sleep training. Maybe waiting longer is better. I couldn’t do it.

3) Establish a bedtime routine. In our house, this means taking a bath, putting on lotion, getting Darcy into a clean diaper and jammies and zipping her up in a cozy sleep sack, and nursing in the rocking chair. (Forrest was bottle-fed; otherwise, his routine was the same at this age.) I claim that the kids’ bedtime is 7, but it usually ends up being closer to 7:30. (Forrest usually gets up between 6 and 6:30, and Darcy gets up between 7 and 7:30 in the morning.)

4) Lay baby down while she is drowsy but still awake. The key is that she has to be falling asleep on her own, in the same circumstances that she’ll find herself in when she wakes up in the night (ie, not in my arms, not nursing, not being rocked, etc.). So when she is sleepy and maybe looking like she’s close to drifting off, but definitely still awake, lay her down.

5) Put in earplugs, because it’s about to get ugly. Ferber recommends checking in at intervals to reassure yourself and baby that everything is okay . . . but don’t go in there and put baby to sleep. I would go in, give her a kiss, rub her belly for a moment, talk to her, etc., but leave while she was still awake. The howling starts up stronger than ever as soon as I leave, but the point of returning to her room isn’t to comfort her to sleep. It’s just to reassure both of you that you’re still there, you still love her, and she’ll survive, but she has to do this part on her own.

6) When baby wakes up in the night, do the same thing—check in periodically, but don’t help baby fall back asleep. Just offer a bit of comfort and leave while baby is still awake. These first few nights will be loooooooooooooong.

7) For naps, follow an abbreviated bedtime routine (for us, it is simply putting baby in a comfy sleep sack and nursing before laying her down). If baby hasn’t fallen asleep within 30 minutes, get her up and try again later.

In my experience, the first night is brutal, the second night is slightly better, the third night slightly better still, and within about a week they are more or less good to go! They will still have the occasional ‘off’ night, and traveling or sickness might mess with things, but once they have learned the necessary skills to soothe themselves and put themselves to sleep without much help from you, it isn’t too tough to get them back into proper sleep mode if they should get out of their normal sleep routine for whatever reason.

How I taught my babies to sleep . . . one (very inexpert!) mom's approach to sleep training.

A few more thoughts:

- Forrest and Darcy both sleep better with fans running rather noisily in the room. I think my family probably snickers quietly whenever we all get together and I show up lugging a gigantic box fan for the kids to sleep next to, but hey, it helps! And I love that the white noise blocks household noise—I don’t feel like I have to tiptoe around the house while they’re asleep since the fan covers up any noise I might make.

- Darcy really seems to benefit, sleep-wise, from having toys in the crib with her. I know you’re not supposed to have anything in the crib with baby, but man, she loves having snuggly toys to cuddle with. Whenever I peek in at her in the night or during naps, she is always snuggling with something—she really seems to find those toys comforting. And when she wakes in the night, I have sometimes heard her laughing and playing with her toys for a while before falling asleep again without crying. So I guess this is something you’ll have to consider and decide on your own, with the knowledge that extra items like toys in the crib are not recommended, but may be helpful if your baby is a snuggler or might entertain herself and put herself back to sleep if she has something in there to keep her occupied. My babies also both love(d) watching themselves in those crib mirrors that tie onto the crib slats (a little entertainment value with less risk, since it secures to the crib).

- When I started sleep training Forrest, I took away the pacifier. My logic was that he didn’t yet have the coordination to put it back in his mouth during the night, so I didn’t want him to rely on it to fall asleep since he might wake in the night and need it to fall back asleep, but wouldn’t be able to replace it himself. He very quickly switched to sucking his fingers—a habit that continues to this day, and I suppose time will tell if this was a bad trade-off. I did the same for Darcy, but reintroduced the paci after maybe a month or two of sleep training since she seemed to really miss it, and it hasn’t been a problem (maybe because she was a little older when I gave the paci at nights, and she has the dexterity to put it in her mouth when she wakes?). I clip one paci to her sleep sack (making sure to clip it quite low so it just barely reaches her mouth—I don’t want slack in the ribbon that could be a strangulation hazard), drop another paci in the crib, and she also has one stuffed animal with a paci attached. When I peek in at her at night, she’s just as likely to be sucking any of the three paci options, and sometimes none of them.

- I found nighttime feedings a little tricky to navigate . . . I think 1 nighttime feeding for a 4/5 month old is probably reasonable, so I continued to feed both Forrest and Darcy just once in the night while sleep training. Forrest dropped this feeding on his own within a few weeks of beginning sleep training—yay! Darcy did not—boo. When she was about 6 months old (and pushing the 90th percentile for height and weight, leading me to believe a nighttime feeding was more preference/habit than necessity), I cut that feeding out and just let her cry when she woke expecting to eat. This is also when I reintroduced the pacifier for her at night—she seemed to not mind too much, and really only cried one or two nights, and not for a very long time. I suppose the paci satisfied her when she wanted to eat.

All right. That’s all I’ve got for you today. I’d love to hear your experience with sleep training—what worked or didn’t work for you and your kids? It’s such a tricky, guilt-ridden, difficult part of parenting babies, and I’m always interested in learning how other moms handle it.

Related Posts Plugin for WordPress, Blogger...
