Maybe Matilda: clothes
Showing posts with label clothes. Show all posts

Monday, November 16, 2015

Lily Jade and London Bridges Giveaway!

I just wanted to pop in real quick and give you a heads up about a fantastic giveaway happening on my Instagram right now!

Giveaway!!! Enter to win a matching mommy and me dress set from London Bridges Clothing and a Rosie designer diaper bag from Lily Jade

I teamed up with London Bridges (a local designer here in Utah who I met at the farmers market over the summer--she sews the most adorable and comfortable baby skirts and mommy + me matching dresses), and Lily Jade (makers of the best diaper bags ever ever ever ever ever) for this giveaway. The winner will get a matching mommy + me dress set from London Bridges, as well as the Rosie bag from Lily Jade!

Head to my instagram to enter to win!!!

Lily Jade bags are truly game changers, and I could not love them more. And I'm so glad I got to meet Holly from London Bridges--I bought Darcy two skirts from her over the summer, and she gets so many compliments on them every time she wears them. They're darling, plus so comfy and perfect for busy little legs to play in. And her new mommy + me dresses are so cute and fun.

Giveaway!!! Matching mommy + me dresses from London Bridges Clothing and a designer diaper bag from Lily Jade!

Giveaway!!! Matching mommy + me dresses from London Bridges Clothing and a designer diaper bag from Lily Jade!

I also did something for this giveaway that I've never, in the history of my 5 years of blogging, done before.

I worked with a professional for pictures.

I'm sure the difference from my typical post photos is obvious . . . 
  Giveaway!!! Matching mommy + me dresses from London Bridges Clothing and a designer diaper bag from Lily Jade!

My friend and new neighbor Carrie is the photographer behind Ivy & Stone, and she helped me out with these pictures. And it is a testament to her great talent that there are any pictures at all where we look decent, because I'm sure we were probably the worst clients she has ever experienced.

Giveaway!!! Matching mommy + me dresses from London Bridges Clothing and a designer diaper bag from Lily Jade!

I was super duper awkward (unsurprisingly) and Darcy was not interested. She literally shouted at Carrie every time she noticed her lifting the camera to take a picture. "No! NOOO!!!!" I honestly thought we wouldn't end up with a single usable picture between Darcy's attitude and my winning combination of photo day stress and typical awkwardness, but somehow we ended up with so many great ones! Thank you, Carrie :-) You can visit her site HERE, and follow her on instagram HERE.

Giveaway!!! Matching mommy + me dresses from London Bridges Clothing and a designer diaper bag from Lily Jade!

Giveaway!!! Matching mommy + me dresses from London Bridges Clothing and a designer diaper bag from Lily Jade!

Friday, September 25, 2015

Bookworm Style -- DIY Poe Shirt

I've been slow to get on the graphic tee bandwagon . . . but I'm more than willing to climb aboard nowadays, especially for a nerdily bookish graphic tee like this one.

DIY Poe-Inspired t-shirt

I made this Poe-inspired shirt for myself this week. I mean, the kids have all sorts of cheesy Halloween stuff to wear over the next month. I want something spooky, too. And Poe . . . Poe is spooky. If you don't believe me, go listen to it read by James Earl Jones. *shivers*

DIY Poe-Inspired t-shirt

Hop over to Delicious Reads for the full tutorial, and get the cut file freeeeeeeee to make this for yourself if you're lucky enough to have that crafting tool that puts all other crafting tools to shame: the Silhouette.

DIY Poe shirt

Friday, June 26, 2015

DIY Curious George Shirt (Be a Good Little Monkey!)

My kids are hardcore Curious George groupies. And that's totally fine with me. I think it's such a cute show. Let's be honest, there are some kids' shows that are just awful to watch, or even to hear in the background while you're busy doing other stuff. (Don't even get me started on Sid the Science Kid.) But I think Curious George is as sweet and adorable as they come.

Forrest was the original George fan in our house, and now Darcy is crazy about, too. I love seeing them sitting side by side to watch George together. And it's not uncommon at all to hear Forrest telling Darcy to 'be a good little monkey!' (If you don't watch the show, that's what the man in the yellow hat says to George in nearly every episode.)

So I figured Curious George inspired shirts were in order for my little monkeys.

diy curious george shirt "be a good little monkey"

I'd like you to know that Darcy ate 2 and a half bananas in the 5 minutes it took to get these pictures. Girlfriend is insatiable. They were meant to be props, not snacks! She is indeed part monkey.

diy curious george shirt "be a good little monkey"

Making an important call on his banana phone, I guess? I don't even know.

diy curious george shirt "be a good little monkey"

These cute tanks were really simple to make with my Silhouette Portrait and some heat transfer vinyl.

I started with store bought shirts--I picked these up from the toddler boys' section at Walmart. Then I downloaded a font that was as close to the Curious George font as I could find. It's called 'Wrexham,' and it is free at Urban Fonts.

Step 1: Lay out your design in Silhouette Studio. Make sure to measure your shirt so you know how large to make the words. I made my first line of words just shy of 6", and the second line between 7-8" to fit Darcy's shirt (18 months). For Forrest's (4T), I stretched the text box about 1" bigger. Remember to mirror image the design so that it cuts in reverse!

Load the heat transfer vinyl into the Silhouette and start cutting. Weed out the excess vinyl after cutting is complete, and you'll be left with just the design, cut backwards, on the transfer paper, as shown in picture 1 below.

Step 2: Lay out the design on your tank. The plastic backing is slightly tacky, which is awesome since you can play with the positioning and just press it down when you're ready so it won't slip as you iron. (And you can't see it in my picture there, but the plastic backing is, in fact, still there.)
how to use heat transfer vinyl and silhouette to make your own t shirt design
 Step 3: Cover the shirt with a thin cloth and iron over it (follow the vinyl package instructions). I ironed it a little longer than called for, just to be safe.

Step 4: Slowly peel off the glossy backing to reveal your awesome completed shirt.

DIY Curious George shirts

Forrest was really excited about his shirt, and eagerly put it on before the fabric had even cooled down from being ironed. And I expected Darcy to put up a major stink about having her clothes changed (because in her world, a wardrobe change is only a baby step away from child abuse), but as soon as she realized that her little shirt matched her brother's, she was frantically clawing at the outfit she was wearing so I could take it off and put this on her. I think she might like matching him. Much tears, many sad at the end of the day when the monkey shirt had to come off so the jammies could go on.

DIY Curious George shirts

Yes, that picture's blurry and as such is probably not blog-worthy . . . but it was one of my favorites anyway.

Do you have any Curious George fans at your house, too?

Friday, June 5, 2015

Friday List: Adorable Kids Swimsuits

The joy of swimsuit shopping for myself, as an adult, imploded long, long ago (although this mommy swimsuit post gave me all the happy feels). Let's be honest, though: it was never a happy situation, even pre-pregnancy.

Thankfully, some swimsuit joy does still exist in shopping for the kids' suits. And I couldn't resist sharing some of my favorite picks for this summer.
5 adorable swimsuits for kids
1. Carters Surfer Dog Rash Guard Set // This is the only one of the bunch that we actually own (so far!). My sister actually found this one, and we ordered it for Forrest this year. It is every bit as cute in person. I love the fresh colors and the rash guard top (because that child is as ivory as ivory can possibly be--he needs all the sun protection help he can get, please and thank you), and he loves the "super cool surfer dogs!!!"

2. Baby Buns Americana Suit // I didn't realize I had something of an Independence Day theme going until I fell hard for this suit as well as #5 below. I love the colors, love that big red bow, and love that it has a loose, flowy cut on top. Perfect for keeping chunky baby tummies breezy and comfortable.

3. Ruffle Butts Polka Dot Rash Guard Set // I wasn't sure about the design of this one until I did a google image search and saw them on actual children. THE CUTENESS! The bums are so ruffly, the poky little tummies are so precious, and the color choices are perfect. Love it.

4. Boys Frog One Piece Swimsuit // I would bet actual money that Jeff would have vetoed this suit immediately, but I can't help myself, I think it's adorable. Stripes? Yes. Cheesy cartoon frog? Yes. ONE PIECE BOYS' BODYSUIT? TRIPLE YES.

5. Ruffle and Stars Bandeau Bikini // I'm picturing Darcy's big round belly poking out of this bikini, and I just can't even handle it. I love the classic colors, love the printed bottom paired with the ruffly top, and especially love the mental image of a sweet baby belly on display.

Friday, April 3, 2015

Friday Lists: Running Clothes on the Cheap

People always point to running as the perfect budget exercise—as long as you’ve got a decent pair of shoes, you don’t really have to spend much money on anything else to get started. Which is true . . . except that you could easily spend a small fortune on your running wardrobe. $50 for a tank top? Yeah . . . not gonna happen.

I have the same general attitude toward running clothes as I do toward beauty products (and, I suppose, toward almost everything): as long as I don’t know what I’m missing out on, I’ll be content with my budget stuff. Maybe someday, if I’ve got money just burning a hole in my pocket, I’ll be more willing to dish out for higher quality, pricier stuff. I don’t doubt that it’s better.

But for now, my budget-friendly running clothes suit me just fine. Almost all of my running wardrobe is from Walmart and Ross, and I’ve been perfectly happy with it so far.

Here are 5 of my favorite affordable running items (I own and regularly use all but #3, which I tossed in because I’m hoping to buy it soon):

cute affordable activewear that won't cost an arm and a leg!

1. Avia Scrunch Back TankIt is breaking my heart that I can’t find my #1 favorite running tank anywhere online(also made by Avia), but this one comes in at a very close second. I learned quickly that I hate running in snug-fitting tops (especially tanks with a built-in bra—the worst!), and I prefer my tops to be loose-fitting and very lightweight. This tank fits the bill perfectly, and comes in plenty of cute colors (I own it in lime green). The only reason it is my second favorite running top is because after months of runs and trips through the washing machine, the hem is just barely starting to bunch up a bit. Not a big deal at all and it has absolutely been worth the (very low!) price, but my other Avia tank hasn’t had that issue, so it’s my #1.

2. Danskin Now Running ShortsThese give me everything I want from a running short. At under $8, the price is absolutely right. They are super comfortable, I’ve never had any chafing issues while wearing them on runs, they’re lightweight and breathable, and come in a great variety of colors. I own two pairs.

3. Free Spirit Tie Dye CapriThis item is the only one I don’t currently own. I’d like to get a second pair of capris soon—I love the fun print on this one, and it could be paired with any color top so I know it would get a lot of use. I may need to swing by TJ Maxx this week to see if I can find this pair.

4.  Danskin Now Textured JacketJeff bought this jacket for me, and I’ll admit, it took a few runs for me to warm up to it. I already owned a different jacket which I liked, and I didn’t think I would use this one as much. But after a few runs in it, it easily won me over. I love that it’s a bit looser-fitting than my previous jacket, and the double layer of mesh material makes it warm but breathable. My only complaint is that the thumb holes (which I think are an awesome feature!) aren’t usable at all, since the sleeve hasn’t been lengthened to allow it to comfortably reach my thumbs.

5. Betsey Johnson Floral LeggingsI’m including these on this list with reservations. If you click that link to purchase them, you’ll see that they are $54, which I would not consider a budget-friendly price. But since I bought my pair at Ross for $20, I suppose they make the budget-friendly cut. I own another pair of running leggings that I thought were great until I bought this pair, which blow pair #1 out of the water. The fit is fantastic, the material is the perfect blend of firm/supportive without being constricting, and the print—my gosh. Polka dot AND floral?! Be still, my pattern-loving heart. If you have $54 to toss at a pair of leggings, by all means, go for it! But if you’re more in my budget range, maybe keep an eye out on ebay and at places like Ross or Marshalls or TJ Maxx for something similar.

Monday, February 2, 2015

My favorite crochet projects in the history of ever.

I started crocheting shortly after Forrest was born, which makes this roughly a 4 1/2-year old hobby for me. I’ve often thought that it would have been cool to keep track of everything I’ve made—for myself, for my kids, for friends’ kids, for my etsy shop customers. Those are some numbers I would be super interested in seeing.

But of course, I didn’t keep track, and have absolutely no idea what the tally on all the various items I’ve made might be.

I do, however, have photos of many of my crochet projects, and thought I’d spotlight a handful of favorites today.

In no particular order, here are some of my very favorite crochet projects from the past 4 years of crocheting:

All Star Crochet Baby Blanket // www.maybematilda.com

Forrest’s All Star Baby Blanket: You can find the original post about this blanket HERE, but to summarize it for you, I not-so-secretly hoped that this blanket would replace his precious blankie—the one made by someone other than me that he loves dearly and snuggles nearly 24 hours a day—but he could not care less about it. Nonetheless, it is still one of my favorite projects ever. I love the classic Americana style as well as the colors, and it was a fun project to make. Find this pattern as part of a crochet pattern book here.

Sidewalk Shawl // www.maybematilda.com

Sidewalk Shawl: Visit my original post on this project HERE. This shawl was challenging but so enjoyable to make, and I think it came out beautifully. Sadly, it’s spent its entire life folded up on a closet shelf. I just don’t know how to use/wear something like this in real life, but that doesn’t stop it from being one of my coolest projects yet. Find the pattern here.

Striped crochet giraffe // www.maybematilda.com

Stripey Giraffe: Visit my original post about this gal HERE. I can’t say I love the process of crocheting amigurumi much—the tight crochet is torture on the hands, and they are boring as he!! to work on—but the finished products are just so sweet. I made this giraffe for Darcy before she was born, and am not at all surprised to tell you she doesn’t give a hoot about it and has never paid it any attention. My children are so unappreciative. Find the free pattern here.

Sweet little crochet baby tank // www.maybematilda.com

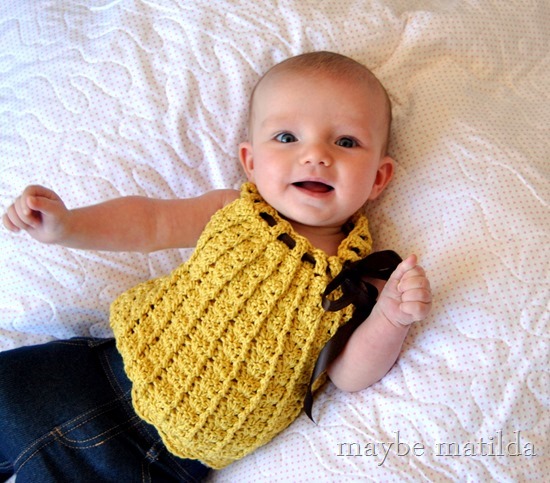
Baby tank top: Visit the original post HERE. This darling little tank top quickly became a favorite. Sadly, she outgrew it rather quickly, but I love the unique design and simple construction, and look forward to making another one for Darcy this spring. Find the pattern here.

Granny blanket // www.maybematilda.com

Granny Flower Garden Baby Blanket: Visit the original post for this project HERE. When I first began crocheting, I remember swearing up and down that I’d never make a multi-colored granny-style afghan, which I could only picture as the outdated, uncomfortable, scratchy blankets that no one wants to cuddle up under at grandparents’ houses. But after seeing some examples of how fresh and modern they can be when made with bright colors, I was converted. Find the pattern for these sunburst granny squares here.

Grandma's Lacy Ripple bedspread // www.maybematilda.com

Grandma’s Lacy Ripple blanket: Visit the original post HERE. I am hoping against hope that I never—never, for the rest of my life—get tired of seeing this blanket on my bed, because far too much work went into it to ever replace it. I can’t say much for its warmth (while wrapped up in my sofa blanket made with this same pattern, my brother-in-law Alan asked recently if here was a way to crochet blankets without giant gaping holes that might actually provide some warmth?) but I do love how it looks. Find the pattern here.

ruffles and dots blanket

Ruffles and Dots baby blanket: Visit the original post HERE. I can hardly believe that smiling chubster up there is Forrest. Some years have passed, but this is still one of my favorite baby blankets to make (and I’ve made many blankets using this pattern, in all sorts of fun colors, although the green has always been a favorite). Simple and cuddly and sweet, I think this is a timeless style that has such a fun, modern feel when made in a bright color. Find the pattern here.

Wednesday, December 3, 2014

3 Holiday Party Outfits + Jockey® Slimmers Giveaway!

Tracking Pixel

‘Tis the season for Christmas cookies and cinnamon rolls and big turkey dinners and daily hot chocolate and unexpected treats dropped off by neighbors. ‘Tis also the season for Christmas parties and family photos and wanting to look awesome. Kind of hard to enjoy both sides of that coin, eh? For this sponsored post today, I want to share how Jockey® Slimmers shapewear helps me look and feel my best for all the fun events coming up, even during this season of sweet, delicious, irresistible excess.

I know full well that I’m not fooling a single solitary soul when I occasionally play style blogger, but bear with me. If nothing else, posts like this at least help me to play around in my closet and figure out how to work with what I’ve got.

We have a few Christmas parties and dinners coming up, and I wanted to see what I could put together from my current wardrobe that would work for different types of gatherings—something a little dressier, something in the middle, and a casual get-together. And I’m really excited about my new Jockey® Slimmers that are helping me feel way more confident—I’ve been avoiding wearing some of these items because I’ve always found something to complain about (lumps here, bulges there), and I’m so glad I can finally enjoy them.

Let’s start with the dressier end of the spectrum, then I’ll wax eloquent on the topic of shapewear. I bought this dress after we had our most recent family pictures taken in the spring—I wore it for those pictures in navy, and loved it so much that I went back and bought the same style in ivory. (And pardon the modeling—I try. I fail. I keep trying anyway.)

winter white + black party outfit

Dress: Downeast // Tights: We Love Colors (c/0) // Heels: Thrifted // Necklace: Walmart

I was so excited to get this dress—but then I didn’t wear it for nearly 6 months, first because Darcy was nursing and it isn’t exactly a nursing-friendly dress, and then because we were headed into cooler weather and I wasn’t sure how to wear a white dress in the winter. But with black tights, heels, and necklace, I think it is deepened up enough for Christmas parties, and I’m glad I can finally wear this dress I’ve waited half a year for.

(Let’s ignore the fact that those heels, which I thought were such a steal when I thrifted them brand-new, are so wildly painful that even hobbling from the camera back to my spot against the wall was enough to get me swearing.)

Now, about this next one: I’m not joking when I tell you I’ve worn this exact outfit to church for 3 weeks in a row now. I’m going to go ahead and say that it would work swimmingly for a holiday party that is maybe a tad dressier than jeans-and-a-sweater, but not so fancy that you need to get out the ankle-breaker heels.

aztec sweater dress

Dress: Ross // Boots: Sole Society (c/o) // Cowl: made by me

I got this sweater dress on sale recently for $9.99, and immediately questioned my shopping wisdom once I got home and tried it on. This silhouette is never one I’m comfortable with. The shape doesn’t hide much, and I was not blessed with flat stomach genes (nor was I blessed with the willpower to make daily crunches a priority). So I just make sure I’ve got some shapewear on hand, and no one’s the wiser. I pair this dress with a cowl (the same one I made for my crochet along a few years ago!), and a pair of moto boots. It’s so comfortable and cozy, but still dressed up a bit for parties or a dinner out.

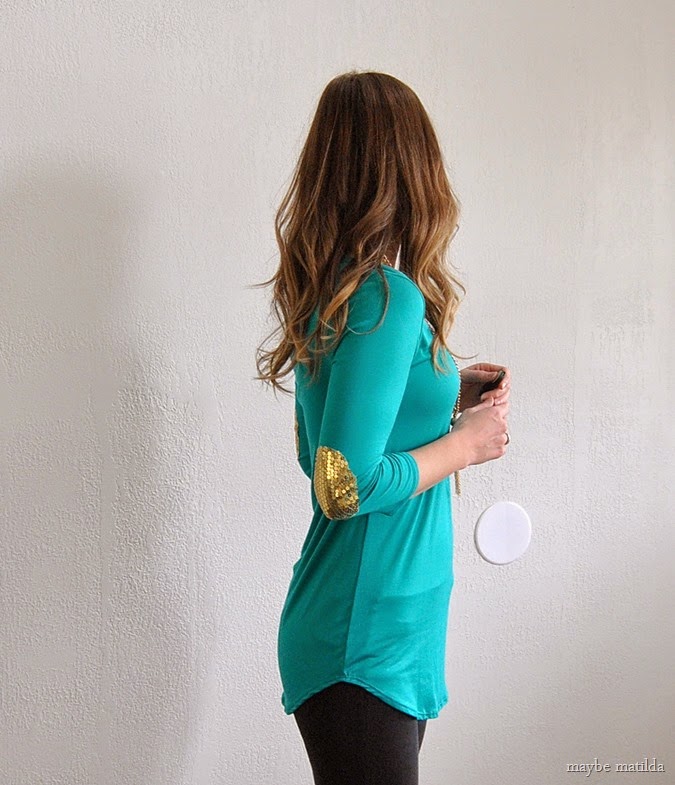
I’ve almost always reserved my shapewear for dresses, but I discovered that my Jockey® Slimmers camisole was just what I needed to make this tunic top wearable. I’ve actually had it for a few months, but haven’t worn it yet because the material is rather clingy. Everything, from the outline of my bra to the cookies I had for lunch yesterday, is perfectly displayed through the fabric. The shapewear camisole was perfect for keeping things tight, as well as smoothing out any lines from showing through the top. Which means I can now wear it for a more casual holiday get-together with friends, along with black jeggings and boots.

tunic + black skinnies

Top: Annie Jean Apparel (now closed—I’m so sad!) // Jeggings: Bella Ella Boutique
Boots: Fashion Corner // Necklace: Walmart

And I have to show you the best part of the top . . .

gold sequin elbow patches!!!

Gold sequin elbow patches!!!

I’m glad to have a few Christmas party outfits ready to go, and I’m especially excited about my new Jockey® Slimmers that helped me love these outfits way more than I have in the past—I’ve always found something to complain about when wearing these various items before (lumps and bumps, you know how it is), and while I’ve shared my love for shapewear before, the Slimmers bring my love to new heights. And I totally know how ‘sponsored’ that sounds, but I’m being dead honest. They are absolutely my new favorites, and I’ve worn them over and over in the few weeks I’ve had them so far. I wear shapewear fairly regularly, and while I may like how I look in it, I’ve never liked how it felt to wear it until now.

Whatever magical material they use to make Jockey® Slimmers is so soft and feels absolutely fantastic to wear (some shapewear I’ve worn before is so stiff and scratchy that I’m conscious of how it rubs and scratches against my skin for every.single.second), but my favorite feature is that it keeps thing firm and tight without making me feel like I’m being slowly strangled. Or squeezed to death by a python. Or being clamped ever tighter in a vice. You get the picture. Some shapewear I’ve worn in the past is so absurdly firm, so crazy tight that it’s almost impossible to even get into, much less wear for an entire day (while still trying to get a full breath of air in). I don’t know how they’ve done it, but they’ve finally made shapewear that is truly comfortable to wear. I suspect witchcraft. I’m fine with it.

If you are in the market for a little firming help this Christmas—and really, who among us isn’t? even the thinnest, most fit ladies I know have certain clothing styles they feel uncomfortable wearing because they’re self-conscious about some part of their bodies—I hope you’ll enter to win a Jockey® Slimmers shapewear prize pack to help you feel totally confident and gorgeous and sexy in whatever you wear! Enter with the Rafflecopter below--the giveaway will be open from December 1 – December 11, and 10 winners will be selected to receive one prize pack from Jockey® (ARV $45).

a Rafflecopter giveaway


This is a sponsored post written by me on behalf of Jockey® Slimmers.

Wednesday, October 22, 2014

DIY Marauder’s Map Shirt (and free Silhouette template)

You’ll never guess what audiobook I’ve been listening to this month.

Go on, guess.

Make a cute and easy Marauder's Map t-shirt with your Silhouette and this free template!

The correct answer is Harry Potter and the Prisoner of Azkaban and no one saw that coming at all.

The words needed to open the Marauder’s Map seem extremely appropriate for a certain someone I know—and I don’t want to embarrass anyone, so I won’t name any names, but it starts with a 4 and ends with an ‘est.’ This child is never not up to no good.

Make a cute and easy Marauder's Map t-shirt with your Silhouette and this free template!

I’m still learning all the ins and outs of my Silhouette Portrait, but even with my beginner-level knowledge, this was still a very quick project to put together. And I wasn’t sure how well it would turn out, so I didn’t take any progress pictures, but it’s a simple enough project that hopefully you don’t need them.

I just set up the text in Silhouette Studio how I wanted it, then grabbed a stock image of footprints online and added them to the design. After cutting the design onto vinyl, I peeled the letters out and tossed them, then used the rest as a stencil. I mixed craft paint with textile medium and sponged it onto the stencil to create the letters and footprints (with a layer of cardboard inside the shirt to make sure you don’t get paint soaking through to the back, of course). I’ve seen people do painted t-shirts without using the textile medium, so I’m assuming it holds up fine without any issues, but I’ve always used the textile medium. In my experience, it gives a very smooth finished product and holds up beautifully in the wash. After peeling up my stencil piece, I just let the shirt air dry overnight, then ironed it to set the paint (your textile medium will give instructions on how to set it).

DIY Marauder's Map t-shirt with free template for Silhouette

I’m happy to share the Silhouette Studio file here for anyone to use to make their own shirts (personal use only, please!)—I hope I’ve done this right. Please tell me if something doesn’t work properly and I’ll work on figuring it out :-)

Get the file for the template as shown HERE.

And get the file for the REVERSED template HERE.

Wednesday, June 25, 2014

Darcy’s Vintage Shell Shrug (Free Crochet Pattern!)

Our church service doesn’t start until 1 in the afternoon. One. In. The. Afternoon. This is the source of much complaining in our house, because it sure would be nice to just wake up, get ready, go to church, come home, and still have a huge chunk of daytime to spend together. Church at 1, though, means trying to manipulate naptimes around church (which never works), finding a way to fill the morning that will leave plenty of time to get ready and head out when the time comes (which usually means wasting the morning entirely), coping with endless nap-deprived whining at church (inevitable but always aggravating), then feeling like you hardly have much of a day left after getting home from church (dinner then straight to bed for grouchy children).

One perk, however—one of the very few perks—of afternoon church is noticing in the morning that Darcy’s new (and by new I mean thrifted, because hello, have you met our budget? we don’t do ‘new’) dress would look cute with a little beige shrug, and realizing that I have more than enough time to start and finish it well before heading off to church.

Free crochet pattern and step-by-step photo tutorial for this sweet vintage-style shrug! Adaptable to any size, from baby through adult.

Free crochet pattern and step-by-step photo tutorial for this sweet vintage-style shrug! Adaptable to any size, from baby through adult.

I first came up with this shrug pattern way back in February—my mom is quite the talented seamstress and sewed a darling dress for Darcy. It fit her perfectly in February, but since it was sleeveless, I worried she’d be chilly and came up with this shrug pattern to complement the dress. Since the dress has such a sweet floral pattern and soft, muted colors and that high ribbon waistline, I get a very ‘Austen-y’ vibe from it, and wanted to design a shrug that would go with that vibe. I think it worked out pretty nicely.

Free pattern and photo step-by-step tutorial to crochet this sweet vintage-style shell shrug!

It’s such a cute addition to girly little outfits, and I love how it has come out both times I’ve made it. It works up so quickly, looks so sweet, and I think the shell pattern is really lovely. Although I haven’t made it in a child or adult size yet, I don’t see any reason it couldn’t be easily adapted to a bigger size (and if you do this, would you let me know how it goes? I’d love to see it on an older kid or an adult!). I’m including the short, abbreviated pattern way down at the bottom of this post so feel free to get your scrolling finger ready if you’re a seasoned crocheter, but if you would benefit from a more in-depth approach, I hope you’ll find the step-by-step photos helpful.

And as is always the case with patterns/tutorials on my blog, feel free to sell any items you make! I’d love a link back to my blog as your pattern source if you decide to sell online, please and thank you and have a nice day.

Darcy’s Vintage Shell Shrug
- You can use any weight yarn for this project (obviously, worsted or thinner yarns will make a more lightweight shrug while a bulky yarn will be, well, bulky). For the white shrug pictured above on itty bitty little 4-month old Darcy, I used Martha Stewart Extra Soft Wool Blend in Bakery Box White. This yarn was wonderful for this shrug—deliciously soft and comfortable against baby’s skin, and offered a bit of warmth for spring wear without being overwhelmingly hot as the weather heated up. For the beige shrug (worn with the coral dress on big chunky 8-month old Darcy), I used LB Collection Cotton Bamboo in Magnolia. It was fantastic for this project, too—the cotton yarn really shows off the stitch pattern nicely, and it’s very lightweight and comfortable on warmer days. I would highly recommend either of those options (or whatever other yarn you fancy!). For a baby-sized shrug, one skein of either of these yarns will be plenty.

- Gauge is unimportant in this pattern—use whatever hook size works well for your choice of yarn. I would recommend using a larger size hook than you typically might in order to keep the shell pattern open and airy. I used a J hook for the shrugs pictured here.

- The shrug is made by making a large-ish rectangle in the shell stitch, then bringing the ends together and partially sewing them to create sleeves. The cuffs and collar are added afterward. See the pictures for details—hopefully they will make the construction sufficiently clear!

- I have made this in a 3-6 month and 6-12 month size, so I’ll include the details for those sizes in the pattern below. I think it should be easy to adapt to bigger sizes, and if you do so, I’d love to hear/see how it turned out!

Row 1: Start by working foundation single crochet in multiples of 6 + 1. If you aren’t sure how to do foundation single crochet, today is a great day to learn it. A chain followed by a row of single crochet won’t give the shrug enough stretch and will probably be uncomfortable and fit poorly, so head over to YouTube and learn! For Darcy’s 3-6 month size shrug, I started with 37 fsc (a multiple of 6 (36) plus 1 = 37). For the 6-12 month size shrug, I started with 43 (multiple of 6 (42) plus 1 = 43).

fsc

Row 2: Begin shell stitch. Chain 1 and turn, then work 1 single crochet in the first single crochet of the foundation row. Skip 2 stitches, then work 5 dc in the next stitch. These 5 double crochets all worked into one stitch make your first shell.

first shell stitch

Skip 2 stitches, then work 1 single crochet in the following stitch (this “anchors” the shell). Skip 2 stitches, then repeat across the remainder of the row, working 5 double crochets into the next stitch, skipping 2 stitches, and working 1 single crochet into the following stitch.

first row of shell stitch

Row 3: Chain 3 and turn your work. (This chain acts as the first double crochet of the row.)

ch3, turn

Work 2 double crochets into the same stitch that the chain of 3 emerges from.

half shell

Skip 2 stitches, then work 1 single crochet into the next stitch (this is the center of the 5 double crochet shell of the previous row).

1 sc in center of shell

Skip 2 stitches, then work 5 double crochets in the following stitch (which is the single crochet between shells of the previous row).

5 dc

Repeat across the remainder of the row, working 1 single crochet in the center of each shell of the previous row, and working 5 double crochets into the stitch between shells of the previous row. When you reach the end of the row, end with 3 double crochets in the final stitch.

2 rows of shell stitch

The shells of each row will be staggered with the shells of the previous row, which is hopefully clear in the picture above. ^^

Row 4: chain 1 and turn, then start with 1 single crochet in the first stitch of the row. Continue with your shell pattern (skip 2 stitches, work 5 double crochets in following stitch, skip 2 stitches, work 1 single crochet in following stitch, repeat).
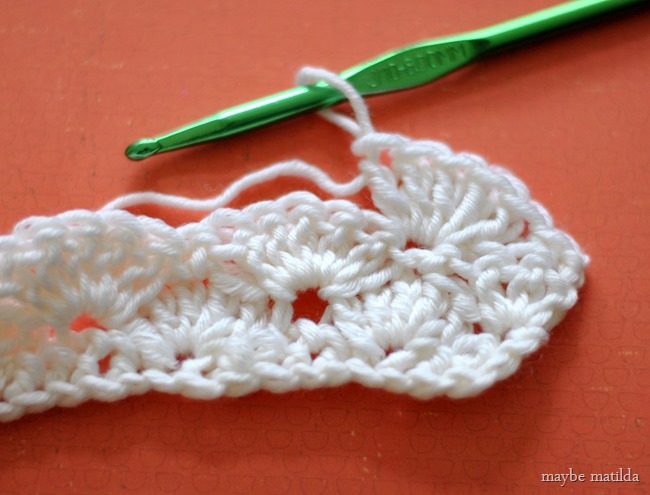
row 3

You will continue with the shell pattern, repeating rows 3 and 4, until your rectangle is the right length. To figure out what length you need, just hold the rectangle against the back/shoulders and fold the short ends together around your arms—they need to meet comfortably around your arms. For the 3-6 month size shrug, I ended up with measurements of 10.5 inches on the long end and 7 inches ‘tall.’ For the 6-12 month size shrug, it was roughly 12 inches across and 8.5 inches ‘tall’.

When you’ve reached the right ‘height’ for your shrug, you’ll need to even out the shell pattern to get a smooth/straight edge.

(In the pictures below, my previous row was a repeat of row 3. If you ended on a repeat of row 2 or 4, the evening out will be slightly different, but it should be fairly obvious what to do once you see the pattern. Or just add another row so you end with row 3.)

Start with a chain 1 and turn your work. Slip stitch in the first double crochet of the previous row, single crochet in the next double crochet, half double crochet in the next double crochet, and work a double crochet in the single crochet between shells of the previous row. This mimics the height of the shell and straightens it out. Then work up the next shell of the row by placing a half double crochet in the first stitch, then a single crochet in the next, and a slip stitch in the center of the shell. Work back down the other side of the shell by following that same pattern in reverse: single crochet in the following stitch, then half double crochet in the next, and double crochet in the stitch between shells. See how that works?

even out shell pattern

Repeat across the row. Lay the rectangle out flat and bring the long ends together (‘hot dog style’) and slip stitch just across the first inch or two of the long ends to create sleeves. Fasten off and repeat on the other side.

slip st to make sleeve openings

Check the fit before continuing on—for a baby size, you really have to be careful not to sew too far when making the sleeves. In the picture below, for instance? I sewed too far! I actually had to go back and undo it a bit to get the fit right. Be careful and check the fit before you move on.

sleeves

Once again, use this picture as a guide of how to sew it and not how far to sew it. For the 3-6 month size shrug, this was too much! I went back and undid it, leaving only about an inch sewn together and that was perfect for Darcy. It’s easier to go back and sew more than to pick it apart.

Now on to the collar and cuffs!

Join your yarn somewhere in that inner circle of the shrug (I started at the seam, but you don’t have to), chain 1, and single crochet evenly around the entire circle. Slip stitch to join with the starting chain, chain 1, and single crochet evenly around. Continue to reach the desired collar length (I did 3 rows). Repeat this process for the arm openings to create the sleeve cuffs. If you’d like, you can go down a hook size or more on the cuffs to create a more fitted cuff. I did 3 rows on the cuffs using a J hook, then 3 more rows with an H hook.)
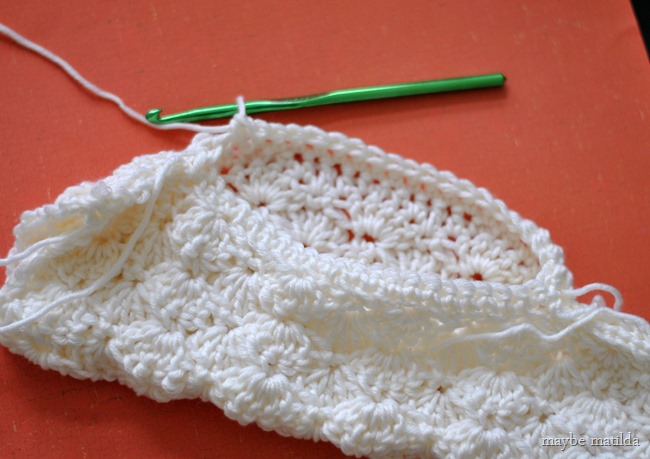
collar

Weave in all your ends, and you’re done!

Free pattern and step-by-step photo tutorial to crochet this sweet little shrug!

And the shortened, photo-free version of the pattern.

Darcy’s Vintage Shell Shrug

Row 1: fsc in multiple of 6 + 1 to desired measurement—measure from one elbow, up arm and across the back/shoulders, then down to the other elbow. (for 3-6 month size, I did 37 fsc; for 6-12 month size, I did 43 fsc). Ch 1, turn.

Row 2: (begin shell stitch) 1 sc in first st of foundation row, *skip 2 st, 5 dc in next st, skip 2 st, 1 sc in next st.* Repeat from * to * to end of row. Turn.

Row 2: Ch 3 (counts as first dc), work 2 dc in same st as ch 3, *skip 2 dc, 1 sc in next dc (center of shell of previous row), skip 2 dc, 5 dc in next sc.( Repeat from * to * to end of row, ending the row with 3 dc in the final sc. Turn.

Row 3: Ch 1, 1 sc in first st, *skip 2 dc, 5 dc in next sc, skip 2 dc, 1 sc in next dc.* Repeat form * to * to end of row, ending last repeat with 1 sc in top of the ch 3 turning chain.

Repeat rows 2 and 3 until desired length is reached. It must be long enough to cover the upper back/shoulders, and when the shorter ends are brought together (‘hot-dog style’), they must be able to touch around the upper arms. (See photos above.)

Even out shell stitch. If you ended on row 2: ch 1, turn. sl st in 1st dc, sc in next, hdc in next, dc in sc between shells, hdc in next, sc in next, sl st in next, sc in next, hdc in next, dc in next. Repeat across row.

Fold long ends together, sl st from edges in just a few inches to create the sleeves. Be careful and check the fit!!! You probably need to sl st less than you might think!

Join yarn at inside seam, ch 1, and sc evenly around to create collar. Join to ch 1 with sl st. Ch 1, sc in each st around. Repeat to desired collar length. (I did 3 rows.)

Repeat for sleeve openings. If desired, decrease by 1 or 2 hook sizes for a more fitted cuff. (I did 3 rows with J hook, then 3 more rows using H hook).

Weave in ends.

--------------------------------------------------------------

Please let me know if you have any questions! I’d love to see pictures of your finished work—share them on my facebook page! And to see more of my crochet projects/tutorials, click the crochet tab.

Related Posts Plugin for WordPress, Blogger...