Maybe Matilda: tee
Showing posts with label tee. Show all posts

Wednesday, October 22, 2014

DIY Marauder’s Map Shirt (and free Silhouette template)

You’ll never guess what audiobook I’ve been listening to this month.

Go on, guess.

Make a cute and easy Marauder's Map t-shirt with your Silhouette and this free template!

The correct answer is Harry Potter and the Prisoner of Azkaban and no one saw that coming at all.

The words needed to open the Marauder’s Map seem extremely appropriate for a certain someone I know—and I don’t want to embarrass anyone, so I won’t name any names, but it starts with a 4 and ends with an ‘est.’ This child is never not up to no good.

Make a cute and easy Marauder's Map t-shirt with your Silhouette and this free template!

I’m still learning all the ins and outs of my Silhouette Portrait, but even with my beginner-level knowledge, this was still a very quick project to put together. And I wasn’t sure how well it would turn out, so I didn’t take any progress pictures, but it’s a simple enough project that hopefully you don’t need them.

I just set up the text in Silhouette Studio how I wanted it, then grabbed a stock image of footprints online and added them to the design. After cutting the design onto vinyl, I peeled the letters out and tossed them, then used the rest as a stencil. I mixed craft paint with textile medium and sponged it onto the stencil to create the letters and footprints (with a layer of cardboard inside the shirt to make sure you don’t get paint soaking through to the back, of course). I’ve seen people do painted t-shirts without using the textile medium, so I’m assuming it holds up fine without any issues, but I’ve always used the textile medium. In my experience, it gives a very smooth finished product and holds up beautifully in the wash. After peeling up my stencil piece, I just let the shirt air dry overnight, then ironed it to set the paint (your textile medium will give instructions on how to set it).

DIY Marauder's Map t-shirt with free template for Silhouette

I’m happy to share the Silhouette Studio file here for anyone to use to make their own shirts (personal use only, please!)—I hope I’ve done this right. Please tell me if something doesn’t work properly and I’ll work on figuring it out :-)

Get the file for the template as shown HERE.

And get the file for the REVERSED template HERE.

Wednesday, September 28, 2011

Lined Paper Tee Shirt Tutorial

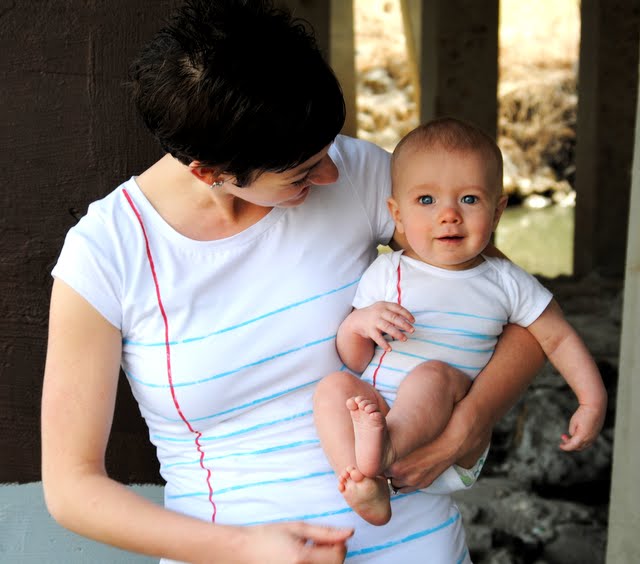
In case you missed this post last month on Ucreate, here's my fun, sorta nerdy back-to-school (or anytime!) tee refashion project:

I think this lined paper tee is such a fun way to bring out the inner student, and possibly even encourage a little bookishness in a little one (maybe that's a stretch, but a girl can hope, right?).

(Oh my gosh, look how teeny Forrest is! Although this post only went up last month, I actually made these shirts and took these pictures when Forrest was maybe 6 months old . . . so about 7 months ago! He's so shrimpy! Never fear, I've kept making these shirts for him as he's grown . . . he has one that fits in his closet right now.)

It's really simple to put together, and you can easily make it in any size. And how cute would it be if you embroidered or stamped your child's name or a favorite quote onto the lines? 

Here's what you'll need to make this tee:

a white tank, tee, or onesie
masking tape
foam brush
blue and red acrylic paint
fabric painting medium (available at craft stores--you'll find it with the paint supplies)

To start, place some cardboard between the front and back of the top so your paint doesn't bleed through to the back of your shirt, then place your tape in straight horizontal lines across your shirt to mark the areas where you'll paint your blue lines. I put my first strip of tape right beneath the sleeves. I spaced the tape strips about 1/4" apart from each other, but only painted in every other open space (on an adult size tee) to create a little more distance between the lines. For my little guy's onesie, I painted in the spaces between each tape strip.


Mix your blue paint and fabric painting medium according to the directions on the medium (usually a 2 to 1 mixture of paint to medium), and lightly sponge it between your tape strips. A little goes a long way, so try not to get too heavy-handed with your brush. (And personally, I really like the look of a lightly painted, sort of splotchy paint line!)

(You can see here that I only painted in every other open space for the adult tee. For a baby/toddler top, you can paint in each open space.)

Give it some time to dry, then carefully remove the tape. Place two long strips of tape vertically down the left side of the shirt where you'll paint your red line. Again, place the strips about 1/4" apart, and make sure they're running straight down the tee so you don't end up with a wavy line.

Mix your red paint with the fabric painting medium according to the directions on the package, and sponge it on as you did for the blue lines. Let it dry for a while and carefully remove the tape.

If you're making a baby onesie, don't forget to lift up the shoulder flap to tape and paint underneath it!

Make sure you read the directions on your fabric painting medium to find out how to finish your shirt--you'll probably need to let it air dry for 24-48 hours, then iron it to set the paint. You can just turn the shirts inside out and toss them in the washing machine, and the paint holds up just fine.
If you make one of these shirts (or anything using one of my tutorials/ideas), feel free to add it to the Maybe Matilda Flickr Group so we can all check it out!

Also, I had a request a few weeks ago to make a onesie for a customer in my etsy shop, and she really loved it on her little girl . . . so there's a listing right here in my shop if you want me to make one for your little one!
Related Posts Plugin for WordPress, Blogger...