Maybe Matilda: crochet
Showing posts with label crochet. Show all posts

Friday, April 17, 2015

Friday List: Crocheters of Instagram

Well, it has been ages since I’ve crocheted, and now that we’re headed toward summer, it’s probably going to stay that way for a while. Crocheting in the winter? Cozy and pleasant and warm. Crocheting in the heat? Sticky and sweaty and disgusting. But I can still appreciate it on instagram, so that’s something.

For today’s Friday List, I want to share a few of my favorite crocheters on instagram—lots of beautiful crochet inspiration to be found here!

Awesome crochet accounts on instagram

1. EBLittleCreations: Oh, just the cutest dang amigurumi you’ve ever seen. From bears to turtles to mermaids to cacti, she crochets it all, and does it so very well. I’ve only been following this account for a few weeks but I love her versatility and the charm of her little creations. You can also find Erika at her Etsy shop here.

2. CypressTextiles: I’m a little on the boring side when it comes to color choices in crochet, but that doesn’t mean I can’t appreciate amazing color when it’s done well. Rachele’s color choices are always inspiring, and she designs such creative and unique blankets. See more of her work (including patterns) at her site here.

3. DarlingBeBrave: Right off the bat, you’ll love Megan’s bright and minimalistic photography, but of course her crochet is fantastic as well. I love her chunky and cozy designs. Visit her blog here and Etsy shop here.

4. RebekahLaw: I think Rebekah’s cute patchy monkey pictures prompted me to follow her account, but she also does the cutest range of animals and dolls (those dinosaurs?! #cutest). You can find her on facebook here.

5. HeyBanjoPants: I’m not sure how Lauren packs so much personality into her animals. She consistently picks out color combos I would never choose in a million years, yet her work always turns out beautifully and makes me wonder why I’m so nervous around color? Plus she is hilarious and wonderful and quite possibly my soul mate. Find her Etsy shop here.

6. LinaMarieDolls: Michelle’s dolls are always gorgeous, with the prettiest little details from their hairstyles to their accessories. Although her dolls sell in the blink of an eye, you can visit her Etsy shop here.

I’d love to hear some of your favorite instagram accounts, too!

Monday, February 2, 2015

My favorite crochet projects in the history of ever.

I started crocheting shortly after Forrest was born, which makes this roughly a 4 1/2-year old hobby for me. I’ve often thought that it would have been cool to keep track of everything I’ve made—for myself, for my kids, for friends’ kids, for my etsy shop customers. Those are some numbers I would be super interested in seeing.

But of course, I didn’t keep track, and have absolutely no idea what the tally on all the various items I’ve made might be.

I do, however, have photos of many of my crochet projects, and thought I’d spotlight a handful of favorites today.

In no particular order, here are some of my very favorite crochet projects from the past 4 years of crocheting:

All Star Crochet Baby Blanket // www.maybematilda.com

Forrest’s All Star Baby Blanket: You can find the original post about this blanket HERE, but to summarize it for you, I not-so-secretly hoped that this blanket would replace his precious blankie—the one made by someone other than me that he loves dearly and snuggles nearly 24 hours a day—but he could not care less about it. Nonetheless, it is still one of my favorite projects ever. I love the classic Americana style as well as the colors, and it was a fun project to make. Find this pattern as part of a crochet pattern book here.

Sidewalk Shawl // www.maybematilda.com

Sidewalk Shawl: Visit my original post on this project HERE. This shawl was challenging but so enjoyable to make, and I think it came out beautifully. Sadly, it’s spent its entire life folded up on a closet shelf. I just don’t know how to use/wear something like this in real life, but that doesn’t stop it from being one of my coolest projects yet. Find the pattern here.

Striped crochet giraffe // www.maybematilda.com

Stripey Giraffe: Visit my original post about this gal HERE. I can’t say I love the process of crocheting amigurumi much—the tight crochet is torture on the hands, and they are boring as he!! to work on—but the finished products are just so sweet. I made this giraffe for Darcy before she was born, and am not at all surprised to tell you she doesn’t give a hoot about it and has never paid it any attention. My children are so unappreciative. Find the free pattern here.

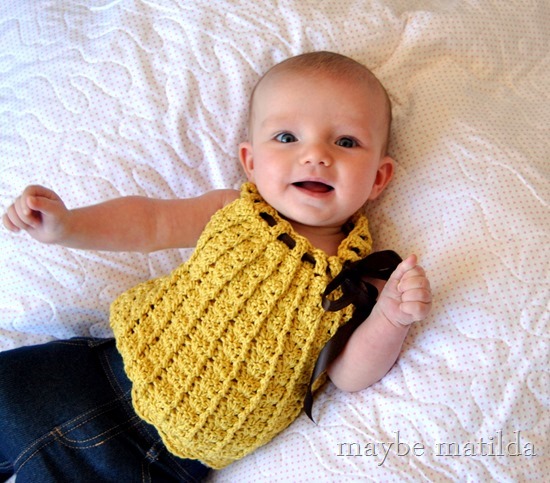
Sweet little crochet baby tank // www.maybematilda.com

Baby tank top: Visit the original post HERE. This darling little tank top quickly became a favorite. Sadly, she outgrew it rather quickly, but I love the unique design and simple construction, and look forward to making another one for Darcy this spring. Find the pattern here.

Granny blanket // www.maybematilda.com

Granny Flower Garden Baby Blanket: Visit the original post for this project HERE. When I first began crocheting, I remember swearing up and down that I’d never make a multi-colored granny-style afghan, which I could only picture as the outdated, uncomfortable, scratchy blankets that no one wants to cuddle up under at grandparents’ houses. But after seeing some examples of how fresh and modern they can be when made with bright colors, I was converted. Find the pattern for these sunburst granny squares here.

Grandma's Lacy Ripple bedspread // www.maybematilda.com

Grandma’s Lacy Ripple blanket: Visit the original post HERE. I am hoping against hope that I never—never, for the rest of my life—get tired of seeing this blanket on my bed, because far too much work went into it to ever replace it. I can’t say much for its warmth (while wrapped up in my sofa blanket made with this same pattern, my brother-in-law Alan asked recently if here was a way to crochet blankets without giant gaping holes that might actually provide some warmth?) but I do love how it looks. Find the pattern here.

ruffles and dots blanket

Ruffles and Dots baby blanket: Visit the original post HERE. I can hardly believe that smiling chubster up there is Forrest. Some years have passed, but this is still one of my favorite baby blankets to make (and I’ve made many blankets using this pattern, in all sorts of fun colors, although the green has always been a favorite). Simple and cuddly and sweet, I think this is a timeless style that has such a fun, modern feel when made in a bright color. Find the pattern here.

Friday, January 16, 2015

A Sheep Named Ashley—No, Charlie—Wait, Yes, Ashley.

My kids’ interest in the little animals I crochet for them is close to zero. They honestly could not care less. And yet I persist.

It may be time to admit that at this point, I’m not making these for the kids anymore—I’m making them for me. I’m only a step away from getting a little glass-front curio cabinet, putting all my amigurumis in it, and forbidding the children from getting too close.

Crochet Sheep // www.maybematilda.com

Predictably, Darcy has never cared about any of her crochet stuffed animals (she has quite a few), but she does love store-bought stuffed animals—the softer and fluffier, the better. So I thought if I crocheted an animal that was fluffy and loopy and more cuddly than the average amigurumi, maybe I could win her over.

Crochet Sheep // www.maybematilda.com

For the record, I was wrong. When I proudly presented this sweet loopy little sheep to her after my hours of labor, she turned it around a few times to give it a good inspection, then immediately tossed it on the floor and went scooting off to get her favorite NON-HOMEMADE animal. Very insulting.

Unexpectedly, though, Forrest has been playing with it for quite a few days now, which beats his previous record of playing with a homemade toy for 2 1/2 minutes. He told me it’s a girl and her name is Ashley. Then 10 minutes later he very frantically said, “No!! Wait!! Her name is not Ashley!! Her name is Charlie,” and seemed very relieved to have gotten that sorted out for about 30 seconds until he forgot about the name change and has gone back to calling her Ashley.

The other night, when I was tucking him into bed, he requested that I also tuck Ashley (not Charlie!!) into bed next to him. I asked him why he liked her so much (thinking maybe it would give me a clue as to what sort of features he likes in a toy that I can be sure to use in the future), and he responded, “Because she is better than all my friends.”

Okay.

Crochet Sheep // www.maybematilda.com

Whatever her name is, I think she’s awfully cute. I used the Sheldon the Sheep pattern (not Ashley or Charlie the Sheep?!?!) from Curly Girl Coop.

The loop stitch definitely takes a little getting used to (it feels very awkward to me, and even though I’ve done it quite a few times, I always have to watch a youtube how-to video to remind myself of how it’s done), but the results are worth it.

My only changes to the pattern were to use a single color for the arms and legs (the pattern calls for black feet and gray legs), and I shortened the limbs quite a bit.

Monday, January 12, 2015

Crochet Bow Headband Pattern in 3 Sizes

Good morning one and all! No need to adjust your monitors: I did not cut off 8 inches of hair or give myself bangs over the weekend. These pictures (and the patterns) are two years old. I always intended to post the patterns, but kept remembering and then immediately forgetting about it. I’m happy to finally be scratching this 2-year old to-do item off my list today.

(With projects like this that take me 2 years to post, you can see why reading a book about early-onset Alzheimer’s would give me some concerns about my own memory.)

Crochet Bow Headband Pattern in 3 sizes: little bow, medium bow, and big bow! // www.maybematilda.com

Like many of my patterns, these are more of a rough guideline than a set-in-stone pattern. Totally easy to adapt to any head size, but they should fit most adults as written. I think these headbands are such a fun, playful accessory—make them in all sorts of colors and sizes to go with any outfit!

We’ll go in size order, from little to big. Scroll on for the patterns. All of the headbands use worsted weight yarn (some of my favorites are Hobby Lobby’s I Love This Yarn, and Vanna’s Choice), and an H hook.

And since they require such a very small amount of yarn, they are a great way to use up little odds and ends that you already have—no need to race out and buy something new (unless, of course, the yarn-shopping urge strikes, as it often does for me).

Little Bow Headband // free crochet pattern at www.maybematilda.com

Little Bow Headband

Note: To adapt this pattern for different head sizes, simply use more or fewer chains in the first step to get the right size loop to fit properly around your head. Visit THIS link for average head sizes based on age, and chain whatever number makes a loop of the right size.

For the headband:

Ch 60, sl st to first ch to make a loop (make sure the chain is not twisted!).

Row 1: Ch 1, sc in each st around. Sl st to first st, fasten off, and weave in ends.

Alternately, for a stretchier headband, simply work foundation single crochet until piece is the proper length to fit your head, slip stitch to the first sc to create a loop, fasten off, and weave in ends.

For the bow:

Ch 22.

Rows 1-4: Ch 1, sc across, turn.

Fasten off, leaving a very long yarn tail. Use this tail to sew the two short ends together to form a loop. Pinch the center of the loop to create a bow shape, and wrap the remaining yarn tail tightly around the center quite a few times. Fasten it securely, then sew the bow to the headband.


Get the free pattern to make this cute crochet bow headband! // www.maybematilda.com

Medium Bow Headband

Note: To adapt this pattern for different head sizes, simply use more or fewer chains in the first step to get the right size loop to fit properly around your head. Visit THIS link for average head sizes based on age, and chain whatever number makes a loop of the right size.

For the headband:

Ch 60, sl st to first ch to form a loop (make sure the chain is not twisted!).

Rows 1-3: Ch 1, sc in each st around, sl st to join. (Do not turn at the end of each row.)

Fasten off, weave in ends.

For the bow:

Ch 27.

Rows 1-5: Ch 1, sc across, turn.

Fasten off, leaving a very long yarn tail. Use this tail to sew the two short ends together to form a loop. Pinch the center of the loop to create a bow shape, and wrap the remaining yarn tail tightly around the center quite a few times. Fasten it securely, then sew the bow to the headband.


Get the free pattern to make this cute crochet bow headband! // www.maybematilda.com

Big Bow Headband

Note: To adapt this pattern for different head sizes, simply use more or fewer chains in the first step to get the right size loop to fit properly around your head. Visit THIS link for average head sizes based on age, and chain whatever number makes a loop of the right size.

For the headband:

Ch 60, sl st to form loop (make sure chain is not twisted!).

Rows 1-6: Ch 1, sc in each st around, sl st to join. (Do not turn at the end of each row.)

Fasten off, weave in ends.

For the bow:

Ch 33.

Rows 1-8: Ch 1, sc across, turn.

Fasten off, leaving a very long yarn tail. Use this tail to sew the two short ends together to form a loop. Pinch the center of the loop to create a bow shape, and wrap the remaining yarn tail tightly around the center quite a few times. Fasten it securely, then sew the bow to the headband.


As with all of my crochet patterns and tutorials, feel free to sell your work! I would love a link back to my blog as your pattern source. And I’d love to see pictures of anything you make with my patterns! Share them on my facebook page, or tag me on instagram (I’m @maybematilda).

Find more of my crochet patterns on my Maybe Matilda Crochet pinterest board!

Wednesday, January 7, 2015

WIN the Blog Hop Crochet Along Afghan!

WIN this beautiful crochet-along afghan! // www.maybematilda.com
Today kicks off the final giveaway of the Blog Hop Crochet Along! We have pieced together all twenty of the bloggers’ squares from our crochet along into one beautiful afghan that one of you will win!

Most of these squares were actually crocheted by their designers and then mailed across the globe to be put together - this pretty afghan is truly a collaborative effort!


Thanks to all of our bloggers for participating:

 
This giveaway ends 1/14/15 at midnight PST and is open WORLDWIDE! Enter in the Rafflecopter below. Good luck!
 
a Rafflecopter giveaway

Monday, January 5, 2015

Top Posts of 2014

Top 10 posts seem to be the thing to do when the end of the year rolls around. To tell you the truth, I almost never look at my site statistics, and I usually feel a bit surprised when I do—the posts that get the most traffic are almost never the ones I have the most fun writing.

So instead of the traditional top 10 showcasing which posts got the biggest numbers and most attention, here instead are some of my favorite posts of the year—the projects and recipes and day-to-day thoughts that I most enjoyed creating and sharing. They may not have been the most popular, but these are some of the posts I enjoyed the most.

Crochet

I didn’t post about crochet nearly as much in 2014 as I have in the past, which probably has a lot to do with having a new baby in the house this year. Of the crochet projects and tutorials I did share, some of my favorites are Darcy’s Vintage Shell Shrug (totally customizable to fit any size):

 Darcy's Vintage Shell Shrug -- free crochet pattern, adaptable to any size!

Other crochet favorites are my 3-part Granny Stripe Baby Blanket tutorial (<—that link will take you to the final post in the series, with links to the other two tutorials), Double Pom Pom hat pattern, Chunky Scalloped Cowl pattern, and the blanket I made for my sister’s wedding.

4 awesome crochet projects from 2014

See more of my crochet projects/tutorials on my crochet Pinterest board.

Recipes

Eat to live? Reverse that, and now we’re talking. One of my favorite recipes from the year (as well as one of my favorite recipes, period) is my mom’s Sausage and Veggie Calzones:

Sausage and Veggie Calzones // www.maybematilda.com

Other favorite recipes from 2014 are my Aunt Emily’s Sour Cream Apple Squares, Asian Sesame + Cilantro Meatballs, Apple Carrot Bran Muffins, and Raspberry Chocolate Chip Bundt Cake.

4 favorite recipes from www.maybematilda.com

See the rest of my recipes on my recipe Pinterest board.

Everything Else

I don’t know whether or not you guys noticed, but my blog underwent a bit of a shift in 2014. When I started blogging (quite a few years ago now!), I almost exclusively shared DIY projects and tutorials. And while those projects are still a part of my life, I’m not interested anymore in having them be my sole focus here. While I keep up with a small handful of DIY blogs, it’s mostly as a source of inspiration—the blogs I read faithfully and look forward to and interact with most are the ones that I feel a more personal connection with. So it felt natural to me to move mine in a more personal direction, too. I hope no one minds.

I loved sharing my monthly reading recap posts and favorite books of 2014 (you can find the links to each of my monthly book posts at the end of the favorite books post):

Book reviews at www.maybematilda.com

image via The Faithpal

Other favorite posts were Deep Thoughts with Forrest (any and all), What Worked in 2014, A Sweet Stage with Forrest, and 9 Months In, 9 Months Out.

some favorite posts from www.maybematilda.com

And just a sappy moment here, if you don’t mind. Thank you so much for reading this blog, for commenting and emailing and making it such a joy for me to share bits of our little life. I appreciate every one of you, and it means a lot to me that you would take time out of your day to read what I have to say.

Thanks for being here.

Monday, December 8, 2014

Dare to Give Handmade Link Up and Double Pom Pom Hat Pattern

Welcome to my favorite week of Dare to DIY: Dare to Give Handmade! Today’s link up is right here at Maybe Matilda, so don’t forget to add YOUR handmade project. Make sure also to visit my cohosts, Newly Woodwards, Décor and the Dog, and Shift Ctrl Art, to see their lovely work. I wouldn’t complain about receiving a single one of their awesome gifts this Christmas.

For my handmade gift, I crocheted a darling little double pom pom hat for Darcy. Because if 1 pom pom is adorable, 2 pom poms are so cute it could kill you.

Free crochet pattern to make this adorable double pom pom hat!

Are you dead?

I’ve been particularly loving big, chunky, thick hats for my kids this year, and I wanted to come up with something kind of silly and fun for Darcy to wear. You could, of course, use a bulky weight yarn to crochet this hat. I almost never have bulky yarn just lying around, but I always have quite a supply of worsted weight, so I crocheted this hat with 2 strands Red Heart super saver variegated yarn. The label was lost long ago, but I believe the name was Wildflower. I don’t use variegated yarns often, but that may change, considering how much I love how this hat turned out. I think this style is darling on babies and kids of any age, and would even be fun for an adult . . . with a sense of humor :-)

Free crochet pattern to make this adorable double pom pom hat!

As with many of my crochet tutorials that I post here, this is more of a ‘guide’ than a strict pattern. It can be adapted to any size and is wildly forgiving, and I’m not including specific stitch counts because it is so easy to change to whatever size you decide to make it.

All you’ll need to know in order to size it properly for the person you’re gifting to is their head size. And since you may not have all your friends’ head measurements memorized, I’d recommend you visit THIS LINK for a hat size chart based on age.

Also, please don’t be afraid of the foundation single crochet that I use to start this hat. It isn’t difficult, and it offers SO much more stretch than the traditional starting chain, which is perfect for a project like this where we start with the brim and work our way up. Stretchy brims are definitely a good thing.

Double Pom Pom Hat

Materials:
- bulky weight yarn or 2 strands of worsted weight yarn (I can’t give much detail on how much yarn you’ll need—it will depend on the hat size you make—but for the pictured hat made for a 1-year old baby, I used almost 1 full skein of Red Heart Super Saver.)
- K hook (10 mm)
- blunt large-eye needle for sewing tails in
- optional: pom pom maker (I love this Clover set—worth every penny)

Abbreviations:
fsc = foundation single crochet
dc = double crochet
sl st = slip stitch
fpdc = front post double crochet
bpdc = back post double crochet
ch = chain

Notes:
Hat is worked from brim up. Do not turn your work at the end of each row. The finished hat will be roughly square shaped, with 2 pointed corners at the top, where you will place your pom poms. Leave a long yarn tail at the end of your work to sew the top of the hat closed.

1) Start with a row of fsc long enough to reach easily around the head of the person you’re crocheting for. Visit THIS page for average head sizes. So if you are making this hat for, say, a 9-month old baby, work fsc until your piece measures about 18 inches in length.

Sl st to join your work in a loop (make sure the loop is flat and has not twisted!).

2) Ch 2,  dc in each stitch around. Join with sl st to top of starting ch.

3) Ch 2, *fpdc in next stitch, bpdc in next stitch. Repeat from * around. Join with sl st to top of starting ch.

4) Repeat row 3, working fpdc in each fpdc of previous row and bpdc in each bpdc of previous row.

5) Ch 2, dc around in back loop only of each stitch. Join with sl st to top of starting ch.

6) Ch 2, dc around. Join with sl st to top of starting ch.

7-?) Repeat row 6 until desired hat ‘height’ is reached. Visit THIS page for hat height suggestions based on age. Add roughly 2 inches to suggested hat heights, since this style is meant to sit high on the head and fit loosely. Fasten off when desired height is reached, leaving long yarn tail.

Use ending yarn tail to stitch the top of the hat closed. Simply lay the hat flat with the seam centered in the back, and sew back and forth with the ending yarn tail to create a long, flat seam. The hat will look square. Sew in all yarn tails.

Using a pom pom maker, make 2 large pom poms. Sew pom poms to top corners of hat.

Free crochet pattern to make this adorable pom pom hat!

As with all patterns/tutorials from my site, feel free to make some, give some, sell some! Just please include a link back to my site as your pattern source if you decide to sell online :-)

Check out my cohosts’ awesome handmade gifts:

Dare to Give Handmade gifts

Pom Pom Hat by Maybe Matilda // Homemade Candy with Ombre Dyed gift bags by Shift Ctrl Art // Crochet Tote by Newly Woodwards // Stovetop Potpourri by Décor and the Dog

I can’t wait to see YOUR handmade gifts! What have you created to give as gifts this Christmas? Link your projects below! Please remember to link back to one of the Dare to DIY cohosts—Décor and the Dog, Newly Woodwards, me, and Shift Ctrl Art :-)

Thursday, November 13, 2014

Puffed Flower Square

Today’s my second go at sharing a granny square for the Blog Hop Crochet Along! It’s been so fun to see all the bloggers’ unique designs, and I’ve loved following along in the facebook group to see all the participants’ take on the patterns. Thanks to all who are joining in—it’s so fun to see everyone’s work!

I’m calling today’s pattern the Puffed Flower Square. I love the smooshy puffy flower in the center of all that traditional granny square goodness.

Puffed Flower Granny Square Pattern // www.maybematilda.com

But before we get to the pattern, here’s the recap on the crochet along so far:


Today I am excited to be joining The Blog Hop Crochet Along! Nine other bloggers and I are teaming up to a new afghan square pattern every day for a month. Crochet along with us and you will have a gorgeous new afghan just in time for the holiday season!

Here's how it is going to work:

  • Every day (M-F) a new square pattern will be posted on one of our ten blogs. 
  • You can join in the fun by crocheting each day's square on that day whenever you have time.
  • Share your progress and post photos of your squares in our facebook group.
  • By the end of the Crochet Along you will have twenty 12" squares all ready to be pieced together into a beautiful afghan just in time for the holiday season.
  • Finally, we will be hosting some fabulous giveaways! You could win Lion Brand yarn to make your own afghan, $100 CASH money, OR our COMPLETED AFGHAN! That's right, we are going to be piecing all of our squares together and shipping an afghan out to one very lucky winner.


Hopeful Honey - Persia Lou - Little Monkeys Crochet 

Fiber Flux - Loopsan One Dog Woof - Maybe Matilda

Dream a Little Bigger - Whistle & Ivy  - Gleeful Things 

We would love if you crocheted along with us. If you'd like to add a button to your blog or website you can grab this one here:
The Blog Hop Crochet Along

Today I am sharing the Puffed Flower Square. You can find links to all the other patterns at the end of this post. The links will be updated daily!

{Pattern Goes Here}

[Blogger InLinkz script]

[Wordpress InLinkz script]

Puffed Flower Granny Square Pattern // www.maybematilda.com


For my square today, I used an I hook, but feel free to use another size if you prefer, and just add or eliminate rows to end up with a 12” square.


Puffed Flower Square


Beg puff st: (yo, insert hook in st, draw up a loop) 2 times, yo, pull through all loops on hook.


Puff st: (yo, insert hook in st, draw up a loop) 3 times, yo, pull through all loops on hook.


1: Start with a magic ring; work 12 sc into ring. Join with sl st to first sc and pull yarn tail to close center. Change colors if desired.


2: Ch 3 (counts as first dc), beg puff st, ch 1, *puff st, ch 1*, repeat from * to * around, sl st to starting ch to join. Fasten off, join new color in any ch 1 space. (12 puffs, 12 ch 1 spaces)


3: Ch 3, beg puff st in ch space from previous round, ch 2, *puff st, ch 2* around in each ch space from previous round, sl st to starting ch to join. Fasten off, join new color in any ch space. (12 puffs, 12 ch 2 spaces)


4: Ch 3, beg puff st in ch space from previous round, ch 3, *puff st, ch 3* around in each ch space from previous round, sl st to starting ch to join. Fasten off, join new color in any ch space.


5: (Ch 3, dc 2, ch 3, dc 3) all in same space; this creates the first corner. *Sk puff st, dc 3 in ch sp, sk puff st, dc 3 in ch sp, sk puff st, (dc 3, ch 3, dc 3) in ch sp.* Repeat around, sl st to starting ch to join.


6-11: Sl st to ch 3 in corner of previous round, then (ch 3, dc 2, ch 3, dc 3) in corner of previous round. Work 3 dc in spaces between each (dc 3) of previous round, and (dc 3, ch 3, dc 3) in each corner space of previous round. Change colors whenever desired, and if necessary, add or eliminate rows to reach 12”.


Monday, November 3, 2014

Flower Garden Granny Square

Today I am excited to be joining The Blog Hop Crochet Along! Nine other bloggers and I are teaming up to share a new afghan square pattern every day for a month. Crochet along with us and you will have a gorgeous new afghan just in time for the holiday season!

Here's how it is going to work:

  • Every day (M-F) a new square pattern will be posted on one of our ten blogs. 
  • You can join in the fun by crocheting each day's square on that day whenever you have time.
  • Share your progress and post photos of your squares in our facebook group.
  • By the end of the Crochet Along you will have twenty 12" squares all ready to be pieced together into a beautiful afghan just in time for the holiday season.
  • Finally, we will be hosting some fabulous giveaways! You could win Lion Brand yarn to make your own afghan, $100 CASH money, OR our COMPLETED AFGHAN! That's right, we are going to be piecing all of our squares together and shipping an afghan out to one very lucky winner.


Hopeful Honey - Persia Lou - Little Monkeys Crochet 

Fiber Flux - Loopsan One Dog Woof - Maybe Matilda

Dream a Little Bigger - Whistle & Ivy  - Gleeful Things 

We would love if you crocheted along with us. If you'd like to add a button to your blog or website you can grab this one here:
The Blog Hop Crochet Along


Today I am sharing the Flower Garden square. You can find links to all the other patterns at the end of this post. The links will be updated daily!

Flower Garden Granny Square pattern // www.maybematilda.com


A talented gardener I am not. Once, while moaning about my black thumb to my sister (who spent a few summers working at a local nursery), she recommended I get a succulent, claiming they were nearly impossible to kill, and surely their hardiness would make them the perfect houseplant for me and my lack of gardening ability. You know what I had a few weeks later? A dead succulent.


Since I seem doomed to never have a real, live flower garden to enjoy, I’ve made a crochet version instead, with plentiful blooms, a blue-gray sky, and puffy cheerful little clouds. I’ll try not to find a way to kill it.


Flower Garden Granny Square pattern // www.maybematilda.com


It starts with a simple ‘filler’ or solid square, then the flowers and clouds are appliqued on top. It’s a fun way to add some color and dimension to a blanket.


Flower Garden Granny Square
I used a J hook and Lion Brand Wool-Ease yarn to make my 12” square. I crochet rather loosely, so you may want to take this into account when planning your square. With this pattern, you can easily add extra rows or leave rows off to reach your desired square size.


Ch 4, join with sl st to form circle.


1: Ch 5 (this will count as first dc and ch2). (DC 3 into circle, ch 2) three times. Work 2 dc into ring and join with a sl st to the 3rd chain of starting ch 5.


2: Sl st into the ch sp. Ch 5 and dc 2 into the same ch sp. *Dc into the next 3 sts, (dc 2, ch 2, dc 2) in the ch sp. Repeat from * three times, then dc into the last 3 sts, dc in the ch sp.  Join with a sl st to 3rd ch of ch 5.


3: Sl st into the ch sp. Ch 5, dc 2 into the same ch sp. *Dc into the next 7 sts, (dc 2, ch 2, dc 2) in the ch sp. Repeat from * three times, then dc into the last 7 sts, dc in the ch sp.  Join with a sl st to 3rd ch of ch 5.


4: Sl st into the ch sp. Ch 5, dc 2 into the same ch sp. *Dc into the next 11 sts, (dc 2, ch 2, dc 2) in the ch sp. Repeat from * three times, then dc into the last 11 sts, dc in the ch sp.  Join with a sl st to 3rd ch of ch 5.


5: Sl st into the ch sp. Ch 5, dc 2 into the same ch sp. *Dc into the next 15 sts, (dc 2, ch 2, dc 2) in the ch sp. Repeat from * three times, then dc into the last 15 sts, dc in the ch sp.  Join with a sl st to 3rd ch of ch 5.


6: Sl st into the ch sp. Ch 5, dc 2 into the same ch sp. *Dc into the next 19 sts, (dc 2, ch 2, dc 2) in the ch sp. Repeat from * three times, then dc into the last 19 sts, dc in the ch sp.  Join with a sl st to 3rd ch of ch 5.


7: Sl st into the ch sp. Ch 5, dc 2 into the same ch sp. *Dc into the next 23 sts, (dc 2, ch 2, dc 2) in the ch sp. Repeat from * three times, then dc into the last 23 sts, dc in the ch sp.  Join with a sl st to 3rd ch of ch 5.


8: Sl st into the ch sp. Ch 5, dc 2 into the same ch sp. *Dc into the next 27 sts, (dc 2, ch 2, dc 2) in the ch sp. Repeat from * three times, then dc into the last 27 sts, dc in the ch sp.  Join with a sl st to 3rd ch of ch 5.


9: Sl st into the ch sp. Ch 5, dc 2 into the same ch sp. *Dc into the next 31 sts, (dc 2, ch 2, dc 2) in the ch sp. Repeat from * three times, then dc into the last 31 sts, dc in the ch sp.  Join with a sl st to 3rd ch of ch 5. Fasten off and weave in ends.


Flowers:
These are the same flowers I used on my camera strap cover tutorial, so visit this link if you’d like to see a photo tutorial. You can easily vary the sizes of the finished flowers by using different size hooks for your flowers.


Start with magic ring. Ch 1, sc 1 into ring.


(Ch 1, 2 dc in ring, ch 1, sc in ring) 5 times. Sl st to join first and last petals, pull starting yarn tail to tighten ring, and use tail to sew flower to the square.


Clouds:
To make the clouds, we’ll start with a chain and crochet across it, working into just one loop, then turn the chain and work back along in the opposite direction, working into the remaining loops. This pattern is for the larger cloud; to create the smaller cloud, I simply started with a chain half the length, and left out a few ‘bumps’ as needed.


Ch 11, work 3 sc in 2nd ch from hook, sc across, work 3 sc in last ch. Turn chain to work back across opposite side. Sc across, and sl st to start to join.


Ch 1, work 2 sc in each of the first 3 st, sc in next 8 st, work 2 sc in each of next 3 st, sc in next 10 st, sl st to join.


Ch 1, sc in same st. Sk next st, 5 dc in next, sk st, sl st in next, sk st, 4 hdc in next, sk st, sl st in next. Sk 2, 6 trc in next, sk 2 st, sl st in next. (Sk 1, work 5 dc in next, sk 1, sl st in next) twice. Sk 1, work 4 hdc in next, sk 1, sl st in next. Sk 2, 6 trc in next, sk 2, sl st to join. Fasten off, and use yarn tail to attach to square.


[Blogger InLinkz script]


[Wordpress InLinkz script]


Friday, October 3, 2014

Chunky Scalloped Cowl Crochet Pattern (and yarn giveaway!)

I don’t think I will ever, for as long as I live, get tired of wearing scarves and cowls. They have so much going for them—they’re an easy burst of color or pattern or texture to amp up an outfit, the perfect transition pieces to carry you into or out of cooler weather, and if you crochet (or knit!) they are so quick and easy and inexpensive to make yourself. Lion Brand  invited me to take part in their #scarfie project (selfie + handmade scarf = scarfie!) by sharing a photo of myself in a scarf I made, and it was the perfect push to do something I’ve been meaning to do for a few weeks anyway: get myself all set for fall with a new cozy cowl. And this one I came up with is peeeerfect, if I may say so myself.

Free crochet pattern to make this cute chunky scalloped cowl! Quick, easy project for beginning crocheters!

I love me a scallop, that’s for sure. I toss them on just about everything (baby blankets, hats, tops), so naturally I couldn’t resist making myself a scalloped cowl. It had to be done. And I was happy to do it.

Free crochet pattern to make this cute chunky cowl! Perfect beginner project, quick and easy.

I used Lion Brand Wool-Ease Thick & Quick (color: Grass), so it was very fast to work up (there are only 10 rows here, people), and my cowl is so thick and warm and chunky. Perfect for chilly fall days.

Free crochet pattern to make this cute chunky cowl! Perfect beginner project, quick and easy.

I’d like to take a little minute here to predict that it will take my dad about 12 minutes from the moment I post this to call me with a triumphant I told you so!!! because after yeeeeeeeears of mocking him for pairing denim pants with a denim/chambray top, I’ve crossed to the dark side and I have no regrets.

On to the pattern! Feel free to add or eliminate chains for a looser or more snug fit (just chain in multiples of 4), and add or eliminate rows to make your cowl ‘taller/shorter.’

Chunky Scalloped Cowl
Uses just over 1 ball of Lion Brand Wool-Ease Thick and Quick (or another super bulky weight yarn of your choice!) (I used roughly 120 yards total)
N hook
written in US crochet terminology

ch: chain
sl st: slip stitch
hdc: half double crochet
dc: double crochet
sk: skip
st: stitch

Ch 56 and join to first ch with sl st to form a circle (make sure your chain isn’t twisted!)

Row 1: Ch 2, hdc in each st around. Join to top of starting ch with sl st. (56)

Rows 2-8: Repeat row 1. (56)

Row 9: (Do not ch!) *Sk next st, work 5 dc in next, sk next st, sl st in next st* Repeat from * to * around. Fasten off.

Row 10: Join yarn with sl st at opposite end of cowl at the seam. Working in the free loop of the foundation chain, repeat row 9. Weave in all ends.

Free pattern to make this easy, chunky crochet cowl!Top: Walmart // Jeans: Ross  //  Boots: c/o Sole Society

If you make this cowl, I would love for you to share a picture on my facebook page, or tag me in an instagram shot of you wearing it. And make sure to use the #scarfie hashtag when sharing your fall and winter scarf/cowl projects!

Would you like a chance to win Lion Brand Wool-Ease Thick & Quick to make this (or another!) cowl for fall? Yes, I thought you might. Two winners will get two balls each—perfect for making yourself a cozy fall scarf. Enter using the rafflecopter below! (giveaway open to US only)

a Rafflecopter giveaway

I was compensated by Lion Brand for this post and project, and received free product to work with. Thank you for supporting/tolerating Maybe Matilda sponsors who help make posts like this possible!

Wednesday, September 17, 2014

You had me at ‘teeny giraffe.’

At some point, I’m sure we’ll collectively move on from our current favorite animal to something different (it’s been birds, owls, giraffes, foxes . . . I’m casting my vote for hippos next), but for now, giraffes are doing me just fine, thanks.

crochet giraffe // www.maybematilda.com

“Always with the amazing photography! How DO you keep this greatness coming?” you ask? Casual fake-humble shrug. God’s gift to the interwebs, armed with a mostly-dead iphone camera, right here.

I recently found (and then stalked and pestered into friendship) Sthefanie from Pastel Barn (you can find her on etsy HERE and instagram HERE). She is just the sweetest little ray of sunshine, and crochets darling little animals and dolls. She posted an itty bitty giraffe recently that she whipped up for her daughter’s first birthday, and was so kind to share her pattern notes with me when I begged for them. This little cutie is the result. I like.

www.maybematilda.com

If anyone’s interested, she’s listed in my etsy shop. And speaking of amigurumi, does anyone have a type of stuffing they are particularly loyal to? I always just choose something mostly at random, but I’m wondering if there is a stuffing that is particularly well-suited to amigurumi?

In other news:

- After picking Forrest up from preschool yesterday, the first thing out of his mouth was a very excited, “I had a gweat time at pweschool today! Some boys hurted my feelings weally bad because they were being way too cwazy and I shouted at them and then I cwied and then my teacher snuggled me all better!” Never have I desired more strongly to be a fly on the wall than since he started preschool. I would love to know what the heck goes on in there, because his reports about his day are pretty baffling.

- We have a trip to Pennsylvania coming up fast and I’m excited for the visit but sort of having anxiety attacks about our flight. Remember how awful my only other time flying with Darcy was? Based on that experience and her generally pleasant attitude the rest of the time, I can only assume that she bottles up all her anger and rage to release when we’ve reached 500 feet. So we’re looking at roughly 6 months’ worth of pent-up baby psychosis being unleashed on a cross-country flight in a few days. Financial tip: now might be a good time to buy stock in earplugs.

- Thank you all so much for your sweet comments about my little TV thingy! I felt silly doing it, and I also felt silly posting about it (but it seemed so weird not to post about it that I sort of had to), but as always, you guys are the nicest. Very encouraging and supportive and I love you all and check your doorstep tonight for a plate of thank-you cookies from me.

Friday, August 22, 2014

Frog / Zebra Amis (or, Toys My Children Won’t Appreciate)

Not sure if you can hear it from your side of the computer screen, but if you picked up on a long, glorious, beautiful sigh of deep relief just now, that was courtesy of yours truly being so glad it’s Friday, and so glad the week is over, and so so so glad my week of marathon sponsored posts has come to an ignominious end (I cannot tell you how glad I am to once again be hitting the ‘publish’ button without cringing in embarrassment). It was such a forceful sigh of relief, I wouldn’t be surprised if your hair actually blew back from your screen a little, hair commercial style. Thanks for hanging in there with me this week. It was awkward and embarrassing to put up one sponsored post after another, but no one left me any nasty comments about it, and for that I thank you.

I am a bit of a stress crocheter, and I have definitely been feeling the stress this past week or two, so I got a good amount of crocheting done (for shop orders and also just for kicks). I found a darling little amigurumi pattern that I can’t wait to make Darcy for her first birthday, which meant that I had to crochet something for Forrest for his birthday, too, and he seems to be into zebras lately, so there you have it. A stress-induced birthday zebra.

Crochet Zebra amigurumi // www.maybematilda.com

Honestly, I’ll be completely shocked if he plays with it more than maybe 4 or 5 times. He’s never really been into stuffed animals, but he’s going to be 4 in 2 days. At 4 years old, I might have a prayer of him enjoying something I’ve crocheted. Will I even have the slightest chance of him loving a crocheted animal at 5 or beyond? Probably not. So I’ll just keep crocheting him things he (probably) won’t care about while I still have even the slimmest chance that he’ll like them.

crochet zebra // www.maybematilda.com

I used this free pattern from Kristen’s Crochet to make the little guy, and it worked up very nicely. For some reason, the limbs (which looked perfectly proportioned on Kristen’s version!) looked goofily large on my zebra, so I went back and scaled them down a bit, plus shortened the mane significantly and went with a braided tail. I think he came out awfully cute. I’m really excited to give him to my little Goob-Meister, and am also preparing myself for the impending heartbreak when he shows zero interest in it whatsoever. Yay parenting!!!

After finishing the zebra, it would have made sense to start working on the toy I have planned for Darcy’s 1st birthday (only 2 months away?!?!?!?!?!), and yet I started a completely unrelated project instead. Because when do I ever do things that make sense? I made a frog, which I hope to not keep much longer (you can find her in my etsy shop, and would you do me a solid and go buy her? thanksverymuch). For unexplainable reasons, I stayed up until 1 AM finishing the little darling, and paid for it dearly the next day when Forrest delivered a friendly wake-up call bright and early by knocking on my forehead to tell me he needed toast. (Once again: yay parenting!!!)

crochet frog // www.maybematilda.com

I don’t feel like the pictures quite do this frog justice—she is so darling, so plump and squeezable, so dang cute in real life. I just love how she came out, and would love to make more of her in the future. 

crochet frog // www.maybematilda.com

I based her on this pattern from lilleliis (and am now obsessed with all of her patterns—girlfriend has talent, no doubt about it). Fantastic pattern, if you’re in the market for a crocheted frog (and why wouldn’t you be?).

I am tempted to stress-begin another amigurumi as soon as I finish typing this, but I’m not sure I can survive another 1AM bedtime. Happy weekend to one and all!

Tuesday, July 8, 2014

A Belated Granny Blanket

Props, props, and more props to those of you out there who can manage to plan out a DIY gift, start working on the gift, finish working on that gift, and actually give that gift right on time for the occasion for which the gift is being given. (<—that sentence there? Me and my keyboard don’t totally understand that concept of ‘succinct.’)

My sister Bekah got married at the start of June and since she weighs roughly 42 pounds and suffers from Perpetually Cold Skinny Person Syndrome (PCSPS, if you will), I thought maybe a cozy handmade blanket would make a nice wedding gift for her (it is the only known cure for PCSPS). She and her now-husband will be furnishing and decorating their first apartment together, so I figured I’d kill two birds with one stone and keep the poor skinny thing warm plus give her a throw blanket to decorate the new place with. And I even started nice and early, over a month in advance of the wedding. Then the big day came, the big day went, and almost exactly one month after the hubbub has died down, I finally finished their blanket. Better late than never or something like that.

Blue, pink, and green granny square blanket // www.maybematilda.com

You know what I think the problem is? It’s all those dang ends. I actually had the blanket itself finished almost in time for the wedding (almost is pretty okay, right? not awesome, but pretty okay), but dragged my feet when it came to sewing the ends in for weeks and weeks. I hate, despise, abhor, loathe weaving yarn ends in. The worst worst worst worst WORST part of any crochet project. I need to train Forrest to do it for me. I could pay him in Cheetos and Netflix. This could work. It’s high time he start earning his keep around here, and weaving in my yarn tails sounds like the ideal way to do it.

Blue, pink, and green granny square blanket // www.maybematilda.com

In a slight departure from the typical granny square afghan, I alternated colorful squares with plain white squares. I love that it adds a bit of a brighter, fresher feel to the blanket. And I really like how the thick granny stripe border turned out. I actually had planned on making that border about 3 times wider than it is, but I ran out of the green yarn and couldn’t get my hands on more at any of my local stores. So instead of continuing without it (or waiting for it to arrive by mail), I just finished it off. Maybe I’ll ask for the blanket back and tack on a few more rows of border in time for their 1st anniversary (that’s too optimistic, considering my sluggish turnaround time on this blanket . . . 4th anniversary it is!).

Blue, pink, and green granny square blanket // www.maybematilda.com

And I can already feel it coming . . . someone will ask for the pattern for these squares. And I am so, so sorry about this, but since it’s been so long since I started the blanket, I have no idea where I found the square pattern anymore. I’ve combed through my Pinterest boards and Ravelry favorites and can’t find it, and my googling has gotten me nowhere. I apologize. If anyone recognizes this particular square and knows where I can find the pattern, let me know and I’ll post it here! {Update: woohoo, a reader found it! This pattern appears to be identical to the one I used. Find it HERE. Thank you for the help, Megan!}

Blue, pink, and green granny square blanket // www.maybematilda.com

I used Vanna’s Choice for this blanket in White, Aqua, and Sapphire, and Vanna’s Choice Baby in Sweet Pea and Pink Poodle. Vanna’s Choice is consistently among my favorite yarns for just about every project. Wonderful color choices, affordable, soft (but not so overly soft/slippery that it won’t hold a shape), and it wears very nicely over time. (They are not paying me to say any of this, by the way. I just love my Vanna and would wholeheartedly recommend it.)

Feels good to finally get that blanket off my couch and into the newlyweds’ possession. And I’ve learned my lesson—next time I plan to start a project that produces zillions of dreaded ends to sew in, I’ll give myself a generous 4+ month window.

Related Posts Plugin for WordPress, Blogger...