Maybe Matilda: holiday
Showing posts with label holiday. Show all posts

Wednesday, October 28, 2015

Chic Black and White Halloween Mantel + Traditional Fall Hutch Decor

I think I've proven in the past that I'm not always the most enthusiastic decorator for holidays. But it's a lot more fun when your kids act excited about decorating, which was a big motivator for my Halloween decor this year.

Chic Black and White Halloween Mantel Decorations

Since I already had quite a bit of black and white happening on my mantel between the clock and vases (not to mention the fireplace box itself and the white mantel), I decided to go with a monochromatic black and white scheme. I wanted to keep it looking chic and sophisticated, but still fun for the kids, and this is what I came up with.

I started by gathering up books from my collection that have black spines/covers, and stacking them up. I always like using my books as decor, since I already have lots of them and it's fun for me to put them on display.

These two lanterns usually have blue and green candles inside. I didn't want to buy black and white candles just for this display, especially since I knew I wouldn't be burning them. So I just took a sheet each of black and white paper, wrapped them around the candles I already owned, and taped them into place. Easy, free fix to keep my black and white look going.

black and white halloween lanterns

I made the 'spook' banner and the bats using my Silhouette Portrait. Super easy and quick to pump out, and I love the swarm of bats escaping from the fireplace. I think I'll leave them up all year, and just accessorize them for every other holiday. They can each wear a Santa hat for Christmas, bunny ears for Easter, etc. It'll totally work, right?

black and white halloween mantel decor

We have a cute hutch in our kitchen that I used to display our more traditional fall decor.

Traditional Fall Decor on Kitchen Hutch

The little 'apple cider' sign was another quick Silhouette project from last year, made from a piece of scrap wood I found in the garage. I used those removable photo hanging strips to attach it to the back of the hutch. Hopefully it'll come down okay!

Traditional Fall Decor on Kitchen Hutch

And I was happy to rediscover this little painting in a box in my garage. I bought it at a thrift store years and years ago, but never found a good spot for it in our last house. I think it looks perfect tucked into this display.

Traditional Fall Decor on Kitchen Hutch

Do you like decorating for fall, or Halloween, or both?

Monday, December 1, 2014

Dare to Entertain: Peppermint Chex Mix + DIY Favor Boxes

Welcome to week two of Dare to DIY, a holiday DIY challenge cohosted by me, Newly Woodwards, Décor and the Dog, and Shift Ctrl Art! Each week, we choose a holiday-related theme and encourage you to join in by creating your own project that fits the theme, and join it up to a link party hosted by one of us.

This week’s theme is Dare to Entertain—make sure to hop over to Décor and the Dog to join in the link party and share your project, and visit all the cohosts to see what we’ve come up with this week! As a reminder, next week’s theme will be Dare to Give Handmade, and the link party will be Monday, 12/8, right here on my blog. I hope you’ll join in and share your handmade gifts!

daretoentertain

Gingerbread Man Place Cards by Décor and the Dog // Truffle Box Place Card by Newly Woodwards // Felt Tree Centerpiece by Shift Ctrl Art // Peppermint Chex Mix and Favor Boxes by Maybe Matilda

I always think Dare to Entertain is the hardest week. I’m not a big entertainer—I like the occasional small dinner party, but I really don’t enjoy putting on big events. And if given the choice between staying home with a book and attending a party—well, it’s hardly even a question.

I was thinking back on past Christmas parties (not thrown by me) to try and come up with an idea for this week, and remembered a Christmas party my sister-in-law Mindy threw a few years ago. She put out a big bowl of the most amazing peppermint Chex mix with white chocolate and candy cane bits, and it’s barely an exaggeration to say I ate about half of the bowl myself.

It’s become a regular Christmas treat in our house since that party, and I think it would make the perfect Christmas party favor for guests to take home after a holiday get-together, or (more realistically for me) a great gift to drop off at friends’ and neighbors’ houses around the holidays. I made my own little favor boxes to pack the Chex mix inside of, and let’s pretend I’m going to throw a Christmas party and hand these out. (I most likely won’t.)

White Chocolate Peppermint Chex Mix and DIY favor boxes. Perfect party favor or neighbor gift for the holidays!

First up, the goodies. Proceed with caution. This stuff is downright inhalable. So delicious and so Christmas-y and don’t say I didn’t warn you.

Peppermint Chex Mix
recipe from my sister-in-law, Mindy

5 cups Rice Chex
12 ounces (1/2 package) vanilla almond bark (or any white chocolate or vanilla candy melts)
1/2 cup crushed peppermint candy canes (5 normal-sized candy canes—I put them in a sandwich bag, wrapped it in a towel, and hammered it into oblivion)

Pour the Chex into a large bowl, and melt the almond bark according to the package directions. Pour the melted almond bark over the Chex, and add half of the crushed candy canes. Stir, stir, stir to evenly coat all the Chex pieces.

Pour them out onto a baking sheet lined with wax paper (or a Silpat) and spread out evenly. Immediately sprinkle with the remaining crushed candy canes. Set aside to allow the almond bark to set (about 20 minutes). When it has hardened, break into chunks.

peppermint chex mix

peppermint chex mix

peppermint chex mix

Irresistible.

The Favor Boxes

I wanted to deliver some of the Chex mix to our neighbors, so I used my Silhouette Portrait to make easy favor boxes.

I used this box template from the Silhouette Online Store, and cut the pieces out of white cardstock. I wanted to use colorful, festive papers for my boxes, but I couldn’t find any I liked that were thick enough to make a sturdy box, so I first cut the boxes from heavy white cardstock, then glued colorful papers to the finished box.

Then I used my Silhouette to cut little gift tags (I used the gift tag that comes pre-loaded in the Silhouette library), as well as some letters that I glued to the tags, and tied them on with coordinating ribbon. (Just a note—I used hot glue to assemble my boxes, but it probably wasn’t the best choice, if you’re a craft perfectionist. It made for some bumpy edges. No biggie, just FYI.)

DIY favor boxes

Peppermint Chex Mix and DIY Favor Boxes

Peppermint Chex Mix and DIY Favor Boxes

What did you make this week? Make sure to swing by Décor and the Dog to link up your projects!

Friday, November 15, 2013

Dare to DIY 2013!

It's Dare to DIY time!

Do you remember the awesome link party holiday celebration I helped host last year? Dare to DIY is a fun series of link-ups to motivate us to DIY projects through Thanksgiving and Christmas - and to do it together. It's a great way to complete some of those holiday projects and meet new blog friends.

The fifth year of this series of blog parties is going to be the best yet, because Kim of NewlyWoodwards—the brains behind the Dare to DIY series—has invited some buddies to join in and host along with her. If you don’t know them yet, say hello to Cassie at Primitive and Proper and Michelle at Decor and the Dog (as well as Kim at NewlyWoodwards, of course!)

We'll each be hosting one week at our blog and we'll have an awesome giveaway each week for one of you! That means more projects and more fun!

Here's the plan:

Each Monday morning, the link party goes live for that week's Dare to DIY challenge at the blog listed above. You can link up your best project (or two). Just remember that the post should correspond with the theme of the week.

The linky will stay live through Wednesday. Later in the week, each of us will spotlight at least 3 projects we loved from the week on our blogs. And one of you will win a special prize! We'll also pin those projects on our shared Pinterest board.

The only rules:

1. Please follow the Dare to DIY theme of the week (see below). You can share up to 2 projects.

2. Please link back to Dare to DIY on one of our blogs.

3. Please go to at least one other blog and comment. This is a party. So get to know a few other bloggers!

And here are the themes - starting in less than 2 weeks!

Party Date: Monday, Nov. 25: Dare to… be thankful!

(Link goes live Monday morning at Primitive and Proper)

DIY a Thanksgiving project to remind you to be grateful during this season. Ideas include a Thanksgiving advent calendar, artwork or banners.

Giveaway: One of you will win 1 artisan enhancement 8 oz leaf and foil, 1 artisan enhancement 8 ounce clear topcoat, 1 copper gilding wax, 1 silver gilding wax  and 15 feet of foil from Catfish Studio.

Party Date: Monday, Dec. 2: Dare to… entertain!

(Link goes live Monday morning at Maybe Matilda)

DIY something for your table. This could be something from last week's Thanksgiving table or a new Christmas look. Get creative and use things in new ways. Or go true DIY and make something totally new. Ideas include place mats, table runners, place cards or centerpieces.

Giveaway: One of you will win 50 free Christmas cards from Tiny Prints.

Party Date: Monday, Dec. 9: Dare to… give homemade gifts!

(Link goes live Monday morning at Decor and the Dog)

DIY a gift made by you. Nothing is more special to give than something you created, so share projects that will be go in brown paper packages this holiday season. Ideas include bath and body items, kitchen gifts, hand-sewn clothing or home decor.

Giveaway: One of you will win a free stencil from Royal Design Studio.

Party Date: Monday, Dec. 16: Dare to… deck the halls!

(Link goes live Monday morning at NewlyWoodwards.)

DIY something new to deck your halls. Did you find something in a catalog that you wish you had? Wreaths, stockings, pillows or advent calendars? Make it! Inspire us all to do the same.

Giveaway: One of you will win $100 from Red Envelope.

So, what do you think? Will you join us and dare to DIY?

Monday, March 25, 2013

More Last Minute Easter Crochet

So, at about this time in 2011, I wrote a post sharing some cute crochet patterns that would make awesome last minute Easter gifts. And for some reason, it got and continues to get a good amount of attention (weird—I’m always kind of surprised when any of the garbage I write here gets attention), so I figured I’d do another one this year with newer pattern ideas!

Now, first things first: I get at least one email a week asking for the pattern to the chick in a bunny suit I made and linked to in the previous Easter post:

The good news: it’s a super cute, super fast little project that will work up in no time, perfect for tucking into an Easter basket.

The bad news: it used to be free, and now it’s not. But it’s only $3, and you can find it right HERE in the Dawnie Dolls etsy shop. (The photo above is my version of the project, which I took some liberties with, so make sure to check out the listing pictures to see how making one exactly as written will turn out!)

Now that’s out of the way, here are my top 5 picks for quick, adorable Easter crochet patterns (all free!) that would be perfect to start and finish in one or two days and add to an Easter basket! (Note: while a few of these are on my to-do list, I haven’t made any of them yet, so I can’t comment on the patterns themselves or finished projects made using them!)

Easter Peeps crochet pattern

If there is a Peeps fan in your house, this Easter Peeps pattern would be so cute and funny to make for them! I have no fondness for Peeps, so the crocheted version looks much better to me than the real deal.

Easter Egg crochet pattern

I love the idea of making a dozen colorful little Easter eggs to use for decorating or filling baskets. Sure beats dyeing eggs every year—not my favorite holiday activity. Get the free Easter egg crochet pattern HERE!

Free Cute Easter Bunny crochet pattern

I love the unique look of these little Easter bunnies! So colorful and cheerful, and the lack of appendages would make them SO quick to work up. Get the pattern HERE.

Easter chick crochet pattern

Doesn’t this little Easter chick look so sweet? It’s hard to tell how big he turns out, but I’m guessing he’s little enough to tuck into an Easter egg. Awwww! Get the pattern HERE.

And last but not least:

I love the Boxy Skirt Bunny! They look cute in every color combo, and look like they’d be a lot of fun to customize and play around with. Get the pattern (a Ravelry download) right HERE.

Have you crocheted anything for Easter this year?

Wednesday, February 13, 2013

Crochet Dog Stuffies for Valentine’s Day

I’m not all that into Valentine’s Day. I mean, it’s nice, and I always appreciate getting a card or candy or flowers or something, but my husband and I don’t typically make a big deal out of it. We went to Chili’s last weekend . . . that’ll probably count as our Valentine’s date. Chili’s! The ribs! The romance!

But now that we have this little boogerface stinking up our house, I kind of want to make it a fun day for him. So we’ll be spending today baking up Valentine’s goodies, and I can’t wait to give him his present tomorrow . . .

Crochet Amigurumi Dog by maybe matilda

A little crochet puppy! He’s cute, huh? The sweater gets me. It gets me every time I look at him. Forrest is pretty into puppies (and kitties aka ‘titties’; yes, that’s right, titties) at the moment—his new favorite game is coming up to me while I’m on the couch, meowing or barking at me, then saying, “gent-oh? gent-oh?” (which is how we try to remind him to pet nicely, I think he thinks ‘gentle’ just means ‘pet’) and waiting to be petted or have his belly rubbed. It’s pretty sweet. I hope he likes his little puppy dog.

And I couldn’t resist showing him off to my sister ahead of time, and she liked him a lot, too, so guess what she is also getting tomorrow?

Girly Puppy Amigurumi by maybe matilda

The girly version! I like this one even better than the one I made for my son. I like the colors better, and I did a better job with placing the facial features. I almost don’t want to give her away.

Amigurumi Dogs

I used the Amigurumi Dog pattern from Lion Brand Yarn, and they were a cinch to work up. Relatively quick (although making all the separate pieces is kind of slow and tedious, I’ll admit), but overall a very simple pattern. I wasn’t crazy about the ears in the pattern, so I went for a more folded-over look instead. I like how they turned out.

Crochet Puppy by maybe matilda

A moody close-up. She’s pondering the state of the economy, or maybe thinking about something deep like . . . I don’t know . . . the poetry of . . . Ginsberg? (The only name that comes to mind . . . it’s early, I’m still waking up, cut me a break.)

I tossed up some listings in my shop for custom versions of these little puppies—you can find the boy puppy HERE and the lady puppy HERE, and message me for a discount if you plan to buy two or more! As always, feel free to play around the colors when you order . . . I’ve got a nice big yarn stash, just begging to be used in whatever creative color combos you come up with.

Did you make any Valentine’s gifts this year?

Wednesday, January 23, 2013

Rustic ‘Love’ Letters

That title kind of makes it sound like this post is about the sort of letters lovers send each other, doesn’t it? As for the rustic part . . . maybe they are very outdoorsy types? And the letters are composed in a cabin in the woods somewhere? I’m sorry to disappoint you, but these rustic love letters aren’t those rustic love letters. I’m talking about these ones:

Rustic 'Love' Letters from Maybe Matilda

I made these to go with my neutral, rustic Valentine’s display, and I really like how they came out. Although I can appreciate and enjoy Valentine’s décor that screams glittery red-and-pink greetings in your face, I wanted something a little softer for my place. This little display only cost a few dollars, it’s going to be reusable for Christmas next year by switching out a letter, and it’s not too traditionally loud for Valentine’s day, I could definitely get away with using it year-round as regular décor. Win-win-win.

To make these letters, I just picked up a few items from Hobby Lobby—a mini-twig wreath to stand in as the ‘o’ (it was $2.50 if I remember correctly), and a few paper mache letters (also $2.50 each, but wait for them to go on sale before you buy—they were 30% off when I bought them a week or two ago!). I picked up an L, V, and E, as well as an N. That way, I can scramble the letters/wreath to make ‘Noel’ to use in Christmas displays next year. Smart, eh? I have my moments.

How to make rustic faux-distressed 'Love' letters

Now, back when I was searching for a nice gray wall color for my house, I bought something like a dozen gray sample paints. So I just popped out one of those tiny sample size paints to use on my letters. It’s a very soft gray, but mostly reads as white, which is fine. Go ahead and paint your letters.

DIY 'Love' Letters for Valentine's Day

(Don’t you paint on your stovetop?)

Now, I wanted them to have a rustic ‘worn’ look. But sanding paint off a paper mache letter to get that distressed look didn’t seem brilliant to me. I don’t know, maybe it would work fine, but I wasn’t willing to try it and potentially ruin my super-expensive $2.50 – 30% off letters. So I tried a different route. I just grabbed some brown craft paint, got the teeniest tiniest bit on my brush, and ‘flicked’ it over the edges of the letters to make them look worn out and distressed.

Faux-Distress Painted Letters

I’m not sure how best to describe this. Just make sure there’s not much paint on your brush (I barely dipped it into the paint, then dabbed most of it off onto a piece of paper so it was just barely barely barely moist with paint), placed the brush right on the edge of the letter and ‘flicked’ it forward/upward. It’ll give it a sort of bristly, worn-off, splattery look. The important points here, I learned by sad experience, are to 1) make sure there is not much paint on your brush—too much paint and it’ll look sloppy instead of shabby chic, and 2) if you make a mistake, just forget it and keep going. You’ll do more harm by trying to rub it off and reapply than by just moving on. Really.

How to faux distress letters with paint

By focusing your faux-distress painting around the corners, it’ll look more natural, so go a little heavier around the corners and a little lighter on the other edges.

I used a tiny picture frame easel/plate stand thing to prop up the ‘O’ and just pulled the sides open a little wider so they’d essentially be hidden by the ‘O’. It worked out just fine. There you have it!

How to make a rustic 'love' sign

Tuesday, December 11, 2012

DIY Removable Lampshade Accessory

As promised, here is my little secret for making removable décor for your lampshade. What has my life come to, that the most exciting thing I’ve done recently is come up with a way to add and remove accessories to/from my lampshades? Don’t answer. I’ll just ponder that one alone for a few minutes, maybe over a bowl of ice cream. This feels petty. But it’s pretty. Pretty makes petty a little better, right?

On Friday, I shared my Christmas vignette. Here is the vignette sans-lampshade spice.

Christmas Vignette

The lampshade matches the burlap runner too closely, and it looks sorta blah when everything else has layers and pattern and texture and glitz and all. I thought it needed a little of the Christmas-y red to tie it in to the rest of the vignette. I wanted to add some felt flowers, but couldn’t think up a way to attach them that wouldn’t ruin the lampshade if I wanted to remove them after Christmas—hot glue would be a disaster when I want to take the flowers off, and even something less permanent like pins or heavy duty tape might damage the fabric shade. Then, inspiration. And a purposeful lack of google/Pinterest searching, because I’d like to just claim this idea for once without having google/Pinterest prove yet again that I never have any original thoughts.

The answer: magnets.

Use magnets to attach flowers to lampshade

I made two little flowers out of felt (tutorials abound on the interwebs for felt flowers, so I won’t contribute a new one here) and gathered up 4 magnets that have been sitting in my craft room for ages. They aren’t anything special or super powerful—just part of a big package of cheap magnets I got from the craft section at Walmart months and months ago.

Just cut a small felt circle to fit the back of your flower, and hot glue it on.

DSC_0294

Then glue one of the magnets onto that circle.

Use magnets to attach flowers to lampshade

And shazam! You’ve got yourself some easily-removable, regret-free, no-lampshades-were-harmed-in-the-making-of-this-Christmas-vignette lampshade spice. When you want to get rid of them or switch them our for something different, they’ll come right off with no damage whatsoever to your shade, and you can make them in various colors to fit your ever-changing décor or different seasons/holidays. Just use one of the magnets inside the lampshade, and place the flower on the outside. They’ll hold together and should stay in place just fine.

How to make removable no-harm-done lampshade flowers

Don’t you think they add a little something to the look? I think they make the lamp look like it belongs in that vignette, and not like it’s just an extra piece just floating around in there. Sitting awkwardly outside the group, trying to join the conversation. Middle school flashbacks, anyone?

Rustic Woodsy Christmas Vignette

Friday, December 7, 2012

Dare to Deck the Halls: Christmas Vignette

I’ve mentioned before that I don’t do much holiday decorating. After 5 years of marriage, last year was the first time we ever had a Christmas tree (when you live in a shoebox-sized apartment and eat mostly student-loan-flavored Ramen, it’s kind of hard to get up the motivation/funds to decorate the aforementioned shoebox). But since this is our first Christmas in our new house, and we finally have some space and slightly less poorness, I knew the time had come. Time to stop being a grinch and start decorating a bit for Christmas. It. Has. Been. Awesome.

Here’s what I came up with to Christmas-ify the buffet table in my living room (and luckily, my decorating falls right in line with this coming week’s Dare to DIY theme: Deck the Halls).
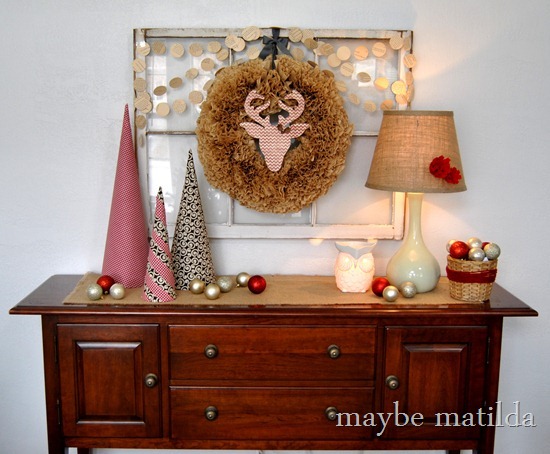
Woodland Christmas Vignette

I’m awfully pleased with it. I think for this entire first year in our new house, I’ll just continue being overly-impressed with myself for doing totally average things that I’ve never done before due to lack of space/house/money/etc. Don’t burst my bubble, I like it in here.

It all started with this little reindeer . . . I snatched it up in an instagram sale from Nicole (here are her blog and shop) and decided to let it be the inspiration for all of my Christmas décor. I love that it’s modern and fun, but still has an old-fashioned, rustic, traditional feel to it. I figured that would make a good décor theme—modern woodland? Fresh rustic traditional? Do these count as theme names?

Rustic Reindeer + Coffee Filter Christmas Wreath

It looked kinda teensy and lonely on that window all by itself, so I layered it on top of a wreath that had been hanging in my bedroom. It’s one of those DIY coffee filter wreaths you’ve probably seen all over the place. I love all the texture between the ruffly wreath and the reindeer itself, and a little burlap runner on the top of the buffet adds some more homespun rustic texture as well.

DIY Posterboard and Fabric Tree Cones

I thought some little trees would fit the whole modern woodland look nicely. But those styrofoam ones at the craft store are ridiculous. I’m not paying that much just to do a DIY project. Isn’t saving money practically the whole point of doing crap yourself? It is for me, anyway. So I made these bad boys out of posterboard and covered them with fabric, and I love how they came out! Pre-made cones this large would have cost me a small fortune (goodbye Forrest’s college fund), but altogether, the 3 of these cost something like $6-10 total.

DSC_0314

On the other end of the table I’ve got a lamp and Scentsy warmer that are always there . . . I just tossed in a little basket full of ornaments, and added some felt flowers to the lampshade. I’ll show you in another post how I attached the flowers to make them completely removable without damaging the shade. I kind of feel like a genius for thinking this up. And I’m purposely not googling it, because even if someone else thought of it first, I’d like to maintain the illusion that I am creative and original, thank you very much.

Modern Woodland Christmas Theme

I sewed together a little garland made from circles punched out of an old book (after cutting and sewing so many circles, I feel like I’ve read A Farewell to Arms . . . war, a lot about someone named Catherine, blah blah blah. Literature shmiterature.) and strung it behind the wreath, along with a super-long matching garland to go around the Christmas tree (which I am apparently incapable of taking a decent picture of, so you’ll just have to take my word for it: it looks nice).

And before you even enter the house and spot my lovely vignette, I kept up the rustic theme for the front door with a homemade and homey-looking star wreath.

DIY Rustic Star Wreath

How cute is that? I’ll share more details on it later, too. I can’t say I’m a big fan of our 90s-relic front door, but I do love all the light that comes in through that goofy mottled glass portion. And it looks an awful lot better with that cute star wreath hanging there.

So in conclusion, after 5 years of a very Grinchy attitude towards decorating, I can totally see why people love Christmas decorating and put so much effort into it. This is super fun, and it’s going to be a sad, sad day when I have to take my little Christmas vignette down.

I can’t wait to see what you’ve made to deck your halls on Monday!

Make sure to stop by and visit Décor and the Dog, NewlyWoodwards, and Two Twenty One to see their Dare to DIY: Deck The Halls projects, too!

I’m linking this project up to Home Stories A to Z, Tatertots and Jello, House of Hepworths, The Shabby Creek Cottage, Tidy Mom, Liz Marie Blog, Craftomaniac, The Shabby Nest, Positively Splendid, Whipperberry, Funky Junk Interiors, Classy Clutter, Today’s Creative Blog, Uncommon Designs, Live Laugh Rowe, Miss Mustard Seed, and Serenity Now.

Thursday, March 15, 2012

Pi(e) Day and Simple Hot Fudge Sauce Recipe

I’m pretty lame when it comes to holidays. I don’t do much decorating (this past Christmas was actually the first year we’ve ever put up a tree), I don’t have traditional recipes I make each year, and I don’t make my child a special holiday outfit to wear. I have nothing against any of that, I’m just lazy and cheap and can’t seem to get excited about spending weeks creating handmade holiday decorations only to take them down again 2 weeks later. I know, I’m a grinch. Sorry.

But a semi-made-up holiday all about pie? Now THAT is a holiday I can get behind.

DSC_0525-1

Speaking of Pi Day, I was very disappointed by the conspicuous absence of a solid Rebecca Black “Friday”/Pi Day parody. Don’t even waste your time youtube-ing it. Internet, you have let me down!

We celebrated Pi Day yesterday with this Frozen Peanut Butter Cheesecake Pie (recipe here), which was a-freakin’-mazing. It’s not really the first thing that comes to mind when you think “pie,” but Jeff always, without fail, requests cheesecake if I give him dessert options, and the poor boy’s been working those adjust-y fingers to the bone lately, so I figured a cheesecake pie was the least I could do. Well, the very least I could do would be nothing, which is what I normally do. So this was the second-least I could do.

The pie was so, so tasty, and I really wanted to make homemade hot fudge sauce to top it off. I have nothing against store-bought hot fudge (I have certainly been known to eat it straight from the jar), but homemade is definitely better, and definitely less expensive. Most of the hot fudge recipes I looked at called for a lot of ingredients that I don’t normally have in the house—I try pretty hard, actually, to not keep standard dessert ingredients like baking squares or chocolate chips or heavy cream on hand because I really don’t need to give in to my 10:30 at night “let’s make cookies! A lot of them! RIGHT NOW!” whims—but I remembered a recipe from a neighborhood cookbook Jeff’s mom gave me (the absolute best cookbook I own, actually . . . everything I’ve made from it has been delicious). It uses normal, pantry staple ingredients that even a non-pantry-stocker like me tends to have sitting around, and oooooooh, it is good. And it was contributed to the cookbook by someone named Margie, and I really feel like I can trust recipes from a person named Margie. That just sounds like the name of somebody who can really cook, am I right?

Simple Hot Fudge Sauce

6 tablespoons margarine or butter

2 cups powdered sugar

1/3 cup cocoa powder

1 cup evaporated milk

Melt butter/margarine in saucepan. Add sugar and cocoa and mix well. Add evaporated milk gradually, whisking until smooth. Bring to a boil over medium heat and cook, stirring constantly, about 5 minutes.

DSC_0527-1

Mmmmm. Thick, rich, delicious hot fudge. No unusual ingredients, no emergency run to the grocery store, no way to accidentally ruin the recipe. Simple and delicious. Thank you, Margie, whoever you are.

Wednesday, December 28, 2011

Christmas and a Baby Quilt

I hope you all appreciated the lack of a Merry Christmas! post here over the weekend. When I noticed that my Google Reader had over 200 new items, all with some variation of the title “Merry Christmas from the ________ Family!” I decided to refrain. You can only read so many Christmas posts, right?

I do, however, have a plethora of pictures that you probably won’t actually care to see. I’ll limit myself to just a few; feel free to skip them and leave me a “He’s adorable!” comment instead. (I bask in those comments.) First up, we have my attempt to get a picture with Forrest in front of the Christmas tree without his precious new toy telephone:

christmas picture I think that’ll be our Christmas photo montage for next year’s card. I almost wish it had been a video instead of photos so you could hear the dialogue . . . me in my super-high “everything’s  cool!” voice saying, “Forrest! Picture time! Woohoo! No more phone! Put down the phone! This is fun! Stop crying! WE’RE HAVING FUN!” almost drowned out by his whining and shouting and staunch refusal to loosen his little vice grip on the phone. I finally gave up, and good thing, too, because we did manage to get a few cute pictures together. With the phone, of course. It is an important member of this family already.DSC_0584-1 We had a lot of fun with my parents and siblings—Forrest is head over heels in love with Grandma and Papa, a love that was only reinforced when one of their gifts to him was . . . a cell phone. Notice that Papa is the one playing with the toy cell phone, and Forrest has claimed a real one. May this go down in history as The Year of the Phone.DSC_0599 And I’d like to thank Michelle of Decor and the Dog for introducing me to the Forever Lazy, which we got my brother for Christmas. I purposely did not ask his permission to post this picture, because I can’t imagine I’d get a “sure, go for it,” so just don’t tell him. Besides, everyone knows that covering up the eyes means you can’t tell who is in the picture.

DSC_0606-1I received a lot of great gifts this year (including some spectacular homemade ones that I’m excited to post about), but one gift in particular really stands out.

DSC_0595-1I COULD WEEP WITH JOY. My parents got me a Bernina. A BERNINA!!! (Here’s the best part: it was my dad’s idea. How about that!) I took it for a test run on Monday . . . this thing is incredible. Absolutely incredible. There is no clunking or grinding or whirring when I sew. It does not randomly choke or cough or spew out a wad of tangled thread. The stitches are perfectly straight, instead of each being tilted to the side, making a “straight” line look more like a lightning bolt. LIKE SOME OTHER MACHINES I USED TO KNOW. Welcome to the family, baby. I’ll love you forever.

Now that I’m saying a not-so-fond goodbye to my horrible, horrible old machine (I like to call it The Machine Who Must Not Be Named), I’d like to show you the last thing I ever sewed on it. This project, which should have taken a few hours to make, sucked up a few weeks of my life between working up the courage to break out my awful old sewing machine, picking out messed up stitches, working on my self-control to hold myself back from physically harming it, and, finally, finishing the project. Despite the awful machine, I think it came out pretty cute.

DSC_0535 A new little nephew will be making his debut this Friday, so my mom and I  worked together to  make him a quilt. It’s the first quilt I’ve made in almost a year and a half, which says something about how much I despised my old sewing machine. I had almost forgotten how much I love sewing and quilting.

The quilt is a disappearing nine patch, inspired by this one from Cluck Cluck Sew (a blog I am a huge fan of, by the way . . . her fabric and color choices are so inspiring to this neutral-loving, color-fearing girl). My sister-in-law said that she preferred fabrics and colors that didn’t look too baby-ish . . . she wanted it to look a little more grown-up, with greens and deep blues and some gray tossed in to give it a more modern look.

DSC_0540 Hopefully we gave her the look she was aiming for! This was a really fun, easy quilt to put together, made even easier by our decision to do straight line quilting instead of my personal favorite, free motion quilting, which we thought would have looked awfully busy on this style.

DSC_0537 (You know what really adds a touch of class to photographs? A trampoline in the background.)

The little fellow also received the crochet edged receiving blanket I posted about here, as well as a little owl hat that I hope will make its way into his newborn photo shoot. I was setting up the blanket and hat to take some pictures when a little helper stopped by and offered to model it for me (and by “offered to model” I mean “snatched the hat and jammed it onto his humongous head”).

DSC_0531 I think it’s just a tad small for his gigantic 1 1/2-year old noggin. But hopefully it’ll fit just right on a sweet newborn.

Related Posts Plugin for WordPress, Blogger...
